background image

18 | Installation Instructions


1.1.3 Mounting of Master Compass 

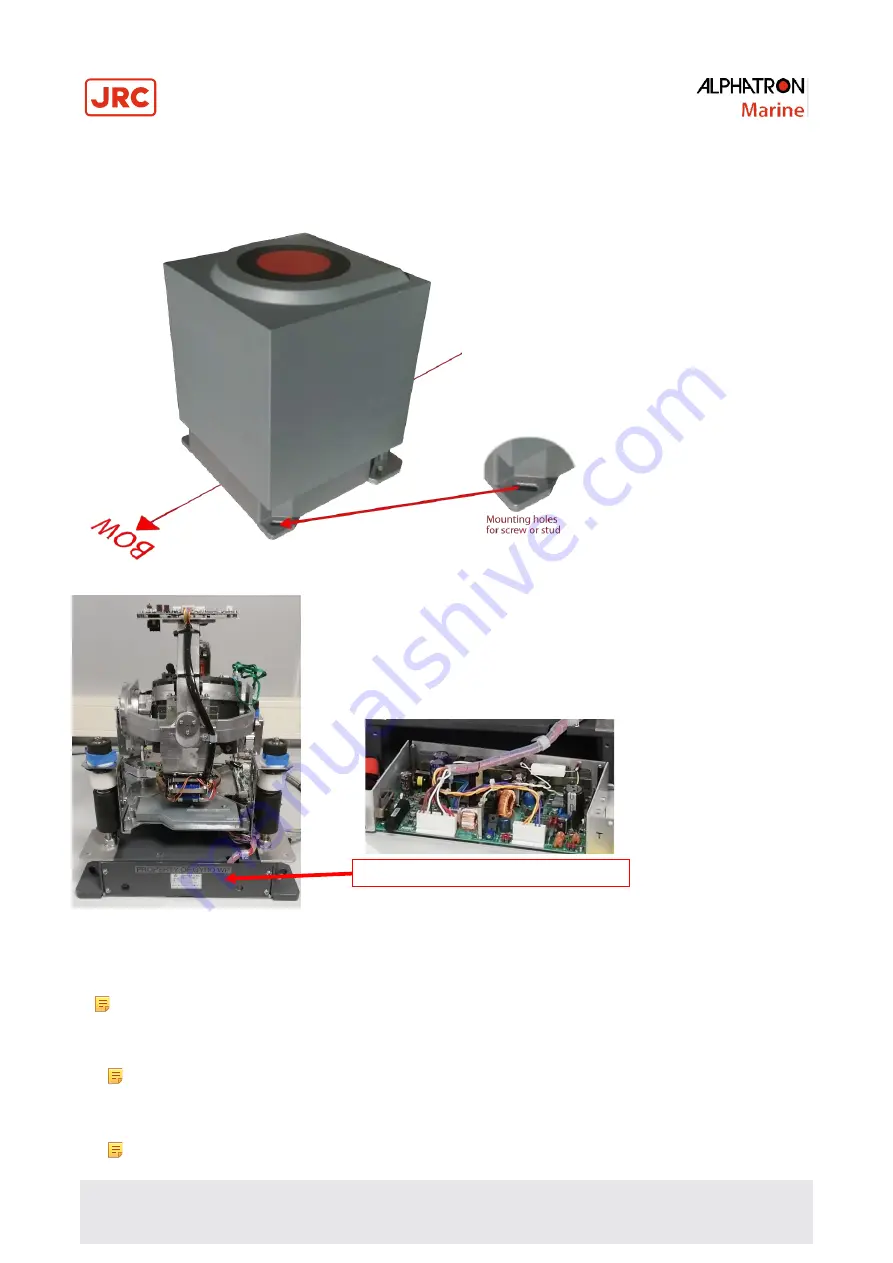
Mounting of the master compass unit is as shown in below. Its housing can be placed in any direction.  

See installation drawing of Master Compass foundation in paragraph 6.1.7. 


Figure: Mounting position 


Figure: Inverter Board Location 


1. 

Orientate the Inverter Board at the back of the Master Compass to the 

Stern of the vessel


Note 

Install the Gyro Compass with in 

5˚ 

accuracy in order to be able to apply a correction by loosening the 

fastening bolts and fine tune placement by turning the Master Compass. 

2. 

Fasten the Gyro Compass to the deck with the four bolts provided. 


Note 

Locate the bolts in the center of the trails to be able to finely adjust the direction of the unit. With the aid of 

the heading offset feature a small mounting offset may be made. 

3. 

Due to cable inlet, it is possible mount 180 degrees reversely. 


Note 

Use dipswitch No.7 on MCC Board located on top off Master Compass

See paragraph 1.5.1.


Inverter Board is located behind this plate 


Summary of Contents for ALPHAMIDICOURSE Mk2

Page 1: ...cument Manual ALPHAMIDICOURSE Mk2 Issue 2 1 ALPHATRON MARINE B V ALPHATRON MARINE B V Schaardijk 23 3063 NH ROTTERDAM The Netherlands Tel 31 0 10 453 4000 Fax 31 0 10 452 9214 P O Box 210003 3001 AA R...

Page 2: ...Specific Tools 16 1 1 2 Unpacking of the AlphaMidiCourse Mk2 17 1 1 3 Mounting of Master Compass 18 1 1 4 Fitting Master Compass 19 1 1 5 Remove Parts from Master Compass Mounting Ring 20 1 1 6 Remove...

Page 3: ...of Turn Filter Constant 57 2 6 Heading Sensor Selection 57 2 7 Pendulum Function 58 2 8 Monitoring while Running 58 2 8 2 Confirmation of Alarm Status 59 2 8 3 Confirmation of Gyro Compass True Headi...

Page 4: ...al signal Communication Stop or LOG serial signal Data Failure 75 5 4 13 Alarm code u LOG Contact Failure 75 5 4 14 Alarm code r E5V Failure 76 5 5 Gyro Compass does not Function when Power Switch tur...

Page 5: ...ted to newest AlphaMidiCourse version Mk2 February 2021 V2 1 Updated Table Jumper Fuses and terminal connections of ICNT March 2021 I 2 Points of Attention 1 Thoroughly read this instruction manual be...

Page 6: ...pass and detected heading signal from the heading detector is sent out as repeater signal and serial signal Rate of Turn Speed of ship s turning Sensitive Element Element to detect north of own ship S...

Page 7: ...carefully and prepare for the occurrence of trouble or alarm in this product Ensure the emergency steering method is well understood to quickly respond to trouble WARNING Maintenance During maintenan...

Page 8: ...ring mode to MANUAL or Non Follow Up then determine the True Heading because wrong heading information repeater signal and serial signal may be sent out When an alarm regarding LOG serial alarm code P...

Page 9: ...m code u is activated and the Gyro Compass True Heading has not been determined first turn the steering mode to MANUAL or Non Follow Up then determine the True Heading because wrong heading informatio...

Page 10: ...ed by the heading information from this system in particular the automatic steering system etc should be operated immediately according to the individual emergency operating procedure CAUTION Correcti...

Page 11: ...ervice Engineer to check it CAUTION Rotor Level Failure alarm code 6 Turn OFF the power switch CAUTION Zero Cross Failure alarm code 8 Determination of the Gyro Compass True Heading when alarm code 8...

Page 12: ...nce to restore to normal conditions and request advice from Alphatron service engineer When the alarm system is activated during use always check to confirm the cause and reinstate It has the followin...

Page 13: ...stem can drive the ship s repeater by the serial signal of the Gyro Compass Even when the Gyro Compass is operated by the emergency power supply the connected repeater can be driven Repeater backup fu...

Page 14: ...erial signal or step signal can be sent from this system by using the external heading sensor Also when the processing unit for the external heading sensor signal is built into the AlphaMidiCourse Mk2...

Page 15: ...B repeater holder bearing bracket serial data G 002329 BH repeater stand G 002330 Azimuth circle including storage box G 002572 NMEA distribution module mk 2 G 002714 Desktop version for Alphaline MFM...

Page 16: ...1 6 Installation Drawing Position the compass on or parallel to the vessel s horizontal center line with the bow indication on the top of the case pointing towards the vessel s bow Use the datum line...

Page 17: ...required for installation of the sphere into the phantom ring 1 1 2 Unpacking of the AlphaMidiCourse Mk2 The three parts Master Compass Sensitive Element and Control Panel are supplied in two boxes as...

Page 18: ...Compass with in 5 accuracy in order to be able to apply a correction by loosening the fastening bolts and fine tune placement by turning the Master Compass 2 Fasten the Gyro Compass to the deck with t...

Page 19: ...19 Installation Instructions 1 1 4 Fitting Master Compass Fitting the Master Compass as shown in pictures labeled 008 to 011 Fitting the Master Compass part 2 as shown in pictures labeled 012 and 013...

Page 20: ...Master Compass Mounting Ring Remove parts from Master Compass mounting ring as shown in pictures labeled 014 to 018 1 1 6 Remove Packing Material from Shock Absorbers Remove packing material from sho...

Page 21: ...th care and keep packaging material for reuse when returning for servicing Unpack Sensitive Element as shown in pictures labeled 026 and 027 Note Handle Sensitive Element with great care Do NOT tilt t...

Page 22: ...22 Installation Instructions 1 1 8 Mounting of Sensitive Element Mount the Sensitive Element as shown in pictures labeled 028 to 031 Mount the Sensitive Element as shown in pictures labeled 032 to 034...

Page 23: ...cap of the tube closed and cut the bottom of the Damping Oil tube to reduce spilling Fill the container half full 1 1 10 Attach Connector to Sensitive Element Attach Connector and fix securely to Sen...

Page 24: ...icates operating conditions of this system and value data of all settings value data Indicated contents can be selected by operating the switches 4 Operating switches They are used for all kinds of op...

Page 25: ...nal Locations TB1 No Details Description No Details Description 1 N Power Supply 24VDC 2 N Power Supply 24VDC TB2 No Details Description No Details Description 1 AL1 Inverter Alarm over current 9 ECA...

Page 26: ...ial signal output 1 IEC61162 1 2 41 3TSC Serial signal common 30 1TX 42 3R24 24VDC for Serial Repeater 31 1TSC Serial signal common 43 3R24 24VDC for Serial Repeater 32 1R24 24VDC for Serial Repeater...

Page 27: ...GND Power supply to DGC 7 ESTX Serial signal output to DCG 17 BTPF Not Used 8 ORX Not Used 18 BTPFC Not Used 9 ORX Not Used 19 LOST Not Used 10 OSC Not Used 20 LOSTC Not Used TB3 No Details Descriptio...

Page 28: ...1 Dip Switch Settings Master Compass MCC S1 Default Details Function Read Timing Remarks NO 1 OFF Master Compass type OFF Standard ON HSC Start Up NO 2 OFF Display of Master Compass Type ON In standar...

Page 29: ...F NO 7 OFF Serial Signal Select Selection OFF IEC61162 2 ON Tokimec format Start Up NO 8 OFF Alarm Output Setup OFF All alarm output ON only power fail Start Up Table ICNT Board Dip Switch S1 assign I...

Page 30: ...Start Up NO 8 OFF Buzzer stop contact output OFF No ON Yes Start Up Table ICNT Board Dip Switch S3 assign ICNT S4 Default Details Function Read Timing Remarks NO 1 OFF Do Not Touch NO 2 OFF For DGC 01...

Page 31: ...RON NO 2 ON MARINE Start Up NO 2 ON NO 1 OFF NO 2 OFF TOKYO KEIKI NO 1 ON NO 2 OFF SIMRAD NO 3 OFF Do Not Touch NO 4 OFF Do Not Touch NO 5 OFF Do Not Touch NO 6 OFF Do Not Touch NO 7 OFF Do Not Touch...

Page 32: ...2 SHORT ESPOL 3 4 short Negative input External Sensor signal polarity 1 2 short Positive input External Sensor signal polarity J14 1 2 SHORT LOG 3 4 short 400 pulse per nautical mile input LOG signal...

Page 33: ...g is accepted by pressing the ACK ENT button or increase decrease by using the or buttons and then by pressing the ACK ENT button If no action is taken within 3 minutes the start up process will conti...

Page 34: ...category 1 6 t 7 Press the SET button again to return to main category A 1 and then press the DISP button to go to A 2 main category 8 Press SET button and enter the value for 2 3 h 2 5 y year 2 6 N m...

Page 35: ...5 The display will return to show the speed value and input source 1 7 5 Balancing the Horizontal ring After the compass has been running continuously for at least 3 hours it horizontal ring should be...

Page 36: ...his value is entered by using its Extension Menu as following 1 Activated Extension Menu by pressing and hold the SET and ACK ENT buttons simultaneously for at least 3 seconds Main category A 1 will b...

Page 37: ...an be entered when any display is shown the LCD 1 Active the menu by pressing and holding the SET and the ACK ENT buttons simultaneously for at least 3 seconds Main category A 1 will be shown 2 Page t...

Page 38: ...rotation Presents a coefficient ratio to the standard value stored in software 1 3 S Horizontal servo gain ratio 1 00 0 00 2 00 Determines the gain of the horizontal servo loop where theta signal roto...

Page 39: ...s this amount of movement v This parameter is only used for AlphaMidiCourse HSC 2 25 0 00 5 00 1 8 c Ks H Suspension wire twist torque Fixed value 1 477 1 000 2 000 1 9 r Maximum rate of turn sec Maxi...

Page 40: ...s bearing Absolute bearing set for MCU board when zero cross pin was passed during start up sequence last azimuth operation and normal running operation Zero cross bearing can be set in this menu but...

Page 41: ...or Non 2 c t Display setting of GPS performance index data check The following abbreviations are used bE Check performance index Non Not check performance index bE or Non 2 d o Analogue signal output...

Page 42: ...1 C External sensor standard serial data character length 8 8 or 7 6 2 P External sensor standard serial data parity bit Non Non Even Odd 6 3 S External sensor standard serial data stop bits 1 1 or 2...

Page 43: ...observed Attentively read the Operator Manual of the automatic steering system carefully preparing for occurrence of trouble or alarm in this system The emergency steering method should be well under...

Page 44: ...played text SET switch Change data and change the input system Change data Gyro Compass True Heading Ship Speed Latitude Rate of Turn Change input system Ship Speed MANUAL GPS LOG and LOG serial signa...

Page 45: ...Mode Display 3 figures 7 segments green LED Type of data is displayed Note When the rotor is in stopped situation the dot at right end of the mode indicator is lit Note When the rotor is running it i...

Page 46: ...True Heading 2 ESt or GYt ESt External Sensor true bearing GYt Gyro compass true bearing 2 3 2 2nd press on DISP button 2nd press on DISP button 1st press on DISP button Master Compass Bearing C P S...

Page 47: ...ING alarm will be generated When the External heading sensor was selected at the time operate according to chapter 5 Troubleshooting because the True Heading determination is required 2 3 2 E S t and...

Page 48: ...lue is calculated based on the ships true bearing and actual speed For the latitude input selection refer to paragraph 1 7 3 Setting the Latitude input source Note When a GPS communication failure is...

Page 49: ...icator starts blinking Note When a LOG serial failure is generated the data indicator starts blinking 2 3 6 Rate of Turn Current ship s turn rate is displayed Unit of the indicated Rate of Turn is in...

Page 50: ...lay indication is as shown below Alarms are displayed in the data indicator in the activated order from the left as shown below See below example Presently alarms with code 3 W A W c W and P C were ac...

Page 51: ...ng Confirm the latitude indication and set again if necessary Speed setting Confirm the speed indication and set again if necessary Repeater synchronization Synchronize each repeater 3 Setting Just be...

Page 52: ...it will synchronize automatically However confirm that the indicated value coincides with the True Heading selected by this system after the repeater switch is turned ON 6 Stop Turn each repeater swit...

Page 53: ...ACK ENT to confirm 10 Press or to set departure day 11 and time 13 pm and press switch ACK ENT to confirm 11 Data indication 000 0 INT will be show and press ACK ENT to confirm 12 Gyro compass does 36...

Page 54: ...g mode of the automatic steering system to MANUAL to prevent a large change of course Confirm the area around the ship is clear and turn to AUTO steering again CAUTION Setting Latitude Input When an a...

Page 55: ...ng 360 The Sensitive Element rotor should have stopped spinning completely approx 4 minutes for preparation of the various tests and adjustments 1 Press the DISP SET buttons and POWER on the operating...

Page 56: ...g because wrong heading information repeater signal and serial signal may be sent out CAUTION Setting Speed Input When an alarm regarding LOG contact alarm code u is activated and the Gyro Compass Tru...

Page 57: ...hange Confirm the area around the ship is clear and turn to AUTO steering again Normally the Gyro Compass is selected as True heading senor If an external heading sensor is connected to the AlphaMidiC...

Page 58: ...itch is set to active the function the following functions are obtained All heading outputs will be changed 180 from the heading An audible alarm will sound 5 times The dots in the indicator field of...

Page 59: ...o AUTO steering again 1 Confirm that the latitude value displayed on GPS coincides with the latitude value displayed on the indicator Note When GPS is selected as the latitude input system the latitud...

Page 60: ...urs only momentarily the alarm indicator extinguishes by pressing the ACK ENT switch Note When the alarm indicator did not extinguish by pressing the ACK ENT switch the alarm conditions continues Note...

Page 61: ...unication failure 1 When the External Heading Sensor signal processing unit stopped its operation or the serial signal from the External Heading Sensor processing unit has stopped F System internal co...

Page 62: ...5 LEVEL FAIL W B 8 10320 ZERO CROSS W B A 10308 INNER COMM1 W B b 10309 INNER COMM2 W B c 10310 GNSS COMM W C B 1 d 10311 GNSS DATA W C B 1 E 10316 EXT SENSOR COMM W B F 10317 EXT SENSOR DATA W B G 10...

Page 63: ...ng on the situation Some alerts escalate to alarms if acknowledging after a certain time Yellowish Orange Sounds twice with short sounds beep beep It repeats every 60 seconds until pressing ACK key Lo...

Page 64: ...lay will show a flashing Int 000 0 as shown below Note A soft clicking sound will be heard from Master Compass Note The rotor brake function will be active for a maximum of 4 minutes CAUTION It is ver...

Page 65: ...Inputs Latitude NMEA 0183 via RS 422 from GPS Speed 200 or 400 pulses nm from log NMEA 0183 via RS 422 Heading NMEA 0183 via RS422 from external heading source Compensation Latitude 70 N to 70 S Speed...

Page 66: ...NAL HEADING SOURCE IEC61162 1 IEC61162 2 Baud rate 38400 bps HDT xxx x hh CR LF Heading deg HDG xxx x x x A x x A hh CR LF Magnetic Heading deg Data Bits 8 bits Parity none Stop Bits 1 Frequen cy 1 50...

Page 67: ...ifier Sentence Number Total Number of ALC HEHBT xx x A x hh CR LF Sequential Sentence Identifier Repeat Interval HEALF x x x xxxxxx xx a a a aaa xx xx xx aa hh CR L F Alert Text Revision Counter Alert...

Page 68: ...r long term satisfactory operation Main purpose of the periodical checks and maintenance is to catch signs of equipment failure at an early stage Repairs on call in port as a result of these checks wi...

Page 69: ...check and clean warning labels so they are easy to read When warning labels become dirty or detached request new ones from Alphatron Marine 4 4 Spare Parts As mentioned before a spare box is includes...

Page 70: ...amage or leaks are defected contact Alphatron Marine Leave the new Sensitive element in its package it be exchanged with defected one by step 6 5 Remove the four screws encircled in red securing the S...

Page 71: ...a rule Two things must be considered when a failure has become apparent in this system or in the connected external equipment 1 An alarm is displayed in this system 2 A failure exists in part or in al...

Page 72: ...k according to paragraph 5 4 Failure Phenomena and Corrective Measures regarding the displayed alarm content corrective measures 5 4 Failure Phenomena and Corrective Measures When a failure has occurr...

Page 73: ...switch and request repair from Alphatron Marine service engineer or agent 5 4 4 Alarm code 6 Rotor Level Failure CAUTION The Gyrocompass True heading may have an error 1 Turn OFF the power switch 2 Tu...

Page 74: ...the Control Unit 1 Turn OFF the power switch 2 Turn ON again after approx 20 seconds 3 Take action according to paragraph 2 5 1 Start if no alarm code b was activated 4 If alarm code b is activated tu...

Page 75: ...ctive bearing source 2 Operate it according to the Operator s Manual for the external heading sensor if it does not operate properly 3 Change the Heading Sensor according to paragraph 2 6 Heading Sens...

Page 76: ...ent immediately after checking steps 1 and 2 5 6 Alarm 3 and A are activated at the Same Time when Powering ON 1 Turn OFF the power switch when error code 3 and A are activated at the same time 2 Turn...

Page 77: ...tigate the cause of the fuse blowing It will occur again unless the cause is resolved 4 See below table with their description and below image for their location Note All fuses are 5 2x20mm 5 Press an...

Page 78: ...fuses Fuse F1 is located inside the fuse holder in the front of the Master Compass and is 6 35 x 31 8mm See below picture for more information 1 Turn OFF the power switch on the operation panel 2 Open...

Page 79: ...er Compass without housing 4 ICNT Terminal Board 5 Connection Diagram 6 Cable Diagram 7 Installation Drawing 6 2 Check Sheet Maintenance AlphaMidiCourse Mk2 6 3 Periodical Check Tables 1 Periodical Ta...

Page 80: ...80 Appendices 6 1 1 Dimensions of Control Unit...

Page 81: ...81 Appendices 6 1 2 Dimensions of Master Compass...

Page 82: ...82 Appendices 6 1 3 Master Compass without housing...

Page 83: ...83 Appendices F1 6 1 4 ICNT Board of Control Unit F5 F4 F3 F2 TB1 1 TB2 TB1 2 TB1 3 S4 S2 S1 S3 Jumpers TB3 F10 F9 F8 F7 F6 S5 J2 J3 J1 J16 J20 J4 J5...

Page 84: ...84 Appendices 6 1 5 Connection Diagram...

Page 85: ...75 Appendices 6 1 6 Cable Diagram...

Page 86: ...76 Appendices 6 1 7 Installation Drawing...

Page 87: ...77 Appendices 6 2 Check Sheet Maintenance AlphaMidiCourse Mk2 AlphaMidiCourse Mk2 Check Maintenance Sheet...

Page 88: ...78 Appendices AlphaMidiCourse Mk2 Check Maintenance Sheet...

Page 89: ...79 Appendices AlphaMidiCourse Mk2 Check Maintenance Sheet...

Page 90: ...80 Appendices AlphaMidiCourse Mk2 Check Maintenance Sheet...

Page 91: ...81 Appendices AlphaMidiCourse Mk2 Check Maintenance Sheet...

Page 92: ...82 Appendices AlphaMidiCourse Mk2 Check Maintenance Sheet...

Page 93: ...that the value of each repeater synchronizes with the displayed true heading on the operating panel b Confirm that the displayed latitude on the operating panel coincides with the current latitude c M...

Page 94: ...of fixing screws in mechanical sections and connecting screws in the terminal board Re tighten if loosened b Confirm connecting and wire wearing conditions at connecting wire mounting points and wire...

Page 95: ...85 Appendices 6 4 Return Slip Sensitive element...

Page 96: ...86 Appendices...

Page 97: ...87 Appendices 6 5 Installation Drawing of AlphaHeading The AlphaHeading is the steering repeater in the AlphaMidiCourse Gyro system Its installation is as following...

Page 98: ...of Bearing Repeater RP 51 1 The Bearing repeater RP 51 1 can be part of an AlphaMidiCourse Gyro system The bearing repeater can be installed in a compass stand Its installation is as following Junctio...

Page 99: ......

Reviews:

Related manuals for ALPHAMIDICOURSE Mk2