


10
139405_A CF
3
BF
3
Log Set Installation
Brick Kit Note: Install the optional Antique Brick Kit 155370
before installing the log set. See instructions supplied
with that kit. The GF 3 BF3 log set must be installed
before operating the burner. The log set includes four
log pieces, packaged inside the firebox, and a quantity of
ceramic embers.
To install the log set, remove the packaging and place
the parts inside the firebox as illustrated in the diagrams
below. Do not handle the log set with your bare hands.
Always wear gloves to prevent skin irritation from the
ceramic fibres.
THE CERAMIC FIBRE LOGS AND EMBERS CAN IRRITATE
YOUR SKIN. GENTLY WASH YOUR HANDS WITH WARM
SOAPY WATER AFTER HANDLING THE LOGS OR EMBERS.
The embers realistically simulate glowing coals when the
burner is operating. These should be spread evenly over
the burner plate and around the logs.
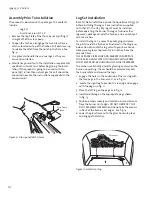
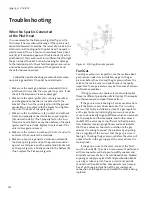
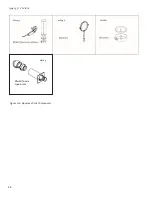
1. Engage the holes in the underside of the rear log with
the two pegs in the burner skirt as in fig. 10.
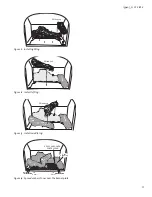
2. Locate the right log to overlap the rear log and engage
with the peg as in fig. 11.
3. Place the left log on the pegs as in fig. 12.
4. Install middle log on the appropriate pegs shown
in fig. 13.
5. Position embers loosely and maintain 6 mm clearance
from the burner skirt edges. DO NOT OBSTRUCT THE
PILOT ASSEMBLY OPENING and do not pile the embers
in front of the burner skirt edges. See fig. 14.
6. Lower the glass frame with the glass back into place
and engage the latches.
Figure 10. Install rear log.
PN 220727
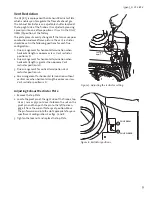
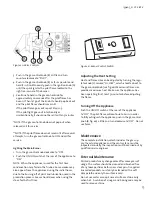
Figure 9. Glass panel latch release.
Glass Frame
Latch
Assembly Prior To Installation
The product is delivered with 2 packages. The contents
include:
• Log Set
• Fuel Conversion Kit - LP
1. Remove the Top Plate of the stove by simply lifting it
straight off of the stove body.
2. To open the firebox, disengage the two Glass Frame
Latches located on top of the firebox. Pull each lever up
to release the latch from the notch in the frame. See
fig. 9.
3. Use gloves to handle the ceramic logs, as they can
cause skin irritation.
4. Familiarize yourself with the installation requirements
specified in this manual, before beginning the instal-
lation. If the product is going to be used with Pro-
pane (G31) rather than natural gas (G20), it should be
converted now. See the instructions supplied with the
conversion kit.


