RWF ROTARY SCREW COMPRESSOR UNITS
MAINTENANCE
S70-600 IOM (OCT04)
Page 38
JORDAN
TEMPERATURE REGULATOR VALVE
The Jordan valve is a high volume, tem-
perature-regulating valve that requires
minimal differential across the valve to
ensure adequate flow for cooling.
The Jordan valve must be mounted on a
horizontal line with the flow arrow point-
ing toward the direction of flow. However,
the valve may be mounted at any angle
perpendicular to the horizontal line, in-
cluding inverted, if necessary.
Sensing Bulb, Vertical Mounting -
When the sensing bulb is to be mounted vertically (pointing
down), no special precaution is necessary. If the bulb is to be
mounted vertically, in an inverted position, a special capillary
is needed because the tip of the sensing bulb is higher than
the capillary end.
Sensing Bulb, Horizontal Mounting -
When mounting the
sensing bulb horizontally it must be mounted so that the
word “TOP” which is stamped on the capillary end of the bulb
appears accordingly.
NOTE: No angular mounting of the
sensing bulb is permitted.
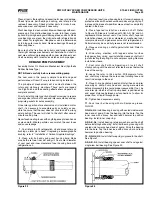
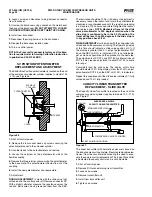
Adjustment -
To in-
crease the oil tem-
perature, increase the
spring tension by turn-
ing the knurled nut at
the base of the spring.
To decrease the oil tem-
perature, decrease the
spring tension by turn-
ing the knurled nut at
the base of the spring
(see Figure 36).
Action -
The valve
should be set as a re-
verse acting valve, how-
ever there are times when the valve may be set as a direct
acting valve. If you experience what seems to be a total
absence of oil cooling you will need to check the action of
the valve.
To check the action you will need to remove the
cap-flange and disc-guide.
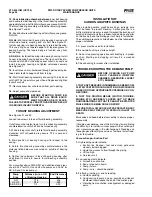
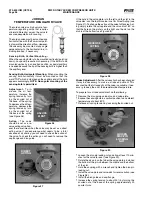
If the hole in the valve plate is to the left and the slot in the
valve disc is on the top this valve is set for
Direct Acting (see
Figure 37)
.
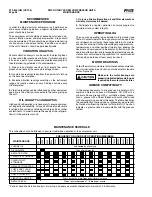
To change the action of the valve to Reverse Act-
ing simply rotate the valve plate and the valve disc 180° so
that the hole on the plate is on the right and the slot on the
disk is at the bottom (see Figure 38).
LOOSEN
DISC-PIN
LOCKING
NUT
DIRECT
ACTING
Figure 36
Figure 37
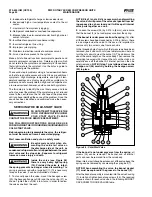
Figure 39
•
Loosen the disc-pin locking nut and allow at least 10 min-
utes for the valve to react (see Figure 39).
•
Rotate the disc-pin so that when the valve-plate is installed
the bottom of the pin is between the middle and the bottom
of the slot.
•
Hold the coupling with a wrench and tighten the disc-pin
locking nut.
•
Install the valve-plate and valve-disk for reverse action (see
Figure 38).
•
Install the disk-guide and cap-flange.
•
Increase the spring tension to about 30% by turning the
knurled nut at the base of the spring approximately 20
quarter turns.
ADJUST-
MENT
REVERSE
ACTING
Figure 38
Stroke Adjustment -
After the valve action has been changed
it may be necessary to make a stroke adjustment. This
ensures that the full capacity of the valve is available, if nec-
essary, to keep the oil at the predetermined temperature.
To prepare for a stroke adjustment do the following.
•
Remove the disc-guide, valve-disc, and valve-plate.
•
Expose the sensing bulb in a vertical position to an ambient
temperature of about 80°F.
•
Release all spring tension by loosening the knurled nut.


