background image

689103-BIM-B-1012

Johnson Controls Unitary Products

9

SECTION VI: INSTRUCTING THE OWNER

Assist owner with processing warranty cards and/or online registration.
Review Owners Guide and provide a copy to the owner and guidance
on proper operation and maintenance. Instruct the owner or the opera-
tor how to start, stop and adjust temperature setting.

When applicable, instruct the owner that the compressor is equipped
with a crankcase heater to prevent the migration of refrigerant to the
compressor during the “OFF” cycle. The heater is energized only when
the unit is not running. If the main switch is disconnected for long peri-
ods of shut down, do not attempt to start the unit until 8 hours after the
switch has been connected. This will allow sufficient time for all liquid
refrigerant to be driven out of the compressor.

The installer should also instruct the owner on proper operation and
maintenance of all other system components.

MAINTENANCE

1. Dirt should not be allowed to accumulate on the outdoor coils or

other parts in the air circuit. Clean as often as necessary to keep the
unit clean. Use a brush, vacuum cleaner attachment, or other suit-
able means.

2. The outdoor fan motor is permanently lubricated and does not

require periodic oiling.

3. If the coil needs to be cleaned, it should be washed with Calgon

Coilclean (mix one part Coilclean to seven parts water). Allow solu-
tion to remain on coil for 30 minutes before rinsing with clean water.
Solution should not be permitted to come in contact with painted
surfaces.

4. Refer to the furnace or air handler instructions for filter and blower

motor maintenance.

5. The indoor coil and drain pan should be inspected and cleaned reg-

ularly to prevent odors and assure proper drainage.

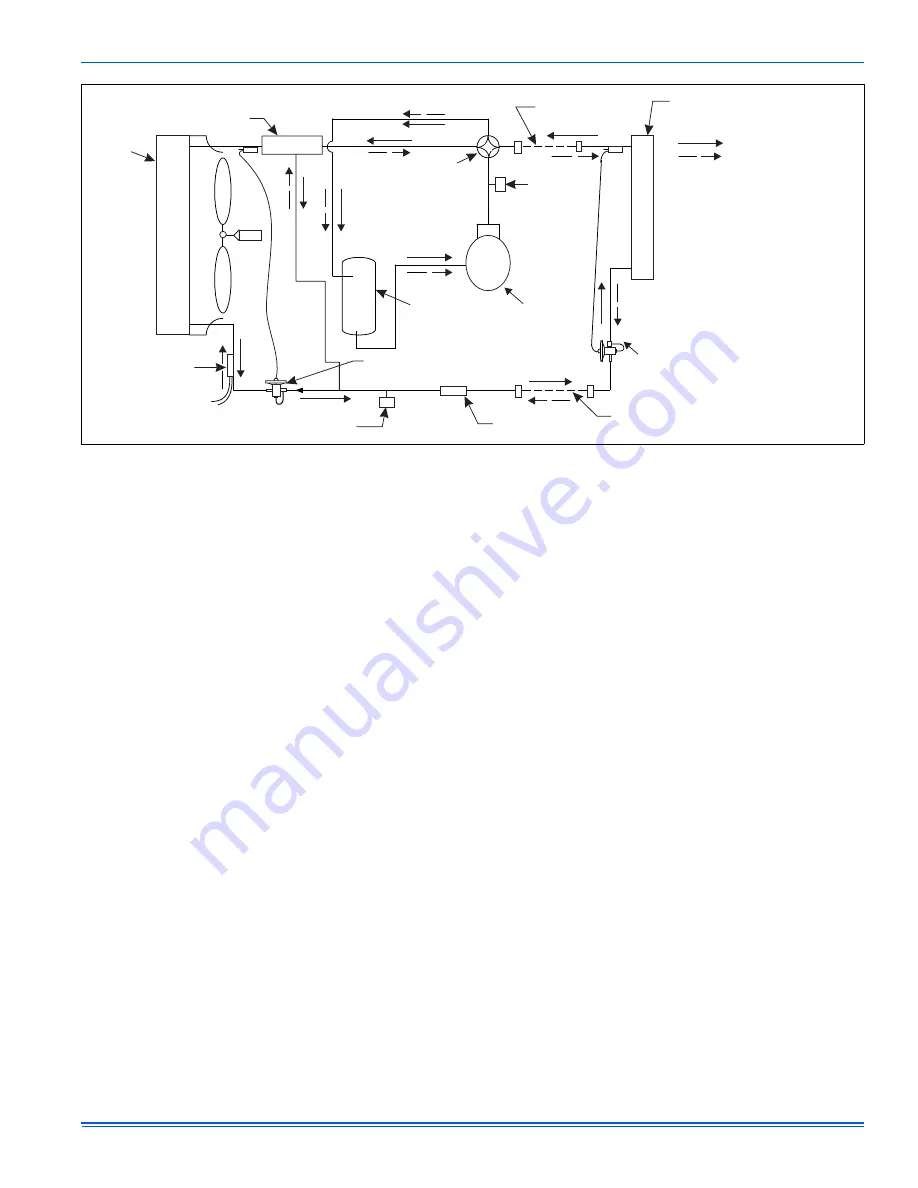
 FIGURE 11:  

Heat Pump Flow Diagram

CHARGE COMPENSATOR

(Empty in cooling / full in heating)

(Not included in all Units)

FIELD
CONNECTED LINE

INDOOR COIL

OUTDOOR
COIL

4-WAY
REVERSING
VALVE

FILTER DRYER
(Solid core)

SUCTION
ACCUMULATOR

LIQUID
SENSOR

COMPRESSOR

FIELD CONNECTED LINE

SHOWN IN COOLING POSITION.

COOLING CYCLE FLOW

HEATING CYCLE FLOW

BI-FLOW
TXV/CHECK
VALVE (Cooling) **

** NOTE: The indoor coil is shipped

with an orifice. The orifice must be
replaced with a TXV Kit.

BI-FLOW TXV/CHECK
VALVE OR ORIFICE (Heating)

LOW PRESSURE SWITCH

HIGH
PRESSURE
SWITCH

Summary of Contents for CHJD FLEX SERIES

Page 1: ...ntly hazardous situation which if not avoided will result in death or serious injury WARNING indicates a potentially hazardous situation which if not avoided could result in death or serious injury CAUTION indicates a potentially hazardous situation which if not avoided may result in minor or moderate injury It is also used to alert against unsafe practices and hazards involving only property dam ...

Page 2: ...in the pre determined location 2 Remove the shipping carton and inspect for possible damage 3 Compressor tie down bolts should remain tightened 4 Position the unit on the base provided LIQUID LINE FILTER DRIER The heat pumps have a solid core bi flow filter drier located on the liquid line AIR TEMPERATURE AT OUTDOOR COIL F AIR TEMPERATURE AT INDOOR COIL F Min Max Min Max DB Cool DB Heat DB Cool DB...

Page 3: ...susceptible to kinking and damage 3 Forming Copper for copper tubing only a No attempt should be made to bend the suction line in a shorter radius than 12 See Figure 2 4 How to dispose of excess tubing a Tubing may be longer than required Coil excess tubing nearer the indoor coil rather than the outdoor unit b Excess tubing must be coiled horizontally so the flow of refriger ant is from top to bot...

Page 4: ...ut d Then tighten an additional 1 6 turn to complete the knife edge seal 10 Check for leaks a After the line set connections have been made they should be checked for leaks b If the valves were kept clean and lubricated per instruction no leaks should be found c Use leak detect solution or soap solution for leak testing An elec tronic leak detector is recommended REFRIGERANT LINE SUPPORT Refrigera...

Page 5: ... wiring to be in accordance with national electrical codes NEC and or local city codes 5 Mount the thermostat about 5 feet above the floor where it will be exposed to normal room air circulation Do not place it on an outside wall or where it is exposed to the radiant effect from exposed glass or appliances drafts from outside doors or supply air grilles 6 Route the 24 volt control wiring NEC Class...

Page 6: ...OST OPERATION General The control maintains proper airflow through the outdoor coil during heating operation by melting frost and ice that may form on the coil Frost may accumulate unevenly in different sections of the coil because of the arrangement of the refrigeration circuit within the coil The control may initiate a defrost cycle even when the coil is not completely cov ered with frost This i...

Page 7: ...defrost cycle is necessary The control will initiate a defrost cycle when the liquid line temperature is below the initiate point for the measured ambient temperature See Figure 10 continuously for 4 1 2 minutes This delay eliminates unnec essary defrost cycles caused by refrigeration surges such as those that occur at the start of a heating cycle The control will initiate a defrost cycle every 6 ...

Page 8: ...t cycle delay timer and start the compressor when the timer expires When the compressor is started following a pressure switch fault the control will start a six hour timer based on accumulated compressor run time If the control senses another opening of the pressure switch before the timer expires it will cause a soft lockout condition The sec ond opening of the pressure switch must be greater th...

Page 9: ...rcuit Clean as often as necessary to keep the unit clean Use a brush vacuum cleaner attachment or other suit able means 2 The outdoor fan motor is permanently lubricated and does not require periodic oiling 3 If the coil needs to be cleaned it should be washed with Calgon Coilclean mix one part Coilclean to seven parts water Allow solu tion to remain on coil for 30 minutes before rinsing with clea...

Page 10: ...ce Published in U S A 689103 BIM B 1012 Copyright 2012 by Johnson Controls Inc All rights reserved Supersedes 689103 BIM A 0412 York International Corp 3110 N Mead Wichita KS 67219 SECTION VII WIRING DIAGRAM FIGURE 12 Wiring Diagram ...

Reviews: