25
Sales/Spares & Replacement Help Line 01604 762881
17.11 GAS VALVE & VENTURI ASSEMBLY
NOTE: The gas valve is factory preset and must not be adjusted. A replacement
valve can only be supplied by Johnson & Starley Ltd.
17.11.1 Remove the 2 fixing screws securing the Venturi (and gas valve) to the burner and remove
the assembly from the burner, carefully removing the gasket.
17.11.2 Replace with the new component and refit in reverse order, ensuring all the seals are in good
condition and correctly positioned.
17.11.3 Check the gas rate and combustion as described in paragraph 14.4.
17.12 BURNER ASSEMBLY
17.12.1 Refer to section 16.3. See Figure 29.
17.12.2 Unscrew the gas joint at the top of the gas cock.
17.12.3 Remove the ESYS (red ignition box) & gas valve / Venturi assembly. Refer to 17.9 & 17.10 and
Figure 21.
17.12.4 Remove the 4 nuts and washers securing the burner assembly.
17.12.5 Carefully withdraw the assembly from the heat exchanger.
17.12.6 Remove the spark detection electrodes, allowing the burner sealing plates to be separated.
17.12.7 Fit new and refit in reverse order. Make sure all gaskets are replaced with new ones, ensure
the rotation position of the burner is correct (indicated by a notch) and the viewing window is
in correct position
17.12.8 Re-fit in reverse order.
17.13 IGNITION ELECTRODES
17.13.1 Refer to section 16.3. See Figure 29.
17.13.2 Unplug the lead from the ESYS (red ignition box) and earth wire from the back of the electrode.
Refer to 17.9 and Figure 19.
17.13.3 Remove the 2 remaining nuts and withdraw the electrode.
17.13.4 Replace with a new unit, ensuring the gasket is replaced with a new one, or if the existing
gasket if reused is in good condition.
17.13.5 Re-fit in reverse order.
17.14 FLAME DETECTION ELECTRODES
17.14.1 Refer to section 16.3. See Figure 29.
17.14.2 Unplug the lead from the ignition control. See Figure 19.
17.14.3 Remove the two retaining nuts and withdraw the electrode.
17.14.4 Replace with new unit, ensuring the gasket is replaced with a new one.
17.14.5 Re-fit in reverse order.
IMPORTANT:
When either the ignition or flame detection electrodes have been serviced or replaced
you MUST set the clearances as shown in Figure 16.
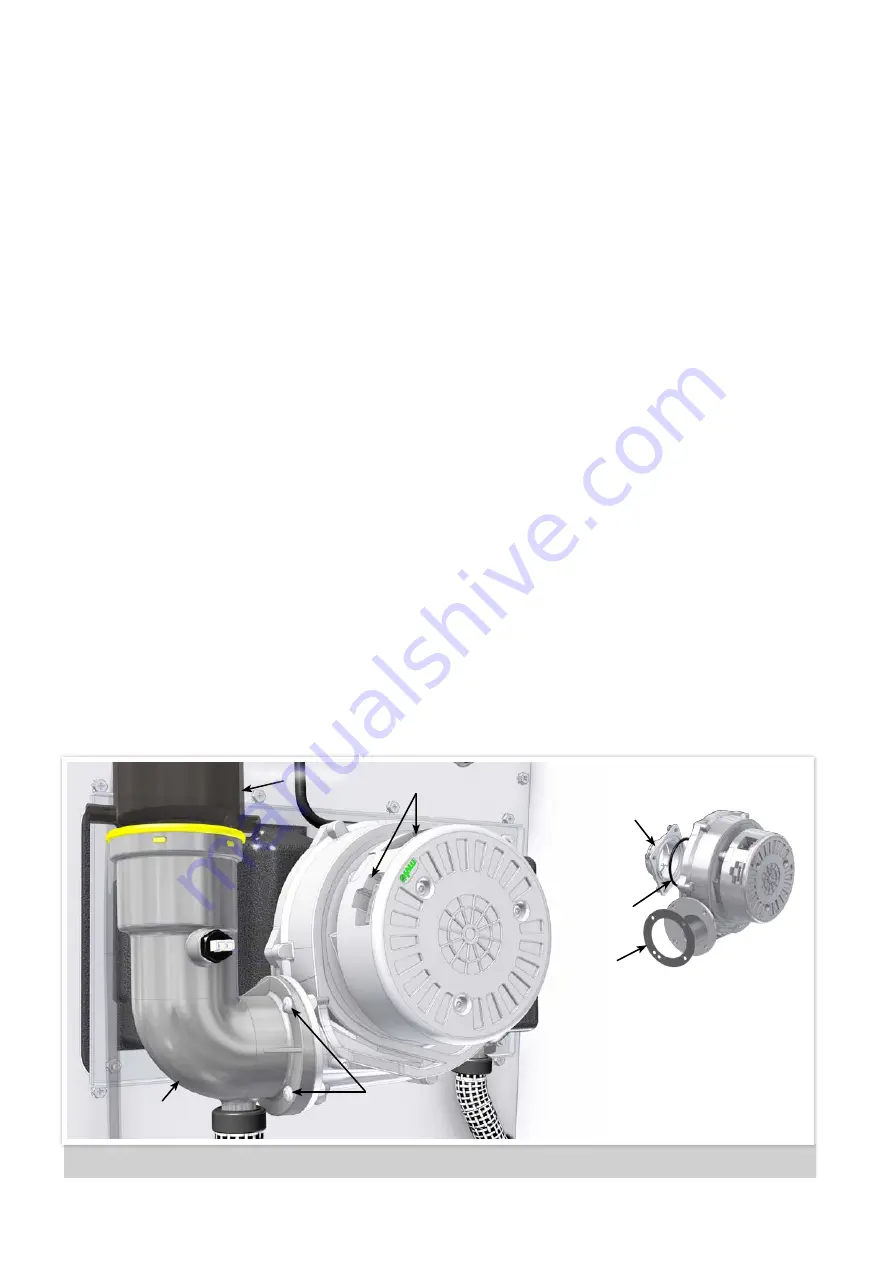
FIGURE 30. COMBUSTION AIR FAN ASSEMBLY
ELECTRICAL CONNECTIONS
SCREWS
FLUE ELBOW
FLUE ELBOW
TELESCOPIC FLUE
17.14.1 Refer to section 16.3.
17.14.2 To remove the CAF refer to
16.8.2 to 16.8.6 and Figure
18.
17.14.3 Remove the 4 retaining
screws that attach the CAF
and flue elbow. See Figure
23.
17.14.4 Fit new and re-fit in reverse
order.
17.14 COMBUSTION AIR FAN (CAF)
FLANGE
CONNECTION
GASKET
SEALING RING
‘O’ RING
Summary of Contents for WARMCAIR C26D
Page 29: ...29 Sales Spares Replacement Help Line 01604 762881 20 FAULT FINDING FLOW CHART...
Page 42: ...NOTES...
Page 43: ...NOTES...


