SECTION 3 - CHASSIS & SCISSOR ARMS
3-40
– JLG Lift –
3121273
3.16 ARMS AND PLATFORM POSITIONING
AND SUPPORT
NEVER WORK UNDER N ELEVATED PLATFORM UNTIL IT HAS
BEEN RESTRAINED FROM MOVEMENT WITH SAFETY PROPS,
BLOCKING OR OVERHEAD SLING.
The arm stack can be supported by using an overhead
crane,(See Figure 3-41.). If an overhead crane is not avail-
able the stack may also be lifted by using a fork-truck
using the following instructions:
1. With the forks on the fork-truck slid close together,
enter from the front of the machine and place the
forks on the cross tube of the second arm assembly
below the platform.
2. Slowly lift the arm stack with the fork-truck while the
manual descent valve is being engaged (this allows
the oil to drain back into the tank).
3. Place machine on safety prop and leave the fork
truck in place.
4. At this point the lift cylinder removal may begin.
(Refer to Section 4.6, Lift Cylinder Removal)
If removal of the platform becomes necessary use the
above procedure to stabilize the platform for pin and plat-
form removal.
3.17 PLATFORM REMOVAL
1. Support the platform using an overhead crane with
straps capable of lifting at least 500 lbs (227 kg)
(See Figure 3-41.). Refer to Section 3.16, Arms and
Platform Positioning and Support.
2. Disconnect and remove the platform control station
and wiring harness at the platform. Disconnect AC
receptacle cable if applicable. Route the cables out
through the hole at the right-rear of the platform to
free platform of any constraints when lifting.
3. Remove the bolts attaching the pins and slide
blocks at each corner to the arm stack. Carefully
remove the four pins attaching the platform to the
arm stack.
4. Lift the platform from the arm stack and set aside.
NOTE:
When attaching platform back onto scissor arm
assembly, follow removal procedures in reverse
order.
3.18 SCISSOR ARMS REMOVAL
1. Remove platform (refer to Section 3.17, Platform
2. Disconnect all wiring and cables attached to scissor
arm assembly.
3. The scissor arms can be removed as a complete
unit or individually.
Removing scissor arm assembly as a
complete unit:
1. Remove the pin attaching the bottom scissor arms
to the rear of the frame by removing the bolt.
2. Place two straps around each end of the the entire
scissor arm assembly. Using an overhead crane,
slowly and carefully move the arm stack forwards so
that slide blocks at front of machine slide out the
front of the slide channel on the frame.
NOTE:
Overhead crane and straps must be capable of lifting
at least 2000 lbs (907 kg).
3. Once slide blocks are clear of machine, the scissor
stack can be moved to a more desirable location for
further arm disassembly.
Removing/Installing scissor arms
individually:
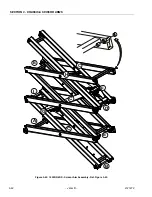
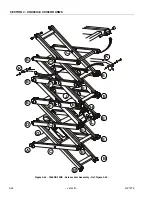
See Figure 3-42., Figure 3-43., Figure 3-44. and Figure 3-
45.
1. With the platform removed, start with the top arms
(closest to platform).
2. Secure each arm section being removed using an
overhead crane with suitable lifting straps.
3. Remove the bolts securing the connecting pins in
place.
4. Remove the pins from the arms.
5. Remove the arm section from the machine using the
overhead crane.
6. Repeat previous steps for remaining arm sections.
NOTE:
When attaching scissor arm assembly back onto
frame, follow removal procedures in reverse order.
Self locking fasteners, such as nylon insert and thread
deforming locknuts, are not intended to be reinstalled
after removal. Always use new replacement hardware
when installing locking fasteners.


