background image

100

Manual de Instrucciones 

6. Mantenimiento

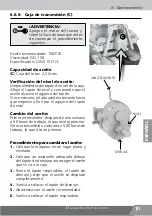
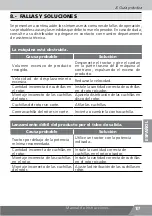
6.8.4-  Lubricación con aceite

¡ADVERTENCIA! 

Apague el motor del tractor y 

retire la llave de arranque antes 

de comenzar el procedimiento 

siguiente. 

Procedimiento para cambiar el aceite:

1. 

Coloque la máquina en un lugar plano y 

nivelado.

2. 

Coloque un recipiente adecuado debajo 

del tapón de drenaje para recoger el aceite 

que se va a la caja. 

3. 

Retire  el  tapón  respiradero,  el  tapón  de 

drenaje y deje que el aceite se desplace 

completamente.

4. 

Vuelva a colocar el tapón de drenaje.

5. 

Abastezca con el aceite recomendado.

6. 

Vuelva a colocar el tapón respiradero.

Aceite recomendado: 150/CLP. 

Viscosidad: ISO 150.

Especificación: DIN 51517/3. 

Capacidad de aceite 

(

A

) Caja de transmissión izquierda: 1,5 litros.

(

B

) Caja de transmisión derecha: 1,5 litros. 

Verificación del nivel de aceite:

Limpie alrededor del tapón de nivel de la caja.

Afloje el tapón de nivel y compruebe que el 

aceite alcanza el agujero del tapón.

Si es necesario, añada aceite lubricante hasta 

que empiece a fluir por el agujero del tapón 

de nivel.

Cambio del aceite:

Primer intercambio: después de una semana 

o 50 horas de trabajo, lo que ocurra primero.

Otros intercambios: cada año o 500 horas de 

trabajo, lo que ocurra primero. 

B

A

6.8.5-  CAJAS DE TRANSMISIÓN (A) Y (B)

ABASTECIMIENTO

NIVEL

DRENAJE

Summary of Contents for 1600-AT S3

Page 1: ...MÁQUINAS AGRÍCOLAS JF 1600 AT S3 INSTRUCTIONS MANUAL MANUAL DE INSTRUCCIONES ESPAÑOL ENGLISH COSECHADORA DE PRECISIÓN MULTIFORRAJE MULTI FORAGE PRECISION HARVESTER ...

Page 2: ......

Page 3: ...JF 1600 AT S3 COSECHADORA DE PRECISIÓN MULTIFORRAJE ESPAÑOL ...

Page 4: ...ESPAÑOL ...

Page 5: ...Manual de Instrucciones 5 1 Identificación ESPAÑOL Manual de Instrucciones Cosechadora de Precisión Multiforraje JF 1600 ATS3 Español JF 1600 AT S3 ...

Page 6: ...na se identifica con un número de serie anotado en la etiqueta existente en la misma Al enviar comunicaciones solicitar piezas de repuesto o ayuda de la Asistencia Técnica siempre mencione el número de serie y el modelo de su máquina 1 IDENTIFICACIÓN Anote el número de serie aquí ...

Page 7: ... responder cualquier consulta ofreciéndole asistencia técnica eficaz y permanente En caso de duda al leer este manual y o al utilizar la máquina póngase en contacto con nuestro departamento de Post Ventas Sr Propietario Las imágenes presentadas en este manual son de carácter meramente ilustrativo Para facilitar la visualización pueden mostrar protecciones de seguridad abiertas o desmontadas En nin...

Page 8: ...5 Tractor requerido 31 3 6 Itens que acompañan a la máquina 32 3 7 Itens que acompañan a la máquina 33 4 PREPARACIÓN 34 4 1 Recepción 34 4 2 Montajes 35 4 1 1 Montaje del tubo de salida 35 4 3 Acoplamiento al tractor 39 4 3 1 Acoplamiento LATERAL 40 4 3 2 Acoplamiento TRASERO 46 4 3 3 Acoplamiento DELANTERO 47 4 4 Nivelación 48 4 5 Cardan de la toma de fuerza 49 4 5 1 Longitud del cardan 49 4 5 2 ...

Page 9: ... 6 5 Pernos Fusibles 91 6 5 1 Cómo cambiar el perno fusible 91 6 5 2 Cómo cambiar el perno fusible de los tambores 92 6 6 Cambiar las sierras de tambor 93 6 7 Calibración de los neumáticos 94 6 8 Lubricación 95 6 8 1 Lubricación con grasa 96 6 8 2 Lubricación de engranajes de caja de rodillos 98 6 8 3 Lubricación de los cardanes 99 6 8 4 Lubricación con aceite 100 6 8 5 CAJAS DE TRANSMISIÓN A Y B ...

Page 10: ...as Estas instrucciones están destinadas a resguardar su propia seguridad y las demás personas que trabajan o que se encuentran cerca de la máquina Al ver el SÍMBOLO DE ALERTA DE SEGURIDAD en este manual lea atentamente y siga estrictamente las instrucciones siguientes SÍMBOLO DE ALERTA DE SEGURIDAD 2 SEGURIDAD La palabra de advertencia CUIDADO Indica una situación potencialmente peligrosa que si n...

Page 11: ...or Asegure los extremos de los protectores de cardán en puntos fijos en el tractor e implemente por medio de las cadenas específicas para este propósito para que permanezcan estáticos sin girar Nunca use el cardán sin guardias de seguridad Lea el manual de instrucciones antes de conectar la máquina Manténgase atento y respete todas las recomendaciones de uso y seguridad durante la operación Repase...

Page 12: ... en un accidente grave Antes de poner la máquina en marcha compruebe que no hay herramientas u otros objetos sobre la misma Realice una comprobación en la máquina observando si no hay tornillos sueltos piezas gastadas roturas escapes o piezas sueltas Observar los alrededores y mantener a los animales y los espectadores a distancia segura Tenga especial cuidado con los niños Se prohíbe la permanenc...

Page 13: ...n el punto muerto antes de apagarlo o de trabajar en el sistema hidráulico Asegúrese de que todos los componentes del sistema se mantienen en buen estado Utilizar equipos de protección individual EPI guantes gafas protector auricular calzado y ropa apropiada al realizar los servicios de mantenimiento Recuerde que los componentes móviles debido a la inercia continúan en movimiento durante algún tie...

Page 14: ...stema antes de desconectar una manguera hidráulica Evite el contacto físico con el aceite hidráulico contiene aditivos que en algunas situaciones pueden ser nocivos para la salud No intente reparaciones improvisadas en los accesorios hidráulicos o mangueras utilizando cinta adhesiva grapas o cementos El sistema hidráulico funciona bajo extrema presión Tales reparaciones fallarán de repente y crear...

Page 15: ...empre dirija el tractor a velocidades compatibles con las condiciones del terreno o carreteras y porte del tractor utilizado Evite las maniobras bruscas especialmente en lugares accidentados Al remolcar una carga con peso mayor que el del tractor no sobrepasar 16 Km hora Reducir la atención al transitar con la máquina enganchada en terrenos inclinados Si percibe algún desequilibrio reduzca la acel...

Page 16: ...prendas sueltas y los cabellos largos pueden ser atrapados por mecanismos en funcionamiento Mantenga las manos siempre alejadas de las piezas en movimiento Nunca intente limpiar ni borrar ninguna parte de la máquina mientras esté en funcionamiento Este procedimiento sólo se puede realizar con la toma de fuerza apagada la llave retirada de la ignición del tractor y la máquina sin ningún movimiento ...

Page 17: ...e responsabiliza por el uso inadecuado del equipo La cosechadora sólo se utilizará de la forma descrita en este manual cualquier otro procedimiento debe evitarse 2 8 CALLEJÓNES 2 8 1 Apertura de los callejones Es importante planificar los callejones con anticipación dejando las aberturas necesarias para que la cosechadora ingrese al área de cosecha Recordamos que esta cosechadora no ha sido desarr...

Page 18: ...tensas Uso obligatorio en todas las fases de utilización de la máquina Protector Auditivo Protección para niveles de ruido perjudiciales para la salud La exposición prolongada al ruido puede causar daño o pérdida de la audición Uso obligatorio durante la operación de la máquina Respiradores Protección para actividades con productos químicos tales como abono polvo incomodas etc Uso obligatorio en p...

Page 19: ...talmente sin movimiento No toque los engranajes en movimiento Durante el acoplamiento al tractor no permanezca entre la máquina y el tractor Los adhesivos de seguridad fijados en la máquina advierte sobre riesgos residuales y advierte para procedimientos a ser adoptados durante las fases de utilización de la misma Mantener todos los adhesivos de seguridad visibles y en perfecto estado de conservac...

Page 20: ...n el cardan No abra la cubierta de la máquina funcionando Mantenga las manos lejos del rotor en movimiento Prohibido permanecer sobre cualquier parte de la máquina durante la operación o el transporte Prohibido alimentar manualmente la máquina Riesgo del tubo de salida entrar en contacto con líneas de alimentación suspendidas Riesgo de choque eléctrico o electrocusión ...

Page 21: ...ridad dañadas inmediatamente A Protecciones de seguridad del cardán Desarrolladas para impedir cualquier contacto con el cardan durante el funcionamiento Riesgo de la eliminación de esta protección El contacto con los cardanes en movimiento puede ocasionar lesiones graves como fracturas torsión mutilación etc con riesgo de muerte De acuerdo con la Norma Reguladora NR 12 se considera protección fij...

Page 22: ...l contacto con los acoplamientos con la máquina conectada puede ocasionar lesiones graves como fracturas torsión etc D Aberturas de entrada de aire Lasentradasdeairesehandiseñadode acuerdo con las normas de seguridad para impedir el contacto con el rotor durante el funcionamiento de la máquina Sus dimensiones impiden que los dedos pasen por los agujeros y alcancen el rotor D C Protecciones de los ...

Page 23: ...ran del material antes de que pueda soltarlo de las manos y usted podrá ser tirado dentro de la máquina Riesgo de accidente grave con amputación de miembros y o muerte CÓMO ELIMINAR EL RIESGO Está prohibido alimentar esta máquina manualmente no es apropiada para ello Siempre que sea necesario utilice una ensiladora equipada con tolva de alimentación propia para ese propósito Incluso con el uso de ...

Page 24: ...ón Detenga el motor del tractor quite la llave de arranque y espere hasta que la máquina esté sin ningún movimiento antes de acercarse o subir en cualquier parte de la cosechadora No permanezca en la dirección del chorro de producto picado Si la máquina recoger algún cuerpo extraño clavos metales etc las astillas pueden ser arrojadas por el tubo de salida y golpearlo causando lesiones graves CÓMO ...

Page 25: ...o tractor puedan moverse Nunca permanezca entre la máquina y el tractor durante el acoplamiento Asegúrese de que el freno de manos del tractor está accionado antes de iniciar el acoplamiento No transporte la máquina con el tubo de salida levantado Riesgo de choque eléctrico y electrocusión en el caso de contacto con la red de energía eléctrica CÓMO ELIMINAR EL RIESGO Descargue el tubo siempre que ...

Page 26: ...llos del rotor Nunca se acerque a las sierras con la máquina encendida El contacto con las sierras de corte en movimiento causará lesiones muy graves Riesgo de cortar las partes en contacto con las sierras piernas brazos manos CÓMO ELIMINAR EL RIESGO Nunca se acerque al área de alimentación de la máquina tambores y sierras mientras está encendida Cuidado Las sierras cuando giran son casi impercept...

Page 27: ...s plantas 6 Rotor Pica y lanza el forraje por el tubo de salida 7 Afilador Afila las cuchillas en el propio rotor 8 Caja de cambio de corte Cambia la longitud del picado 9 Conductores Direccionan las plantas para los tambores 10 Tambores de recogida Cosechan las plantas 11 Caja de Cambio de Velocidad Cambia la velocidad del tambor 12 Sierras Cortan las plantas 13 Rueda de Apoyo Rueda con neumático...

Page 28: ... y rotación 16 Cardán Transmite potencia y rotación 17 Pie de Apoyo Apoyo para aparcamiento 18 Enganche Punto de enganche para carreta o vagón 19 Caja de Herramientas Caja que contiene elementos que acompañan a la máquina 20 Brazo Brazo para acoplamiento lateral al tractor Item Opcional 13 19 17 14 16 20 18 15 sentido de rotación sentido de rotación ...

Page 29: ...elevación hidráulica del tractor una caja de alimentación con dos rodillos delanteros y dos traseros uno de los cuales es móvil con un sistema de cambio de marcha para variar la longitud de corte un rotor picador que contiene quince cuchillas un tubo de salida giratorio con quiebra chorro con accionamiento hidráulico Esta máquina ha sido diseñada exclusivamente para su uso en operaciones agrícolas...

Page 30: ...hadora está disponible en las siguientes versiones Con brazo de acoplamiento del tractor y 540 rpm en la TDF Con brazo de acoplamiento del tractor y 1000 rpm en la TDF Con kit trasero para acoplamiento trasero y 540 rpm en la TDF Con kit trasero para acoplamiento trasero y 1000 rpm en la TDF CON BRAZO DE ACOPLAMIENTO AL TRACTOR CON KIT PARA ACOPLAMIENTO TRASERO ...

Page 31: ...rido COSECHA La cosechadora se acopla al tractor a través del sistema hidráulico de tres puntos y se acciona mediante la toma de fuerza A medida que avanza por la plantación las sierras montadas en los dos tambores delanteros cortan las plantas en el rango de trabajo del cabezal Los tambores arrastran las plantas a la caja del alimentador donde se juntan dos rodillos delanteros y dos rodillos tras...

Page 32: ...ajón 2 2 02 126217 Engranaje Z94 MOD 2 25 3 2 02 126219 Engranaje Z62 MOD 2 25 4 2 02 126071 Engranaje Z103 MOD 2 25 5 2 02 126081 Engranaje Z53 MOD 2 25 6 1 03 016156 Engranaje de corte C 18 7 1 03 016155 Engranaje de Corte C 14 8 1 03 016152 Engranaje de corte C 5 9 1 03 016151 Engranaje de corte C 3 10 1 02 126333 Pasador de Enganche Tercero Punto Categoría 3 11 1 02 106675 Vástago del Afilador...

Page 33: ...tación ESPAÑOL 3 7 Itens que acompañan a la máquina 3 1 2 4 4 ITEM CANT CÓDIGO DESCRIPCION DEL PRODUCTO 1 1 02 045091 Botador 2 2 05 000281 Pasador Elástico 13 x 60 mm 3 2 05 001495 Pasador Elástico 8 x 60 mm 4 10 05 077722 Perno Fusible ...

Page 34: ...e la misma En ese caso levante la máquina siempre por los dos puntos indicados en la figura al lado PUNTOS DE IZAMIENTO Movimiento de la máquina embalada Manténgase a la distancia segura al encender la máquina No permitir la presencia de personas cercanas durante el levantamiento Recuerde que es posible un movimiento lateral intencional o no de la máquina cuando está suspendida Nunca permanecer de...

Page 35: ...ucciones que siguen para proceder con su montaje COMPONENTES DEL TUBO DE SALIDA E D B C C P P A J R Q R R 1 Monte el doble quiebra chorro A en el segmento del tubo de salida B Fijalos con el pasador C y los dos pasadores aleta P 2 Coloque el pasador Q los dos articuladores R Fijalos con los dos pasadores abatibles P P Pasador de 1 8 x 1 02 pzs P Pasador de 1 8 x 1 02 pzs 4 2 Montajes ...

Page 36: ...alo con las arandelas y tuercas U 6 Conecte las dos mangueras al cilindro hidráulico G T Tornillo de Cabeza Redonda y Cuelo Cuadrado M10 x 30 mm 08 piezas T Arandela plana M10 08 piezas T Tuerca hexagonal autoblocante M10 08 pzs T Tornillo de Cabeza Redonda y Cuelo Cuadrado M10 x 30 mm 08 piezas T Arandela plana M10 08 piezas T Tuerca hexagonal autoblocante M10 08 pzs U Arandela plana M10 02 pieza...

Page 37: ...el tubo de salida con los tornillos arandelas y tuercas S 9 Con un cabrestante levante el tubo y colóquelo arriba del tubo de descarga 10 Coloque el pasador X coloque los dos tensores T y coloque los dos bloqueos V 1 2 3 4 M Arandela plana M8 08 piezas M Tuerca hexagonal M8 con traba de nylon 08 pzs M T T T X T V L S S Tornillo hexagonal M12 x 40 mm 02 piezas S Arandela plana M12 02 piezas S Tuerc...

Page 38: ...je la contratuerca G y ajuste la longitud del tensor H 12 Apriete el tensor girando el eje H Vuelva a apretar la contratuerca G 13 Conecte las 4 mangueras del motor hidráulico y del quiebra chorro a los sujetadores del tubo de salida fig al lado 14 Coloque el cilindro hidráulico M fijando con los pasadores P y Q Coloque las 4 pasadores abatibles R R Pasador 3 16 x 1 1 2 04 L ...

Page 39: ...os del tractor Durante el acoplamiento Asegurar que el tractor esté frenado Operar el sistema hidráulico de tres puntos del tractor lenta y cuidadosamente Jamás colocarse entre el tractor y la máquina El acoplamiento lateral solo está disponible en la versión con brazo de acoplamiento Antes del acoplamiento verifique que la potencia del tractor sea compatible con la solicitada por la máquina y que...

Page 40: ...r el brazo izquierdo A luego el brazo derecho B y finalmente el tercer punto C 3 Cierre los brazos con los pernos de Para facilitar el transporte generalmente el brazo para el acoplamiento lateral de la cosechadora al tractor permanece desarmado y plegado como se muestra en la figura al costado Para el acoplamiento lateral de la máquina ensamble el brazo de acuerdo con las instrucciones a continua...

Page 41: ... con la máquina 4 Levante el hidráulico un poco lo suficiente como para quitar el brazo del piso 5 Levante el pie de apoyo B y asegúrelo en la posición de descanso 6 Retire el pasador C 7 Articular el brazo D hacia un lado figura al lado 8 Asegure el brazo en esta posición D E ...

Page 42: ...uina suelte los bloqueos F y G como se describe a continuación 10 Empuje el pasador de bloqueo H del acoplador pasador con resorte vea la figura en el costado 11 Gire el pasador de bloqueo H para bloquearlo en esta posición vea la figura al costado 12 Repita el procedimiento anterior en el otro bloqueo del brazo ...

Page 43: ...loqueos F y G nuevamente La cabeza del pasador debe entrar en el orificio ver la figura al costado 15 Repita el procedimiento en el bloqueo del otro enganche Después de conectar la máquina al brazo gire los dos pasadores H activando nuevamente los bloqueos de acoplamiento Si no se observa esto la máquina puede desacoplarse del brazo con el riesgo de accidente con daños materiales y personales ADVE...

Page 44: ...ateral Después del acoplamiento Coloque el regulador E en la posición que se muestra en el lateral IMPORTANTE IMPORTANTE E P Observar los procedimientos descritos anteriormente es muy importante para que el brazo se articule durante la operación o el transporte y permita que las ruedas sigan las irregularidades del terreno ADVERTENCIA ...

Page 45: ...s 3 pernos de enganche No seguir estas instrucciones puede conducir a accidentes con daños personales y materiales CUIDADO HOLGURA Después del acoplamiento compruebe que hay suficiente espacio entre el neumático trasero del tractor y la máquina fig al lado Utilizando los estabilizadores del tractor centralizar la máquina con el tractor y ajustar el juego lateral En caso de duda consulte el manual ...

Page 46: ...ración 1 Aproxime el tractor de la máquina procurando alinear la toma de fuerza del tractor con el eje de la máquina 2 Inicie la acogida por el brazo izquierdo A luego el derecho B y finalmente el brazo de articulación de tres puntos C 3 Cierre los brazos con los pernos de bloqueo suministrados con la máquina 4 3 2 Acoplamiento TRASERO Utilizando los estabilizadores del tractor centralizar la máqu...

Page 47: ... de tractor con sentido de rotación contrario al estándar imagen a continuación se debe utilizar el kit de rotación del inversor Como es un accesorio específico para esta condición del tractor el KIT INVERSOR no se suministra con la cosechadora y se puede comprar por separado KIT INVERSOR DE ROTACIÓN 4 3 3 Acoplamiento DELANTERO Dirección de rotación estándar según ISO WD 8759 3 El enganche al tra...

Page 48: ...cerca de la máquina ADVERTENCIA 4 4 Nivelación Transversal Longitudinal Elevar la máquina a aproximadamente 20 cm del suelo Mirando la máquina hacia trasera asegúrese de que esté nivelada Baje la máquina y realice los ajustes necesarios Mirando la máquina a un lado compruebe si está nivelada Haga las correcciones ajustando la longitud del brazo del tercer punto del levantamiento hidráulico ...

Page 49: ...holgura indicada será necesario cortar el cardán Marque los lugares donde se harán los cortes dejando la holgura indicada en la página siguiente Desenganche el cardán de la máquina y el tractor y haga los cortes 4 5 Cardan de la toma de fuerza 1 Accione el hidráulico y coloque el eje de la máquina a la misma altura de la toma de fuerza del tractor véase la figura siguiente 4 5 1 Longitud del carda...

Page 50: ...dan deben tener la misma longitud Utilizando una lima darle acabado en las partes cortadas A continuación lubrique con una fina capa de grasa Atención especial debe ser dada al montaje del tubo y barra en los cardans de perfil cuadrado Los terminales deben estar alineados conforme se verifica en las figuras abajo Los terminales desalineados generan vibraciones desgastes y rupturas de cardan CORREC...

Page 51: ...e dañar la máquina y causar un grave accidente si alguien es alcanzado por el mismo No entre en zona de trabajo del cardan mientras la máquina está en funcionamiento el contacto con el cardan puede provocar un grave accidente No utilice ropa ancha con cinturones o partes que puedan sujetarse a los componentes móviles del cardan Jamás utilice el cardan sin las protecciones CUIDADO No trabaje con el...

Page 52: ...ulico del tractor Desconectando las mangueras del tractor Con las palancas del control en la posición neutra tire de las mangueras rápidamente la desconexión ocurrirá con pérdida mínima de aceite Antes de conectar y desconectar las mangueras es necesario aliviar la presión del circuito hidráulico Para esto apague el tractor y accione algunas veces las palancas hasta aliviar la presión Con las pala...

Page 53: ...R EL TUBO DE SALIDA GIRAR EL TUBO DE SALIDA La cosechadora viene equipada de fábrica con tubo de salida de accionamiento hidráulico La dirección del quiebra chorro y los movimientos para subir bajar el tubo de salida se realizan mediante cilindros hidráulicos El movimiento de giro es realizado por un motor hidráulico ...

Page 54: ...do el chorro de producto picado 4 7 1 Joystick 4 7 2 Montaje de joystick en el tractor El Joystick debe montarse en la palanca de control hidráulico del tractor ya que se activará simultáneamente con la palanca JOYSTICK PALANCA HIDRAULICA PALANCA HIDRAULICA CONTRATUERCA PERILLA JOYSTICK 1 Desenrosque la perilla de la palanca del tractor 2 Enrosque el joystick en la palanca ...

Page 55: ...ales del cable del Joystick a la válvula solenoide de la cosechadora figura al lado A continuación conecte los cables positivo y negativo del Joystick a los polos correspondientes de la batería del tractor 12v CABLE ELÉCTRICO NEGRO CABLE ELÉCTRICO COLOREADO VÁLVULA ELÉCTRICA ER2 ER3 ER4 ER1 3 4 1 ...

Page 56: ...l botón GIRAR EL TUBO en el Joystick vea la figura al lado 2 Mueva la palanca de control hidráulico del tractor Cómo regular el quiebra chorro 1 Presione y mantenga presionado el botón GIRAR EL TUBO en el Joystick vea la figura al lado 2 Mueva la palanca de control hidráulico del tractor 4 7 4 Girando el tubo de salida 4 7 5 Mover el quiebra chorro JOYSTICK JOYSTICK MOVER EL QUIEBRA CHORRO El lado...

Page 57: ...vita daños y accidentes en caso de contacto con árboles la red eléctrica etc Para bajar el tubo de salida proceda de la siguiente manera PROCEDIMIENTO 1 Afloje la contratuerca B y el tensor C 2 Retire el pasador de aleta y el pasador D 3 Gire el tubo de salida hacia el frente de la máquina B C D Nunca transporte la máquina con el tubo de salida levantado El contacto con la red eléctrica puede resu...

Page 58: ...el pasador E y suelte los dos brazos tensores F Vuelva a colocar los pasadores aleta E 7 Coloque los brazos tensores F en los dos pasadores del tubo de salida consulte la figura siguiente 8 Asegure los brazos F con los pasadores aleta G E F F F G El lado al que se mueve la palanca hacia adelante o hacia atrás determina la dirección de rotación del tubo de salida Haz una prueba y observa NOTA BAJAR...

Page 59: ...tón LEVANTAR EL TUBO DE SALIDA en el Joystick vea la figura al lado 5 Mueva la palanca de control hidráulico del tractor 6 Conecte el tensor C al tubo de salida utilizando el pasador D 7 Finalmente apriete la contratuerca B B C D F E G 4 7 7 Levantando el tubo de salida F El lado al que se mueve la palanca hacia adelante o hacia atrás determina la dirección de rotación del tubo de salida Haz una p...

Page 60: ... ajusta la altura de corte 4 8 Ajuste de la altura de corte JOYSTICK AJUSTE DE LA ALTURA DE CORTE D Ajuste de la altura de corte 1 Presione y mantenga presionado el botón BAJAR EL TUBO DE SALIDA en el Joystick vea la figura al lado 2 Mueva la palanca de control hidráulico del tractor El lado al que se mueve la palanca hacia adelante o hacia atrás determina si la máquina subirá o bajará Haz una pru...

Page 61: ...DVERTENCIA Apague el motor del tractor y retire la llave de arranque antes de comenzar el procedimiento siguiente Nunca ajuste el tumbador con la máquina encendida Apague el tractor retire la llave del motor de arranque y espere hasta que los rodillos están totalmente inmóviles antes de comenzar el procedimiento CUIDADO Para ajustar el tumbador 1 Retire los cuatro pasadores de bloqueo E dos a cada...

Page 62: ... montar con diferentes configuraciones como se muestra en las siguientes figuras Todas las piezas necesarias para los diferentes conjuntos se suministran con la máquina Configuración estándar para maíz y sorgo Configuración opcional para maíz y sorgo Configuración opcional para pastos y caña ...

Page 63: ...de picado sus pares de engranajes y la cantidad de cuchillas necesarias para obtener cada tamaño ADVERTENCIA Apague el motor del tractor y retire la llave de arranque antes de comenzar el procedimiento siguiente C B A Engranajes de cambio de picado 1 Retire las dos tuercas y arandelas A 2 Retire la cubierta B de la caja de cambio de corte 3 Observe en la tabla arriba cuál par de engranajes debe se...

Page 64: ...os expertos en alimentación animal NOTA El rotor picador de la cosechadora es dimensionado para picar con 3 5 o 15 cuchillas La cantidad de cuchillas utilizados deberá tener en cuenta los siguientes aspectos Producto tipo edad etc Finalidad de la cosecha silaje tracto diario Potencia del tractor utilizado Tamaño de corte deseado Se recomienda para Cosecha de maíz y sorgo 15 cuchillas Recogida de c...

Page 65: ...enimiento y regulaciones de la máquina Utilice guantes adecuados y gafas de protección Tenga especial cuidado al manipular cuchillas y contracuchillas estos componentes poseen áreas cortantes que pueden causar lesiones si se manipulan sin la debida protección y cuidado IMPORTANTE Se recomienda comenzar la extracción con la cuchilla ubicada en la dirección del tornillo que fija el rotor al eje E Es...

Page 66: ... de comenzar el procedimiento siguiente El desbalance del rotor provoca vibraciones que dañan la máquina y pueden provocar accidentes Mantenga la cantidad y posición de las cuchillas limpiadores y lanzadores como se muestra en las figuras anteriores RECUERDE SE Las cuchillas deben colocarse frente a los lanzadores LANZADOR CUCHILLAS adelante de los lanzadores CORRECTO CUCHILLAS detrás de los lanza...

Page 67: ...G 6 Retire los parafusos que fijam la cuchilla que desea retirar Retire la cuchilla 7 Despuesdelaremoción vuelvaacolocarlos elementos desmontados anteriormente F F G D E CUCHILLA ROTOR D Cuchilla IMPORTANTE Donde se retiraron las cuchillas reemplace los tornillos D que aseguran el cubo al disco con Tornillo Cabeza Hexagonal M16 X 50 MB 1 5 CL 10 9 RI ...

Page 68: ...nsecuencia mejor será el rendimiento en la producción de leche y carne Utilice el procesador de granos para cosechar maíz o sorgo Quite el procesador de granos y coloque el fondo liso para cosechar pastos o caña NOTA El sistema de procesamiento de grano PRO consta de dos placas curvas una lisa y otra con agujeros redondos y alargados fabricadas en acero especial de alta resistencia Las particulas ...

Page 69: ...cas A y la tapa B 2 Retire los dos tornillos y turcas C ATENCIÓN Apague el motor del tractor y retire la llave de arranque antes de comenzar el procedimiento siguiente 3 Tire del fondo liso D hacia arriba empújelo sobre el rotor 4 Retire el fondo liso D 4 12 2 Colocación del procesador de granos ...

Page 70: ...6 Con las manos gire el rotor bajando el procesador de granos a la posición de trabajo 7 Fije el procesador de granos en la máquina utilizando los tornillos y tuercas C 8 Vuelva a colocar la tapa B y fíjela con los cuatro tornillos tuercas y arandelas A Para mantener una operción eficiente limpie el procesador de granos periódicamente NOTA A A C B ...

Page 71: ...d de los tambores El sincronismo de rotación entre los tambores de recolección y los rodillos de alimentación genera un flujo de procesamiento de producto ideal garantizando la calidad del corte y evitando problemas de sobrecarga que pueden por ejemplo hacer que los pasadores de seguridad se rompan De manera general La mayor velocidad del tambor se usa para productos con poco volumen y la velocida...

Page 72: ... cambios 3 Coloque el par de engranajes de acuerdo con la velocidad deseada tabla en la página anterior 4 Vuelva a colocar la cubierta E y fíjela con los cuatro tornillos 5 Repita el ajuste en los dos tambores D D ENGRANAJES DE CAMBIO DE VELOCIDAD DE LOS TAMBORES E Cambio de la velocidad de los tambores ...

Page 73: ...en el interior de la carrocería del vehículo utilizado para el transporte Utilice cables amarras cuerdas etc en cantidad suficiente para inmovilizar y mantener la carga estable sobre el camión o carreta Compruebe las condiciones de la carga cables flojos calzos y otros periódicamente durante el viaje Siga siempre la legislación de tránsito vigente Esté atento con relación a la altura total de la c...

Page 74: ...nada de trabajo con la máquina el operador debe efectuar inspecciones de las condiciones de operabilidad y seguridad y si se constatan anormalidades que afectan la seguridad las actividades deben ser interrumpidas hasta que las correcciones sean implementadas Antes de la utilización de la máquina el área más cercana debe controlarse y liberarse Mantenga a distancia de la máquina personas no necesa...

Page 75: ...to del tractor poco a poco hasta alcanzar la más adecuada a las condiciones del producto tales como altura humedad densidad inclinación del terreno etc Antes de comenzar el trabajo realice una prueba de funcionamiento de la máquina de la siguiente manera Asegúrese de que el cardan está debidamente trabado en los ejes de la máquina y en la toma de fuerza del tractor Arranque el tractor Elevar la má...

Page 76: ... natural o en consecuencia de operación inadecuada estas partes pueden sufrir averías Si observa cualquier daño o desgaste en estos elementos de seguridad haga la sustitución inmediata de los mismos utilizando siempre las piezas originales Nunca utilice la máquina faltando elementos de seguridad o en mal estado de conservación pues esto pone en riesgo la seguridad de las personas involucradas en l...

Page 77: ...onsiderando las condiciones de cosecha tales como tipo de cultivo porte de las plantas inclinación del terreno potencia del tractor utilizado etc En general se utiliza Velocidades menores para cultivos voluminosos más altos y o para picado fino Velocidades mayores para cultivos no voluminosos más bajos y o para picado grueso Asegúrese de que su tractor tiene un adhesivo que contiene una tabla y o ...

Page 78: ...ción A en los acoplamientos de las mangueras y en las válvulas del tractor 5 8 Desconectando las mangueras del tractor 5 9 Desacoplando la máquina del tractor Seleccione un lugar plano para desacoplar la máquina del tractor Manténgase atento al realizar este procedimiento hay riesgo de daños personales Desconecte la toma de fuerza y el motor del tractor Estacione la máquina sobre un terreno plano ...

Page 79: ...máquina 6 MANTENIMIENTO Conforme a la Norma Reguladora NR 12 las intervenciones en la máquina deben ser realizadas por profesionales habilitados calificados capacitados o autorizados para este fin LEMBRE El uso de piezas o accesorios no originales de fábrica puede dañar el equipo perjudicar su funcionamiento y provocar accidentes además de implicar la pérdida de la garantía ofrecida El fabricante ...

Page 80: ...en la tabla de torsión de este manual Antes de iniciar una reparación hidráulica alivie la presión en el sistema Apriete periódicamente todas las tuercas y tornillos de fijación Al completar un procedimiento de mantenimiento asegúrese de que todas las protecciones de seguridad estén instaladas antes de poner en marcha la máquina Es obligatorio el uso de equipos de protección individual EPI durante...

Page 81: ...Operador autorizado Tornillos y tuercas de fijación en general Operador autorizado Presión de los neumáticos Operador autorizado Cuchillas de rotor Operador autorizado Aceite de caja de transmisión Operador autorizado Nivel de aceite de caja de transmisión Operador autorizado Mangueras y conexiones hidráulicas Operador autorizado Grasa de caja del rodillos Operador autorizado Puntos indicados en e...

Page 82: ...alizar ACCIONES NECESARIAS Compruebe la holgura entre las cuchillas y la contra cuchilla del rotor Después de cada afilado de las cuchillas del rotor Operador autorizado Sustituya la contracuchilla del rotor Cuando todos los lados están gastados Operador autorizado Reemplace todas las cuchillas del rotor Cuando el desgaste ya no permite afilar y o ajustar con la contracuchilla contracuchilla Opera...

Page 83: ...si están dañadas o desgastadas de modo que sea imposible afilarlas y ajustarlas con las contracuchillas Para mantener el balance del rotor se debe sustituir siempre todas las cuchillas El desequilibrio provocará vibraciones y daños en la máquina IMPORTANTE 6 2 1 Cómo cambiar las cuchillas del rotor 1 Retire los tornillos A y B 2 Retire la cubierta del afilador C 3 Retire los cuatro tornillos D y E...

Page 84: ...provocar un accidente grave Es obligatorio el uso de EPI Equipo de Protección Individual durante la operación mantenimiento y regulaciones de la máquina Utilice guantes adecuados y gafas de protección Tenga especial cuidado al manipular cuchillas y contracuchillas estos componentes poseen áreas cortantes que pueden causar lesiones si se manipulan sin la debida protección y cuidado ATENCIÓN CUIDADO...

Page 85: ...llos D y E 4 Utilizando una llave del tipo L afloje el tornillo H A B C D E Para facilitar el acceso al tornillo H retire la cuchilla que está en la dirección del tornillo F F G H El ajuste adecuado de las cuchillas con la contracuchilla del rotor asegura una mejor calidad del picado requiere menos potencia del tractor además de reducir el consumo de combustible Compruebe el ajuste después de cada...

Page 86: ... manualmente el rotor dando una vuelta completa Observe con atención si no hay contacto de las cuchillas con la contraucchilla Si es necesario vuelva a realizar el ajuste como se describió anteriormente El funcionamiento de la máquina con las cuchillas chocándose en la contracuchilla se dañará y puede provocar el lanzamiento de astillas que pueden llegar a las personas y causar un accidente con da...

Page 87: ... afiladas consumen menos energía del tractor para picar las plantas reducen el consumo de combustible y garantizan la mejor calidad de corte ATENCIÓN Por razones de seguridad antes de comenzar a afilar se deben quitar los engranajes C para que los tambores y rodillos de alimentación dejen de funcionar durante el procedimiento ADVERTENCIA Apague el motor del tractor y retire la llave de arranque an...

Page 88: ...cuidado gire el vástago G para acercar la piedra de las cuchillas hasta que empiecen a chispear 7 Utilizando el vástago G empuje el afilador hasta el final de los rieles Haga una pausa rápida y tire del afiador de nuevo al principio de los rieles 8 Repita el movimiento hacia adelante y hacia atrás del afilador haciendo pausas rápidas al principio y al final del movimiento Repita el movimiento de i...

Page 89: ...n ambas direcciones aumentando así la calidad del hilo Si no se mueve hasta el final del curso se producirá un desgaste irregular en las cuchillas perjudicando la uniformidad del corte E F E A C CUIDADO Se prohíbe la presencia de personas o animales cerca del tubo de salida durante el afilado Durante el procedimiento las chispas pueden ser lanzadas por lo tubo y si llega a personas y animales pued...

Page 90: ...uno nuevo 7 Asegure el conjunto de piedra con los cuatro tornillos G ajuste el afilador a los rieles monte el afilador en la máquina coloque la cubierta del afilador y fíjelo con los dos tornillos A A B C D D F G H Siempre use las piedras originales Una piedra inadecuada puede romperse durante el afilado y causar lesiones y accidentes personales ObligatorioelusodeEPI guantesadecuados y gafas duran...

Page 91: ... piezas de hierro piedra madera etc o si hay alguna sobrecarga durante la cosecha Los rodillos de alimentación dejan de funcionar si el perno fusible se rompe Reemplazar el perno fusible roto de la caja de cambio de corte de la siguiente manera 1 Retire los 2 tornillos C y la cubierta de la caja de engranajes D 2 Retire los dos engranajes E 3 Retire la caja de cambio de corte F El uso de pernos fu...

Page 92: ...ierta D 6 5 2 Cómo cambiar el perno fusible de los tambores Cuando el perno fusible se rompe el tambor deja de funcionar Cambiar el perno fusible como se describe a continuación 1 Retire la cubierta J de la caja de cambios 2 Retire el engranaje más grande K 3 Utilizando el punzón que se encuentra en la caja de herramientas de la máquina retire el perno fusible H que esté roto 4 Instale un nuevo pe...

Page 93: ...es adecuados y gafas de protección CUIDADO Las sierras de tambor están segmentadas Cada sierra consta de cuatro segmentos iguales fijados al tambor por siete tornillos A Siempre que necesite reemplazar debido al desgaste o rotura asegúrese de que la máquina esté apagada y retire todos los tornillos correspondientes a la parte que necesita reemplazo Para su seguridad levante y calce la parte delant...

Page 94: ...ucir una explosión y provocar lesiones graves Para mayor seguridad este trabajo debe ser realizado por un profesional calificado Al inflar el neumático permanezca siempre a un lado y nunca enfrente o sobre él CUIDADO La calibración del neumático determina en gran medida la vida útil del neumático Verifique la presión con el neumático frío y si es necesario calíbrelo Presión recomendada Neumático 6...

Page 95: ... en algunas situaciones pueden ser nocivos para la salud Al utilizar lubricantes es importante 6 8 Lubricación Evitar el contacto directo con dichos productos El aceite puede causar lesiones en la piel Proteger la piel con guantes apropiados Nunca utilice aceite o grasas lubricantes para limpiar las manos Dale al aceite que se descartará el destino previsto en la ley Jamás derrame en el medio ambi...

Page 96: ...ciente cuando se realiza al final del período de trabajo ya que la grasa fluye mejor mientras la máquina está caliente Guarde los lubricantes siempre protegidos del polvo humedad y otros contaminantes Lubricación de los engranajes indicados a la derecha con grasa especial para rodamientos multiuso abasedejabóndelitio clasificación NLGI 2 Ejemplo LUBRAX LITH 2 Lubricar cada 50 horas de trabajo o se...

Page 97: ...plo LUBRAX LITH 2 Lubricar los puntos indicados después de cada 8 horas de trabajo o diariamente Utilizando un engrasador o una bomba lubricar con grasa especial para rodamientos a base de jabón de litio clasificación NLGI 2 Ejemplo LUBRAX LITH 2 Lubrique los puntos indicados después de cada 50 horas de trabajo o semanalmente 6 engrasadores 2 engrasadores 2 engrasadores 1 engrasador ...

Page 98: ... Utilice grasa especial para rodamientos multiuso basada en jabón de litio clasificación NLGI 2 EP Ejemplo LUBRAX LITH 2 Cantidad de grasa 1 5 kg C 6 8 2 Lubricación de engranajes de caja de rodillos Utilizando un engrasador o una bomba lubricar con grasa especial para rodamientos a base de jabón de litio clasificación NLGI 2 Ejemplo LUBRAX LITH 2 Lubrique los puntos indicados en el costado cada 8...

Page 99: ...ÑOL 6 8 3 Lubricación de los cardanes 8 horas 8 horas 20 horas Utilizando un engrasador o bomba lubrique las crucetas de los cardanes cada 8 horas de trabajo Lubricar las barras cada 20 horas Utilizar grasa a base de litio NLGI 2 2 cardans 2 cardans ...

Page 100: ...ceite recomendado 6 Vuelva a colocar el tapón respiradero Aceite recomendado 150 CLP Viscosidad ISO 150 Especificación DIN 51517 3 Capacidad de aceite A Caja de transmissión izquierda 1 5 litros B Caja de transmisión derecha 1 5 litros Verificación del nivel de aceite Limpie alrededor del tapón de nivel de la caja Afloje el tapón de nivel y compruebe que el aceite alcanza el agujero del tapón Si e...

Page 101: ... 5 Abastezca con el aceite recomendado 6 Vuelva a colocar el tapón respiradero Aceite recomendado 150 CLP Viscosidad ISO 150 Especificación DIN 51517 3 Capacidad de aceite C Caja del rotor 2 5 litros Verificación del nivel de aceite Limpie alrededor del tapón de nivel de la caja Afloje el tapón de nivel y compruebe que el aceite alcanza el agujero del tapón Si es necesario añada aceite lubricante ...

Page 102: ...50 Especificación DIN 51517 3 Capacidad de aceite D Caja TDF brazo 2 3 litros Verificación del nivel de aceite Limpie alrededor del tapón de nivel de la caja Afloje el tapón de nivel y compruebe que el aceite alcanza el agujero del tapón Si es necesario añada aceite lubricante hasta que empiece a fluir por el agujero del tapón de nivel Cambio del aceite Primer intercambio después de una semana o 5...

Page 103: ... El aceite drenado deberá ser destinado conformealadeterminacióndelasleyes de preservación del medio ambiente vigentes en el país Jamás derrame el aceite en el medio ambiente Inspeccione también el respiradero debe estar siempre limpio y claro El nivel de aceite incorrecto puede causar calentamiento de la caja de transmisión con serias consecuencias IMPORTANTE ACEITES RECOMENDADOS PETROBRAS LUBRAX...

Page 104: ...erpo y la cara contra salpicaduras de suciedad y restos de aceite La protección insuficiente del cuerpo y la cara puede originar daños graves a la piel ya los ojos Los productos de limpieza con Ph neutro ofrecen la protección óptima de la máquina Los productos con Ph muy bajo o muy elevado pueden ser corrosivos cuando se utilizan en superficies de plástico o goma 6 9 Conservación 6 9 1 Limpieza di...

Page 105: ...te grave al contacto con partes de la máquina en movimiento 6 9 3 Almacenamiento 6 9 4 Retorno al trabajo En el período en que la máquina se quede sin usar antes de guardarla se recomienda realizar la revisión general indicada en el ítem anterior Después de la revisión Afloje completamente las correas y cadenas de transmisión en los modelos donde haya Quite las ruedas Esto aumentará la vida útil d...

Page 106: ...te manipulados almacenados y destinados para que la salud de los trabajadores directamente ligados a su manipulación y la salud de la población no sufran daños No deben desecharse sobre el suelo ni en cursosdeaguaparaevitarlacontaminaciónambiental El aceite lubricante utilizado o contaminado es un residuo peligroso No lo utilice para ningún fin Vuelva a su distribuidor o entregue a un colector aut...

Page 107: ...recta de cuchillas en el rotor Instale la cantidad correcta de cuchillas en el rotor picador Montaje incorrecto de las cuchillas del rotor Ajuste la distribución de las cuchillas en disco del rotor Cuchillas del rotor sin corte Afilar las cuchillas Contracuchilla del rotor sin corte Invierta o cambie la contracuchilla Lanzamiento débil del producto por el tubo de salida Causa probable Solución Tra...

Page 108: ...a velocidad de desplazamiento uniforme Mala organización del transporte de vagones forrajeros Organice el posicionamiento y desplazamiento de los vagones forrajeros Tractor inadecuado Utilice un tractor con potencia adecuada Terreno no indicado para la cosecha mecanizada Plante en terreno más adecuado La máquina no recoge el producto Causa probable Solución Perno s de seguridad roto s Sustituya lo...

Page 109: ...ación excesiva del cardán Causa probable Solución Cardan desbalanceado Compruebe que el ajuste de longitud se ha realizado correctamente Compruebe que el cardán esté bien conectado a la máquina y a la TDF Verifique que las horquillas del cardán estén alineadas ...

Page 110: ... Capacidad productiva estimada Hasta 50 ton h Tamaños de picado mm 15 cuchillas 3 4 5 6 7 9 y 11 5 cuchillas 9 12 15 21 24 y 33 3 cuchillas 15 20 25 35 40 y 55 Estándar de acoplamiento al tractor Categoría 2 Accionamiento Toma de fuerza TDF Peso Aproximado Completo 2625 kg Sin brazo de acoplamiento 2140 kg La productividad citada puede variar debido a factores tales como tamaño de corte masa por h...

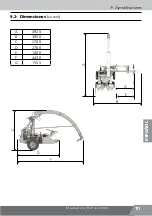
Page 111: ...Manual de Instrucciones 111 9 Especificaciones ESPAÑOL 9 2 Dimensiones en mm C D F A B E G A 4920 B 3850 C 2780 D 2760 E 1400 F 4430 G 1555 ...

Page 112: ...112 Manual de Instrucciones 9 Especificaciones 9 3 Tabla de torque de tornillo Unidad de torque N m ...

Page 113: ...Manual de Instrucciones 113 9 Especificaciones ESPAÑOL 9 4 Tabla de medidas de llaves ...

Page 114: ...l de Instrucciones 9 Especificaciones BIBLIOGRAFIA Normas técnicas observadas en las fases de diseño y construcción de este equipo Norma de Seguridad en el Trabajo en Máquinas y Equipos NR 12 ABNT NBR ISO 121000 ...

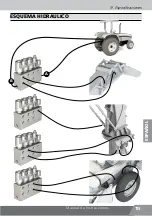
Page 115: ...Manual de Instrucciones 115 9 Especificaciones ESQUEMA HIDRAULICO A B ESPAÑOL ...

Page 116: ...116 Manual de Instrucciones 9 Especificaciones ESQUEMA ELECTRICO CABLE ELÉCTRICO NEGRO CABLE ELÉCTRICO COLOREADO VÁLVULA ELÉCTRICA ER2 ER3 ER4 ER1 3 4 2 1 ...

Page 117: ...personas no auto rizadas por el fabricante 4 4 Empleo de piezas o componentes no originales 4 5 Uso de tractor con potencia superior a la máxima recomendada en el Manual de Instrucciones 4 6 Presentación de Notas Fiscales de compra rasuradas o adulteradas 5 Las reclamaciones sobre eventuales defectos durante el período de la garantía deberán ser presentadas a los revendedores locales que las encam...

Page 118: ...118 Manual de Instrucciones ...

Page 119: ...Manual de Instrucciones 119 ESPAÑOL ...

Page 120: ...120 Manual de Instrucciones ...

Page 121: ...JF 1600 AT S3 MULTI FORAGE PRECISION HARVESTER ENGLISH ENGLISH ...

Page 122: ...ENGLISH ...

Page 123: ...Instructions Manual 3 1 Identification ENGLISH Instructions Manual Multi Forage Precision Harvester JF 1600 AT S3 English JF 1600 AT S3 ...

Page 124: ...ag Your machine is identified with a serial number noted on the tag on the machine By sending messages requesting spare parts or Technical Support always inform the serial number and model of your machine 10 IDENTIFICATION Write down the serial number here ...

Page 125: ...y question offering you effective and permanent technical assistance If you have any questions while reading this manual and or using the machine please contact our After Sales department Mr Owner The images presented in this manual are merely illustrative The products may be equipped with options For easy viewing they may show open or removed security protections Under no circumstances should you...

Page 126: ...3 5 Required Tractor 29 3 6 Items that accompany the machine 30 3 7 Items that accompany the machine 31 4 PREPARATION 32 4 1 Reception 32 4 2 Mounting the machine 33 4 1 1 Mounting the outlet chute 33 4 3 Tractor coupling 37 4 3 1 SIDE coupling 38 4 3 2 REAR Coupling 44 4 3 3 FRONT coupling 45 4 4 Leveling 46 4 5 PTO cardan shaft 47 4 5 1 Cardan shaft length 47 4 5 2 Coupling the cardan shaft 48 4...

Page 127: ... sharpening stone 88 6 5 Safety pins 89 6 5 1 How to replace the safety pin of the cutter set box 89 6 5 2 How to replace the safety pin of the drums 90 6 6 Changing the drum saws 91 6 7 Tire calibration 92 6 8 Lubrication 93 6 8 1 Grease lubrication 94 6 8 2 Lubrication of the platform s gears 96 6 8 3 Cardans lubrication 97 6 8 4 Lubrication with oil 98 6 8 5 Gearboxes A and B 98 6 8 6 Gearbox C...

Page 128: ... by specific instructions These instructions are intended to protect your own safety and the safety of others who work or are near the machine When viewing the SAFETY ALERT SYMBOL in this manual carefully read and follow the instructions below SAFETY ALERT SYMBOL 2 SAFETY PRECAUTIONS The word CAUTION indicates situations where there is potential risk or hazard and if not avoided might cause seriou...

Page 129: ...he power take off of the tractor Secure the ends of the cardan s safety guards at fixed points on the tractor and implement by means of the specific chains for this purpose so that they remain static without turning Never use the cardan without safety guards Read the Instructions Manual before turning the machine on Be aware of and observe all recommendations for use and safety during operation Pa...

Page 130: ...tention might result in a serious accident Before turning on the machine make sure there are no tools or other objects on it Perform a check on the machine noting that there are no loose bolts worn parts cracks leaks or loose parts Observe the surroundings and keep animals and spectators at a safe distance Take special care of children It is forbidden to stand on the machine when it is working or ...

Page 131: ... in the neutral position before turning it off or working on the hydraulic system Make sure that all system components are kept in good condition Wear personal protective equipment PPE protective gloves safety goggles ear plugs safety boots and proper clothes when servicing Keep in mind that moving parts due to inertia remain in motion for some time after the machine is switched off Before touchin...

Page 132: ...s on hydraulic fittings or hoses using adhesive tape staples or cements The hydraulic system operates under extreme pressure Such repairs will suddenly fail and create a dangerous and unsafe condition Hydraulic fluid under pressure can penetrate the skin or eyes and cause serious injury blindness or death If injured by a high pressure hydraulic fluid flow seek medical attention immediately Wear ey...

Page 133: ...nd on bends Always drive the tractor at speeds compatible with the terrain or road conditions and size of the tractor used Avoid sudden maneuvers especially in rough places When towing a load with a weight greater than that of the tractor do not exceed 16 km hour Pay special attention when moving with the machine engaged in sloping terrain If you notice an imbalance reduce the acceleration When de...

Page 134: ...to moving parts or mechanisms Wide clothes and long hair can be picked up by functioning mechanisms Keep hands away from moving parts Never attempt to clean or unclog any part of the machine while it is turned on This procedure can only be carried out with the power take off switched off key removed from the ignition of the tractor and the machine without any movement Be careful of surfaces that m...

Page 135: ...as will not be held responsible for the inadequate use of its equipment The harvester must be used only with accordance with this Manual any other procedure must be avoided 2 8 Clearance 2 8 1 Clearance opening It is important to plan ahead the clearances leaving the necessary gaps in order to allow the harvester to enter the harvesting area We remind you that the harvester has not been developed ...

Page 136: ...ense light radiations Mandatory use at all stages of machine operation Hearing Protection Protection against harmful levels of noise Prolonged exposure to noise can cause damage or hearing loss Mandatory use during machine operation Respirators Protection for activities with chemical products such as fertilizers uncomfortable dust etc Mandatory use in t h e p r e s e n c e o f uncomfortable dust G...

Page 137: ... without being sure that it is completely free of movement Do not touch moving gears During tractor coupling do not stand between machine and tractor The safety stickers affixed to the machine warn of residual risks and alert to procedures to be adopted during the stages of machine use Keep all safety stickers visible and in perfect condition Immediately replace damaged or illegible stickers In ca...

Page 138: ... climb on the cardan shaft Do not open the machine cover when the machine is switched on Keep hands away from moving rotor Prohibited to remain on any part of the machine during operation or transportation It is prohibited to manually feed the machine Risk of outlet chute coming into contact with suspended power lines Risk of electric shock or electrocution ...

Page 139: ...ediately A Cardan shaft safety protections Designed to prevent any contact with the cardan during operation Removal risk of this protection Contact with moving cardan shafts can lead to serious injuries such as fractures kinks mutilation etc which could lead to death In accordance with Regulatory Standard NR 12 fixed protection is considered to be the element specifically used to provide safety th...

Page 140: ...ith the machine on may cause serious injuries such as fractures sprains etc D Air inlet openings The air inlet openings have been designed in accordance with safety standards to prevent contact with the rotor during the operation of the machine Its dimensions prevent the fingers from passing through the holes and reaching the rotor D C Cardan safety protections Designed to prevent any contact with...

Page 141: ...ne manually The drums pull the material before you can release it from your hands and you can be pulled into the machine Risk of serious accident with limb amputation and or death HOW TO ELIMINATE THE RISK It is forbidden to feed this machine manually it is not proper for this Whenever necessary use a chopper equipped with a feeding chute suitable for this purpose Even with the use of appropriate ...

Page 142: ...sport nor during operation Turn off the tractor remove the key from the ignition and wait until the machine is idle before approaching or climbing any part of the harvester Do not stand in front of the outlet chute If the machine picks up some foreign matter nails metals etc shrapnel may be thrown by the outlet chute and hit you causing serious injury HOW TO ELIMINATE THE RISK Never stay inside th...

Page 143: ...chine or tractor from moving Do not stand between machine and tractor during the coupling Make sure the tractor brakes are engaged before starting the coupling Do not carry the machine with the outlet chute lifted Risk of electric shock and electrocution in case of contact with wires of the electric power grid HOW TO ELIMINATE THE RISK Lowerthechutewheneveryouaretransporting the machine When lifti...

Page 144: ...rpening the Rotor Knives Never approach the saws with the machine on Contact with moving drum saws will cause very serious injury Risk of disruption of the parts in contact with the knives legs arms hands HOW TO ELIMINATE THE RISK Never approach the machine s feeding area drums and saws while it is in motion Caution The saws when they are turning are almost imperceptible Never approach or attempt ...

Page 145: ...r Tilts and directs the crops 6 Rotor Chops and throws the forage to the chute 7 Sharpener Sharpens the rotor knives 8 Cutter Set Box Changes the cut length 9 Aligners Directs the crop to the drums 10 Drums Gathers the crops 11 Speed Gearbox Changes the drum speed 12 Saws Mow the plants 13 Support Wheel Wheel with tire and tube 14 PTO Gearbox Transmits power and rotation 3 PRESENTATION 4 5 6 7 1 2...

Page 146: ...rnal Cardan Shaft Transmits power and rotation 17 Support Leg Parking support 18 Hitch Coupling point for truck or wagon 19 Tool Box Box containing items that come with the machine 20 Arm Arm for lateral coupling to the tractor Optional item 13 19 17 14 16 20 18 15 direction of rotor rotation ...

Page 147: ...draulic lift system platform with two front and two rear rollers one of which is movable with a cutter set box for varying the cutting length a chipper rotor containing fifteen knives a swivel outlet chute hydraulically operated and a deflector to directs the chopped crop This machine is designed exclusively for use in agricultural or similar operations and should only be used for its intended pur...

Page 148: ...uired The Harvester is available in the following versions With tractor coupling arm and 540 rpm on the PTO With tractor coupling arm and 1000 rpm on the PTO With rear kit for rear coupling and 540 rpm on the PTO With rear kit for rear coupling and 1000 rpm on PTO WITH TRACTOR COUPLING FRAME WITH REAR KIT FOR REAR COUPLING ...

Page 149: ...r through the three point hydraulic lift system and driven through the power take off As you progress through the crop circular saws mounted on the two front drums cut through the crops that are in the working range of the head The plants are gathered by the drums to the platform where two front feeding drums collect and two rear rollers lead them to the chopper rotor PROCESSING The harvested plan...

Page 150: ...2 093645 Toolbox 2 2 02 126217 Gear Z94 MOD 2 25 3 2 02 126219 Gear Z62 MOD 2 25 4 2 02 126071 Gear Z103 MOD 2 25 5 2 02 126081 Gear Z53 MOD 2 25 6 1 03 016156 Cutting Gear C 18 7 1 03 016155 Cutting Gear C 14 8 1 03 016152 Cutting Gear C 5 9 1 03 016151 Cutting Gear C 3 10 1 02 126333 Hitch Pin 3rd Point Category 3 11 1 02 106675 Sharpener s Handle ...

Page 151: ...sentation ENGLISH 3 7 Items that accompany the machine 3 1 2 4 4 ITEM QTY CODE DESCRIPTION OF PRODUCT 1 1 02 045091 Pin Punch 2 2 05 000281 Heavy Elastic Pin 13 x 60 mm 3 2 05 001495 Elastic Pin 8 x 60 mm 4 10 05 077722 Safety Pin ...

Page 152: ...case always lift the machine by the points indicated in the picture below LIFTING POINTS Moving the packed machine Keep a safe distance when you lift the machine Do not allow the presence of people near the machine during the lifting Remember that it is possible for a side movement to happen intentional or not when the machine is suspended Never stand under a suspended machine Lift the machine onl...

Page 153: ...instructions that follow to proceed with its assembly OUTLET CHUTE COMPONENTS E D B C C P P A J R Q R R 1 Assemble the deflector A on the chute segment B Secure them with the pin C and the two counter pins P 2 Place the pin Q the two articulators R Secure them with the two counter pins P P Counter pin 1 8 x 1 02 pcs P Counter pin 1 8 x 1 02 pcs 4 2 Mounting the machine ...

Page 154: ...h the eight bolts washers and nuts T 5 Assemble the hydraulic cylinder G Secure it with the washers and nuts U 6 Connect the two hoses to the hydraulic cylinder G T Carriage bolt M10 x 30 mm 08 pcs T Flat Washer M10 08 pcs T Lock nut M10 08 pcs T Carriage bolt M10 x 30 mm 08 pcs T Flat Washer M10 08 pcs T Lock nut M10 08 pcs U Flat washer M10 02 pcs U Lock nut M10 02 pcs D E T F D T G U U ...

Page 155: ...T fixing them at the outlet chute with the bolts washers and nuts S 9 Using a crane lift the chute and position it on the outlet chute 10 Place the pin X fit the two tensioners T and place the two locks V 11 Secure the tensioner to the chute with the 1 2 3 4 M Flat washer M8 08 pcs M Lock nut M8 08 pcs M T T T X T V L S S Hex nut M12 x 40 mm 02 pcs S Flat washer M12 02 pcs S Lock nut M12 02 pcs V ...

Page 156: ...djust the tensioner length H 12 Tighten the tensioner by turning the spindle H Retighten the jam nut G 13 Attach the 4 hoses of the hydraulic motor and the deflector to the outlet chute s fasteners fig beside 14 Fit the hydraulic cylinder M securing it with pins P and Q Mount the 4 counter pins R R Counter pin 3 16 x 1 1 2 04 pcs L ...

Page 157: ...c lift points of the tractor During coupling Make sure the tractor is braked Operate the tractor s three point hydraulic system slowly and carefully Never stand between the tractor and the machine The side coupling is only available in the with coupling arm version Before coupling check that the tractor s power is compatible with the power requested by the machine and that the three point hydrauli...

Page 158: ...arm A then the right arm B and finally the third point C 3 Lock the arms with the locking pins provided with the machine In order to facilitate the transport generally the frame for side coupling of the harvester to the tractor remains disassembled and folded as shown in the figure on the side For the side coupling of the machine assemble the side frame according to the instructions below 4 3 1 SI...

Page 159: ... 4 Lift the hydraulic a little enough to remove the frame from the floor 5 Lift the support foot B and secure it in the resting position 6 Remove the pin C 7 Articulate the arm D figure beside 8 Secure the arm in this position using the regulator E D E ...

Page 160: ...F and G as described below 10 Push the locking pin H of the coupler spring pin see the figure on the side 11 Rotate the lock pin H to lock it in this position see the figure at the side 12 Repeat the above procedure on the other arm lock 13 Move the tractor hooking the arm to the two pins of the machine ...

Page 161: ... pin head must enter the hole see the figure on the side 15 Repeat the procedure on the lock of the other hitch After engaging the machine to the side frame turn the two pins H activating the coupling locks again If this is not observed the machine may disengage from the arm with the risk of accident with material and personal damage ATTENTION ...

Page 162: ...on the side After coupling Place the regulator E in the position shown on the side IMPORTANT IMPORTANT E P Observing the procedures described above is very important for the arm to articulate during operation or transportation and allow the wheels to follow the unevenness of the terrain ATTENTION ...

Page 163: ...ing pins E on the 3 coupling pins Failure to follow these instructions can lead to personal injury and property damage CAUTION GAP After coupling make sure there is sufficient clearance between the tractor rear tire and the machine as shown in the picture besides Using the tractor stabilizers and adjust the side clearance If in doubt consult the manual of the tractor used E ...

Page 164: ...UTION 4 Preparation 1 Approximate the tractor to the machine aligning the tractor power take off to the machine s drive shaft 2 Start the coupling by the left arm A then the right B and finally the hydraulic cylinder C 3 Lock the arms with the locking pins E provided with the machine 4 3 2 REAR Coupling Using the tractor stabilizers center the machine with the tractor and adjust the lateral cleara...

Page 165: ...actor with direction of rotation contrary to the standard image below the inverter rotation kit must be used As it is a specific accessory for this tractor condition the INVERSOR KIT is not supplied with the harvester and can be purchased separately ROTATION INVERTER KIT 4 3 3 FRONT coupling Standard direction of rotation according to ISO WD 8759 3 Coupling to the tractor is done through the three...

Page 166: ...the machine ATTENTION 4 4 Leveling Cross Level Longitudinal Level Lift the machine about 20 cm from the ground By looking from the tractor rear end check if the machine is parallel with the ground Lower the machine and make the necessary adjustments Looking at the machine on its side check that it is level Make the corrections by adjusting the arm length of the third point of the hydraulic lift ...

Page 167: ... above If there is not the indicated gap it will be necessary to cut the cardan Mark the tube where the cuts will be made leaving the gap indicated on the next page Disengage the cardan from the machine and tractor and make the cuts 4 5 PTO cardan shaft 1 Start the hydraulics and position the machine s shaft at the same height as the tractor power take off see figure below 4 5 1 Cardan shaft lengt...

Page 168: ... and the plastic protection of the cardan should have the same length Using a lime remove all the filings from the tubes Then lubricate with a thin layer of grease Special attention should be given to the tube and bar mounting on the square profile cardans The Terminals should be aligned as shown in the figures below Misaligned terminals generate vibrations wear and cardan breaks RIGHT aligned WRO...

Page 169: ...ion may damage the machine and cause a serious accident if someone is struck by it Do not enter the cardan shaft work area while the machine is in motion any contact with the cardan shaft can cause a serious accident Do not wear wide clothes with belts or parts that may catch on the cardan s moving parts Never use the cardan without its protective cover CAUTION Do not work with the cardan shaft wi...

Page 170: ...necting the hoses from the tractor With the tractor remote control levers in the neutral position pull the hoses quickly disconnection will occur with minimal loss of oil Before connecting and disconnecting the hoses it is necessary to relieve the pressure in the hydraulic system To do this turn off the tractor and activate the levers some times relieving the system With the control levers in the ...

Page 171: ... LOWER THE OUTLET CHUTE ROTATE THE OUTLET CHUTE The harvester leaves the factory equipped with a hydraulically controlled outlet chute The direction of the deflector and the movements to raise lower the chute are performed by hydraulic cylinders The turning movement is performed by a hydraulic motor ...

Page 172: ...to move the deflector directing the jet of chopped crop 4 7 1 Joystick 4 7 2 Mounting the Joystick on the Tractor The Joystick must be mounted on the tractor s hydraulic control lever as it will be activated simultaneously with the lever JOYSTICK HYDRAULIC LEVER HYDRAULIC LEVER JAM NUT HANDLE JOYSTICK 1 Unscrew the tractor lever handle 2 Thread the joystick onto the lever ...

Page 173: ...ions Connect the cable terminals of the joystick to the Harvester s electro valve see figure Then connect the positive and negative wires of the Joystick to the corresponding poles of the tractor battery 12 V BLACK WIRE COLORED WIRE ELECTRO VALVE ER2 ER3 ER4 ER1 3 4 1 ...

Page 174: ...the Joystick see the figure beside 2 Move the tractor hydraulic control lever To adjust the deflector 1 Press and hold the MOVE THE DEFLECTOR button on the Joystick see the figure at the side 2 Move the tractor hydraulic control lever 4 7 4 Rotating the outlet chute 4 7 5 Moving the deflector JOYSTICK JOYSTICK MOVING THE DEFLECTOR The side to which the lever is moved forward or backward determines...

Page 175: ...ust be lowered This procedure prevents damage and accidents from occurring in the case of contact with trees the power grid etc To lower it proceed as follows PROCEDURE 1 Loosen the jam nut B and the tensioner C 2 Remove the counter pin and the pin D B C D Do not carry the machine with the chute lifted Any contact with the power grid can result in an electric shock and or electrocution accident CA...

Page 176: ...ver 6 Remove the counter pin and the pin E and release the two tensioning arms F Replace the counter pins E 7 Fit the tensioning arms F to the two pins of the lifting tube see figure on the side 8 Secure the arms F with the counter pins G E F F F G The side to which the lever is moved forward or backward determines whether the chute will lift or lower Take a test and observe NOTE LOWER THE CHUTE J...

Page 177: ... hold the LIFT THE CHUTE button on the Joystick see the figure opposite 5 Move the tractor hydraulic control lever 6 Secure the tensioner C to the chute with the pin D 7 Finally tighten the jam nut B B C D F E G 4 7 7 Lifting the outlet chute F The side to which the lever is moved forward or backward determines whether the chute will lift or lower Take a test and observe NOTE LIFT THE CHUTE JOYSTI...

Page 178: ... cylinder D adjusts the cutting height 4 8 Adjusting the cutting height JOYSTICK TO ADJUST THE CUTTING HEIGHT D To adjust the cutting height 1 Press and hold the ADJUST THE CUTTING HEIGHT button on the Joystick see the figure on the side 2 Move the tractor hydraulic control lever The side to which the lever is moved forward or backward determines whether the machine will raise or lower Take a test...

Page 179: ... vice versa 4 9 Adjusting the bender ATTENTION Turn off the tractor and remove the ignition key before starting the following procedure Never adjust the bender with the machine on Turn off the tractor remove the key from the ignition and wait until the rollers stop turning completely before starting the procedure CAUTION To adjust the bender 1 Remove the four locking pins E two on each side of the...

Page 180: ...ounted with different configurations as shown in the figures on the side All parts required for the different assemblies are supplied with the machine Standard configuration for corn and sorghum Optional configuration for corn and sorghum Optional configuration for grass and cane ...

Page 181: ...hows the possible cuts their gear pairs and the number of knives required to obtain each size ATTENTION Turn off the tractor and remove the ignition key before starting the following procedure C B A Cutting gears 1 Remove the two nuts and washers A 2 Remove the cover B from the cutter set box 3 Note in the table above which pair of gears should be mounted to obtain the desired chop size 4 Change t...

Page 182: ...E CLEANER LAUNCHER The chopping rotor of the harvester is designed to chop with 15 5 or 3 knives The quantity of knives used should take into account the following aspects Crop type age etc Purpose of harvest silage daily treatment Tractor power used Cutting size desired It is recommended for Harvesting corn and sorghum 15 knives Harvesting sugar cane and elephant grass 5 knives This is not a rule...

Page 183: ...t proper protection and care CAUTION The machine leaves the factory ready to harvest with 15 knives If you want to harvest with 3 or 5 knives you must be aware of the correct positioning during the removal of the knives according to the following instructions IMPORTANT It is recommended to start the removal with the knife located on top of the bolt that secures the rotor to the shaft E This will m...

Page 184: ...itioning of the knives cleaners and launchers as shown in the figures above REMEMBER The knives must be positioned in front of the launchers LAUNCHER IMPORTANT KNIFE KNIVES back launchers KNIVES in front launchers RIGHT WRONG To change the number of rotor knives ATTENTION Turn off the tractor and remove the ignition key before starting the following procedure ...

Page 185: ... After removing the knives replace any previously removed items F F G 1 Remove the bolts A and B 2 Remove the sharpener cover C 3 Remove the bolts D and B 4 Remove the bolts F 5 Carefully remove the rotor cover G D E KNIFE ROTOR D KNIFE IMPORTANT Where the knives were removed replace the bolts D that secure the hub to the disc with Hex Bolt M16 X 50 MB 1 5 CL 10 9 RI ...

Page 186: ...ction Place the grain processor to harvest corn or sorghum Remove the grain processor and put the smooth plate to harvest grasses or sugar cane NOTE The Kernel Processor System PRO consists of two curved plates one smooth and the other with round and oblong holes made of special high strength steel The particles of chopped material are released by the high speed rotor against the processor they ar...

Page 187: ...e the four bolts and nuts A 2 Remove the cover B 3 Remove the two bolts and nuts C 4 Remove the smooth plate D ATTENTION Turn off the tractor and remove the ignition key before starting the following procedure 4 12 2 Kernel Processor placement A A C B D ...

Page 188: ...rotor 6 With your hands rotate the rotor lowering the kernel breaker to the working position 7 Fix the grain processor with the screws and nuts C 8 Replace the cover B and secure it with the four screws nuts and washers A E A A B NOTE To maintain efficiency in breaking of the grains periodically clean the processor ...

Page 189: ... can change the speed of the drums The rotation synchronism between the drums and the feeding drums generates an ideal crop processing flow guaranteeing the cut quality and avoiding overload problems that can for example cause the safety pins to break In general Higher drum speed is used for crops with little volume and lower speed for more bulky crops DRUMS SPEED OF THE DRUM GEARS A B SLOWER FAST...

Page 190: ...emove the cover E from the gearbox 3 Place the gear pair according to the desired speed table on the previous page 4 Replace the cover E and fix it with the bolts D 5 Repeat the adjustment on the two drums D D Drums speed change gears E To change de speed of drums ...

Page 191: ...ine must be completely inside the bodyshell of the vehicle used for transport Use cables ropes etc in enough quantity to immobilize and keep the load stable on the truck or cart Check the load conditions loose cables chocks and others periodically during the trip Always follow the current traffic regulations Be aware of the total height of the load especially under power grid overpasses and others...

Page 192: ...nts 5 OPERATION At the beginning of each working day with the machine the operator must inspect the operational and safety conditions and if abnormalities that affect safety are detected the activities should be interrupted until the corrections are implemented Before switching on the machine the nearest area must be controlled and released Keep away from the machine persons not required for opera...

Page 193: ...of the tractor s movement gradually until it reaches the most appropriate conditions of the crop such as height humidity density slope of the terrain etc Before starting to work perform a preventive test as follows Make sure the cardan shaft is properly locked in the machine shaft and in the power take off of the tractor Turn on the tractor Raise the machine to the desired distributing height resp...

Page 194: ...t conditions of use Due to natural wear or improper operation these parts may be damaged If you notice any damage or wear on these safety items replace them immediately using the original parts Never use this machine with missing or poorly maintained safety items as this may endanger the safety of persons involved in the operation At harvest site Lift and lock the outlet chute Turn the chute by po...

Page 195: ...sting conditions such as type of crop size of plants slope of terrain power of the tractor used etc In general it is used For bulky crops taller and or for fine chopping lower speeds should be used For not so bulky crops shorter and or thick chopping higher speeds can be used Make sure your tractor has a sticker containing a chart and or graph scale that reports the speed for several revolutions p...

Page 196: ...sert all the protective caps A into the hose couplings and the tractor valves 5 8 Disconnecting hoses 5 9 Uncoupling the machine from the tractor Choose a flat location to uncouple the machine from the tractor Be aware when performing this procedure there is a risk of personal injury Turn off the power take off Park the machine on a level and sturdy ground Engage the tractor s parking brake Lower ...

Page 197: ...your machine 6 MAINTENANCE According to Standard NR 12 interventions in the machine must be performed by qualified qualified trained or authorized professionals for this purpose REMEMBER The use of non original parts or accessories may damage the equipment impair its operation and cause accidents as well as forfeit the warranty The manufacturer is not responsible for injuries or damages caused by ...

Page 198: ...he proper torque as specified in the torque chart in this manual Before starting a hydraulic repair relieve pressure on the system Tighten all nuts and bolts periodically When completing a maintenance procedure make sure all safety guards are installed before operating the machine The use of personal protective equipment PPE is mandatory during maintenance services on the machine After the first 5...

Page 199: ...ED Security protections Operator authorized Fixing screws and nuts in general Operator authorized Tires pressure Operator authorized Rotor knives Operator authorized Gearbox oil Operator authorized Gearbox oil level Operator authorized Hydraulic hoses and connections Operator authorized Drum Gearbox grease Operator authorized All points indicated in the Grease lubrication item Operator authorized ...

Page 200: ...e retighten sharpen perform ACTIONS REQUIRED Check the gap between the knives and the counter knife of the rotor After each sharpening of the rotor knives Operator authorized Replace the rotor counter knife When all sides are worn Operator authorized Replace all rotor knives When the wear no longer allows sharpe ning and or adjustment with the counter knife Operator authorized Replace the sharpene...

Page 201: ...s must be replaced when there is worn or damaged making it impossible to sharpen and adjust with the counter knife To keep the rotor balance always replace all knives The unbalance will cause vibrations and machine damage IMPORTANT 6 2 1 How to change the rotor knives 1 Remove the bolts A and B 2 Remove the sharpener cover C 3 Remove the four bolts D and E A B C D E ...

Page 202: ...e a serious accident The use of PPE Personal Protective Equipment is mandatory during operation maintenance and adjustment of the machine Wear suitable gloves and eye protection Take special care when handling knives and counter knife these components have sharp areas that can cause injury if handled without proper protection and care ATTENTION CAUTION 4 Remove the four bolts F 5 Carefully remove ...

Page 203: ...olts D and E 4 Using a socket or an allen key loosen the bolt H A B C D E To facilitate the access to the bolt H remove the knife that is in the direction of the bolt F F G H Proper adjustment of the knives with the rotor counter knife ensures better cutting quality requires less tractor power in addition to reducing fuel consumption Check the adjustment after each sharpening of the knives trying ...

Page 204: ...ent is mandatory during operation maintenance and adjustment of the machine Wear suitable gloves and eye protection Take special care when handling knives and counter knife these components have sharp areas that can cause injury if handled without proper protection and care 5 Using the same tool tighten the bolt J to move the rotor over the shaft bringing the knives closer to the counter knife 6 M...

Page 205: ...gears from the drums before starting sharpening 1 Remove the covers A from the two gearboxes 2 Remove the gears C from the two drums to immobilize them during sharpening ATTENTION Replace the covers A at the drum gearbox before start to sharp the knives ATTENTION Turn off the tractor and remove the ignition key before starting the following procedure ATTENTION For safety reasons before starting th...

Page 206: ...arefully turn the rod G to bring the stone closer to the knives until the sparks begin 7 Using the rod G push the sharpener to the end of the rails Take a quick break and pull the sharpener back to the top of the rails 8 Repeat the back and forth movement of the sharpener making quick pauses at the beginning and end of the movement Repeat the back and forth movement 4 times 9 After sharpening turn...

Page 207: ...e cutting edge If it does not move until the end of the stroke it will cause an irregular wear on the knives damaging the uniformity of the cut E F E 12 Replace the cutting gears C the covers A and fix it with the screws on the two drums 13 Replace the cover F and fix it with the bolts E A C CAUTION The presence of people or animals near the outlet chute during sharpening procedure is prohibited D...

Page 208: ...7 Fix the stone assembly with the four bolts G fit the sharpener to the rails mount the sharpener on the machine place the sharpener cover and secure it with the two bolts A A B C D D F G H Always use original stones Inappropriate stone may break during sharpening and cause an accident with personal injury and damage to the machine The use of PPE suitable gloves and safety goggles is mandatory dur...

Page 209: ... wood etc or if there is any overload during the operation When the safety pin on the feeding drums breaks it stops working Replace the pin of the cutter set box proceeding as follows 1 Remove the 2 bolts C and the cover of the cutter set box D 2 Remove the two gears E 3 Remove the cutter set box F 4 Using the pin punch found in the machine toolbox remove the safety pin The use of improper safety ...

Page 210: ...n of the drums When the safety pin of one of the drums breaks it stops working Replace the pin on that drum proceeding as described below 1 Remove the cover J from the gearbox 2 Remove the bigger gear K 3 Using the pin punch found in the machine toolbox remove the safety pin L that is broken 4 Install a new safety pin 5 Using a compression punch crimp the pins ends so that they are tightly mounted...

Page 211: ... gloves and goggles Take special care when handling the saws CAUTION The drum saws are segmented Each saw consists of four equal segments fixed to the drum by seven bolts A Whenever you need to replace due to wear or breakage make sure that the machine is turned off and remove all bolts corresponding to the part that needs replacement For your safety lift and chock the front of the machine before ...

Page 212: ... resulting in serious injury For greater safety this work must be performed by a qualified professional When inflating the tire always stay at the side and never in front of or on it CAUTION Tire calibration largely determines tire life Check the pressure with the cold tire and if necessary calibrate it Recommended pressure Tire 60 pounds inch 60 psi 4 1 bar According to Manufacturer PROPER INFLAT...

Page 213: ...dditives which in some situations can be harmful to health When using lubricants it is important to 6 8 Lubrication Avoid direct contact with such products Oil can cause skin damage Protect the skin with suitable gloves Never use oil or grease to clean your hands Give the discarded oil the destination provided by law Never spill it into the environment Get medical attention if skin irritation deve...

Page 214: ... is most efficient when done at the end of the working period because the grease flows better while the machine is still hot Store lubricants always protected against dust moisture and other contaminants Lubricate the gears indicated on the side with special bearings grease based on lithium soap NLGI classification 2 Example LUBRAX LITH 2 Lubricate every 50 hours of work or weekly IMPORTANT ...

Page 215: ...tion 2 Example LUBRAX LITH 2 Lubricate the following points every 8 working hours or daily Using a grease gun or pump lubricate with special grease for bearings based on lithium soap NLGI classification 2 Example LUBRAX LITH 2 Lubricate the following points every 50 working hours or weekly 6 grease points 2 grease points 2 grease points 1 grease point ...

Page 216: ...rease and add new grease Use a grease based on lithium soap NLGI classification 2 Example LUBRAX LITH 2 Grease quantity 1 5 kg C 6 8 2 Lubrication of the platform s gears Using a grease gun or pump lubricate with special grease for bearings based on lithium soap NLGI classification 2 Example LUBRAX LITH 2 Lubricate the following points every 8 working hours or daily 4 grease points ...

Page 217: ... Cardans lubrication 8 hours 8 hours 20 hours Using a grease gun or a pump grease the cardan crossheads every 8 working hours Lubricate the shafts every 20 hours Use lithium based soaps lubrication greases grade NLGI 2 2 cardans shafts 2 cardans shafts ...

Page 218: ... the drain plug 5 Fill with the recommended oil 6 Replace the breather Recommended oil 150 CLP Viscosity ISO 150 Specification DIN 51517 3 Oil Capacity A Left Gearbox 1 5 liter B Right Gearbox 1 5 liter Checking the oil level Wipe around the level plug on the gearbox Loosen the level plug and check that the oil reaches the hole in the plug If necessary add lubricating oil until it begins to seep t...

Page 219: ... Replace the drain plug 5 Fill with the recommended oil 6 Replace the breather Recommended oil 150 CLP Viscosity ISO 150 Specification DIN 51517 3 Oil Capacity C Rotor Gearbox 2 5 liters Checking the oil level Wipe around the level plug on the gearbox Loosen the level plug and check that the oil reaches the hole in the plug If necessary add lubricating oil until it begins to seep through the hole ...

Page 220: ...the drain plug 5 Fill with the recommended oil 6 Replace the breather Recommended oil 150 CLP Viscosity ISO 150 Specification DIN 51517 3 Oil Capacity D PTO Gearbox arm 2 3 liters Checking the oil level Wipe around the level plug on the gearbox Loosen the level plug and check that the oil reaches the hole in the plug If necessary add lubricating oil until it begins to seep through the hole in the ...

Page 221: ... skin damage The drained oil should be destined as determined by the laws of environmental preservation in force in the country Never spill oil in the environment Also inspect the breather it should always be clean and unobstructed Incorrect oil level may cause gearbox heating with serious consequences IMPORTANT RECOMMENDED OILS PETROBRAS LUBRAX GEAR 150 TEXACO MEROPA 150 AGIP BLASIA 150 SHELL OMA...

Page 222: ...on a machine general overhaul at your dealer or at the factory Do a completely and rigorously machine washing Dry any water accumulated in the machine guards Retouch the paint where it is needed Replace worn or damaged parts Apply anti corrosive oil to the metal parts of the machine Lubricate properly Attention during cleaning work guarantees safety to all involved Lack of attention can result in ...

Page 223: ...risk of a serious accident to contact with parts of the machine in motion 6 9 3 Storage 6 9 4 Back to work In the period that the machine goes unused before storing it it is recommended to perform a general overhaul indicated in the previous item After overhaul Fully loosen the belts and drive chains where fitted Remove the wheels This will increase tire life on models equipped with wheel Store th...

Page 224: ...erly handled stored and intended so that the health of workers directly linked to their handling and the health of the population are not harmed They should not be dumped on the ground or in waterways to avoid environmental contamination Used or contaminated lubricating oil is a hazardous waste Do not use it for any purpose Return it to your dealer or hand it over to an authorized dealer Plastic p...

Page 225: ...Excessive traveling speed Reduce speed Incorrect quantity of rotor knives Install the correct quantity of rotor knives Incorrect mounting of rotor knives Adjust the correct distribution of knives Dull rotor knives Sharpen the knives Dull rotor counter knife Turn over the counter knife or replace it Weak releasing of chopped crop by the chute Probable cause Solution Tractor below the minimum recomm...

Page 226: ...our work speed as constant as possible Bad forage wagon transport logistic or organization Organize the positioning and shifting from forage wagons Inadequate tractor Use a tractor with adequate power Improper ground for mechanized harvesting Cultivate on proper ground The machine does not gather the crop Probable cause Solution Broken safety pin s Replace the safety pin s Tractor below the minimu...

Page 227: ... ENGLISH Excessive cardan vibration Probable cause Solution Unbalanced cardan Check if the length adjustment was performed properly Check that the cardan shaft is well attached to the machine and the PTO Check if the cardan yokes are aligned ...

Page 228: ...production capacity Up to 50 ton h Theoretical Length of Cut mm 15 knives 3 4 5 6 7 9 and 11 5 Knives 9 12 15 21 24 and 33 3 knives 15 20 25 35 40 and 55 Standard for tractor coupling Category 2 Activation Power take off PTO Approximate weight Complete 2625 kg Without coupling frame 2140 kg Productivity mentioned above might vary depending on factors such as chopping size mass per hectare availabi...

Page 229: ...Instructions Manual 109 9 Specifications ENGLISH 9 2 Dimensions in mm C D F A B E G A 4920 B 3850 C 2780 D 2760 E 1400 F 4430 G 1555 ...

Page 230: ...110 Instructions Manual 9 Specifications 9 3 Bolt torque table Torque unit N m ...

Page 231: ...Instructions Manual 111 9 Specifications ENGLISH 9 4 Gauge keys table ...

Page 232: ...uctions Manual 9 Specifications BIBLIOGRAPHY Technical standards observed during the design and construction phases of this equipment Safety Standard for Work in Machinery and Equipment NR 12 ABNT NBR ISO 121000 ...

Page 233: ...Instructions Manual 113 9 Specifications HYDRAULIC SCHEME A B ENGLISH ...

Page 234: ...114 Instructions Manual 9 Specifications ELECTRIC SCHEME BLACK WIRE COLORED WIRE ELECTRO VALVE ER2 ER3 ER4 ER1 3 4 2 1 ...

Page 235: ...ion Manual 4 3 Modifications adaptations and or repairs carried out by persons not authorized by the manufacturer 4 4 Use of non original parts or components 4 5 Use of tractor with power greater than the maximum recommended in the Instruction Manual 4 6 Presentation of purchase invoices shaved or adulterated 5 Complaints about any defects during the warranty period should be submitted to the loca...

Page 236: ...116 Instructions Manual ...

Page 237: ...Instructions Manual 117 ENGLISH ...

Page 238: ...118 Instructions Manual ...

Page 239: ......

Page 240: ...já Itapira SP Brazil Código Postal Zip Code 13973 900 Caja Postal PO Box 114 Teléfono Phone 55 19 38639600 CNPJ 46 127 635 0001 55 e mail falecom jfmaquinas com br www jfmaquinas com 05 201083 Publicação 02 21 Revisão 3 LA SOLUCIÓN PARA EL PRODUCTOR THE SOLUTION FOR THE PRODUCER ...

Reviews: