


58
Jetter AG
6 Initial commissioning
Creating and configuring a visualization project in JetViewSoft
JetViewSoft lets you create visualization files for the JVM-507B and upload
them to the HMI. This topic covers the following:
Creating a project in JetViewSoft
Defining the project settings.
Creating visualization files and uploading them to the HMI.
The following prerequisites must be fulfilled:
JetViewSoft must be installed on the PC.
JetViewSoft must be licensed (see Online Help in JetViewSoft).
An active Ethernet connection between the PC and the HMI has been set
up.
To create a new project for the HMI in JetViewSoft, proceed as follows:
Step
Action
1
Start JetViewSoft
2
Open the
File
menu. Select menu item
New Project
.
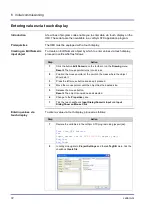
Result:
The following dialog box opens:
3
Select in
Selected display:
the HMI used. To do so, click on the image of
the corresponding HMI.
4
In
Display name
, select a program-internal name for the HMI. You can
add one or more HMIs to a project.
5
Select
JetView-ER-STX (CE)
.
6
In
Project name
, enter the name of the project.
7
If necessary, change the project menu path under
Location
.
For the sake of clarity, the end of the path name should be
\Visu
.
8
Enter the name of the workspace into
Workspace
.
Introduction
Prerequisites
Creating a project


