background image

Page 24 

Bullfrog Spas Owner’s Manual 

pump. 

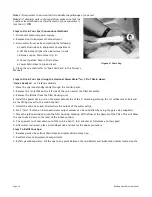
With a two-pump spa you get two JetZones. Each of these 

JetZones can be customized with the use of a JetZone 

Divider (Fig. Q). 

By simply moving the JetZone Divider, you can either 

increase or decrease the number of JetPaks that are 

powered by a particular pump, thus creating a new 

JetZone. By adding JetPaks to a particular JetZone you will 

decrease the power to that zone. By removing JetPaks 

from a particular zone you will increase the power to that 

zone. 


TO CREATE A NEW JETZONE: 

1. Put the spa in "Standby Mode". This will prevent the 

pump(s) from activating while disconnecting JetPaks. (See 

"Standby  Mode" under "OPERATION" in this Manual.) 

2. Locate the JetPak that contains the JetZone Divider. 

3. Remove the headrest. 


4. Using your hands, remove the SnapCap

 by lifting it 

upward. 

5. Push the JetPak forward until you have enough room 

to reach the two PVC unions. 

6. Using your hands, loosen the two PVC water unions as 

well as the air line union. 

7. Pull the manifold out from between the two unions 

and then remove the JetPak from the JetPod. 

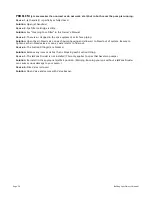
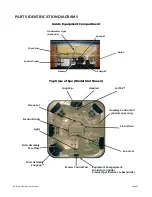
8. Remove the JetZone Divider (Fig. R) and reattach the 

JetPak in the same manner as you removed it. 

9. Install the JetZone Divider in a location of your choice. 


Note:

 If you would like to interchange JetPaks, please 

refer to “JetPaks” in this Manual.


IMPORTANT WARNING: 

 Never operate the spa without 

the JetZone Divider in place. Doing so, will cause serious 

damage to your pump(s).


MAINTENANCE 


WATER CHEMISTRY 

Tap water that is safe to drink is not always right for your 

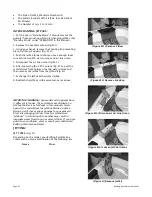
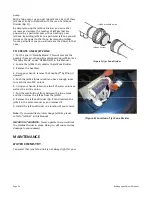
JetZone Divider 

JetPak manifold union 

(Figure Q) Jet Zone Divider 

(Figure R) Location of Jet Zone Divider 

Summary of Contents for 2003 Bullfrog Portable

Page 1: ...uirements Hook Up P 07 Checklist Before Filling Your Spa P 10 Initial Start Up P 11 OPERATION Control Systems P 12 JetPaks P 22 Jetting P 23 JetZones P 24 MAINTENANCE Water Chemistry P 25 Changing Your Spa Water P 28 Cleaning Your Filter P 29 Light Bulb Replacement P 30 Ozone Sterilizer Replacement P 30 Spa Shell Care P 31 Spa Cabinet Care P 31 Spa Cover Care P 31 Miscellaneous Care P 32 LOW USE O...

Page 2: ... be bonded to the equipment grounding bus with copper conductors not smaller than No 6 AWG 6 DANGER Risk of Accidental Drowning Extreme caution must be exercised to prevent unauthorized access by children To avoid accidents ensure that children cannot use this spa unless they are supervised at all times 7 DANGER Risk of Injury The suction fittings in this spa are sized to match the specific water ...

Page 3: ...yperthermia a The use of alcohol drugs or medication can greatly increase the risk of fatal Hyperthermia in spas and hot tubs b The causes symptoms and effects of Hyperthermia may be described as follows Hyperthermia occurs when the internal temperature of the body reaches a level several degrees above the normal body temperature of 37 C 98 6 F The symptoms of Hyperthermia include an increase in t...

Page 4: ...tornadoes etc 12 CAUTION Unauthorized Access Secure the spa area against unauthorized access Make sure all barriers meet both state and local codes Keep spa cover on spa when spa is not being used 13 CAUTION Risk of Damage to Spa or Equipment By performing maintenance as described later in this Owner s Manual the chance of damage to your spa and it s equipment will be greatly reduced Never block t...

Page 5: ...Spa LED Lighting System This unique lighting system offers 12 different lighting shows with thousands of different colors and color schemes CoverMate I Cover Lifter Take the work out of uncovering and covering your spa let Bullfrog s cover lifter do the job for you with very little effort And while you are using your spa the Cover Lifter neatly stores your cover behind the spa offering a privacy w...

Page 6: ... switches and other permanently installed electrical devices Indoor Considerations There are several considerations when installing your spa indoors First the environment both around and below the spa should be water resistant It must be capable of handling water splashed out from the spa as well as the possibility of a leak from the spa Your Bullfrog portable spa is the most leak free spa in the ...

Page 7: ...ructions please refer to the system wiring diagram locating inside of the control system box 120 VOLT INSTALLATION Use only a qualified Licensed Electrician to make 120 Volt electrical installations Your 120 Volt spa requires a dedicated GFCI 20 AMP electrical circuit and a minimum supply wire size of 12 gauge It is important that this circuit is dedicated not being used by any other electrical ap...

Page 8: ...Page 8 Bullfrog Spas Owner s Manual Figure C Standard 120V 240V Wiring Diagram ...

Page 9: ...spa and located not less than five feet from the spa and not more than 50 feet from the spa a GFCI Sub Panel may be used to substitute the disconnect if located within the same parameters Installation of the GFCI All conductors except the green ground must be routed through the GFCI including the neutral Never bypass the neutral line If the neutral line is bypassed then the current will be imbalan...

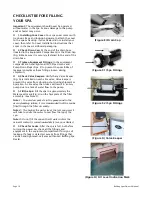
Page 10: ... installed on each slice valve Valve keepers prevent the valve from vibrating shut during shipment or operation A slice valve that closes will result in a noisy pump due to a lack of water flow to the pump 5 Fill the Spa Fill the spa to approximately the Water Level mark Fig H on the face plate of the filter assembly See Note 2 Note 1 To avoid air pockets in the pumps and in the main plumbing inta...

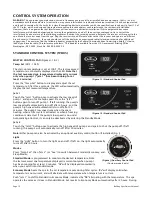
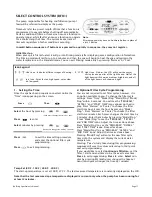
Page 11: ...ode By default the spa will begin to heat until it reaches the start up temperature of 100 F DELUXE CONTROL SYSTEM When your spa is first activated it will go into Priming mode indicated by Pr on the display The Priming mode will last for less than 5 minutes and then the spa will begin normal operation in Standard Mode For the first one minute F will appear on the display while the system is sensi...

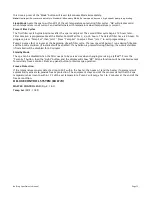
Page 12: ...at least 2 minutes Press the Temp Set button to display and adjust the set temperature After three seconds the LED will automatically display the last measured temperature Jets 1 Touch the Jets 1 button once to activate the low speed of pump 1 and again for the high speed Press the Jets 1 button again to turn off pump 1 If left running the pump s low speed will automatically turn off after 2 hours...

Page 13: ...es at the beginning of each filter cycle The low speed of pump 1 runs during filtration and the ozone sterilizer if installed will be enabled If any button is pressed during filtering the ozone sterilizer if installed will be disabled for 60 minutes Standby Mode The spa can be disabled when the filter needs to be serviced or when changing servicing a JetPak Press the Temp Set button then the Light...

Page 14: ...leep Modes Standard Mode is programmed to maintain the desired temperature Note the last measured spa temperature displayed is current only when pump 1 has been running for at least 2 minutes Std will be displayed momentarily when you switch into standard mode Economy Mode heats the spa to the set temperature only during filter cycles Ecn will display solid when temperature is not current and will...

Page 15: ...ENTER THE WATER Remove the spa cover and allow water to cool At 107 F the spa should automatically reset If spa does not reset shut off the power to the spa and call your authorized Bullfrog Portable Spa Dealer ICE on Display Ice Auxiliary Freeze Sensor detects potential freeze condition Action Required No action required The pumps will automatically activate regardless of spa status SnA on Displa...

Page 16: ...ired for dry message Spa will not automatically reset you may press any button to reset Warning Shock Hazard No User Serviceable Parts Do not attempt service of this control system Contact your authorized Bullfrog Portable Spa Dealer for assistance Follow all owner s manual power connection instructions Installation must be performed by a licensed electrician and all grounding connections must be ...

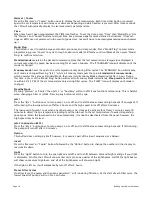
Page 17: ...ing Or Each press changes the time by 1 hour Press to enter Select minutes by pressing Or Each press changes the time by 1 minute Press Press to exit the time setting procedure and enter the optional filter cycle programming to exit programming Light Icon On dim the LCD will show the center circle plus one quarter of the light beams Half of the light beams will show on medium brightness and all of...

Page 18: ...ly during filter cycles The SLEEP icon will display until mode is changed Standby Mode Pressing Warmer or Cooler then Jets 2 or Auxiliary will turn off all spa functions temporarily This is helpful when changing a filter or JetPak Pressing any button resets the spa Jets 1 Press the Jets 1 button once to turn pump 1 on or off and to shift between low and high speeds if equipped If left running the ...

Page 19: ...ext setting or to exit after the last setting The de fault filter cycles are as follows The first filter cycle is automatically activated at 8 00 AM and operates the pump until 10 00 AM The filter 1 indicator icon will light when filter 1 is running The second filter cycle is automatically activated at 8 00 PM and operates the pump until 10 00 PM The filter 2 indicator icon will light when filter ...

Page 20: ...urrent spa temperature either switch to Standard mode or turn Jets1 on for at least two minutes Repair required Contact your dealer or service organi zation Press any button to leave Standby Mode and return to normal operation Add pH increaser according to manufacturer s instructions Add pH decreaser according to manufacturer s instructions Add sanitizer according to manufacturer s instructions Re...

Page 21: ... instructions Test reset GFCI per manufacturer s instructions Drain and refill spa per manufacturer s instructions Drain and refill spa per manufacturer s instructions Clean and condition cover per manufacturer s instruc tions Clean and condition cabinet per manufacturer s in structions Install new filter Warning Shock Hazard No User Serviceable Parts Do not attempt service of this control system ...

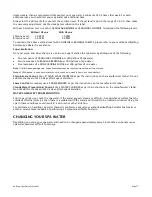
Page 22: ...nd then remove the JetPak from the JetPod Fig N 7 Exchange the JetPak with another JetPak 8 Reattach the JetPaks in the same manner as above IMPORTANT WARNING Spa models with 2 pumps have 2 different jet zones These JetZones are divided by a JetZone Divider see JetZones in this manual Never operate the spa without the JetZone Divider in place Doing so will cause serious damage to your pump s Also ...
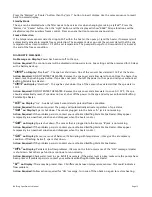
Page 23: ...g P To adjust the water pressure on any jet simply turn the outer ring of the jet itself To Increase Jet Water Pressure Turn the outer ring of the jet clockwise To Decrease Jet Water Pressure Turn the outer ring of the jet counter clockwise Note 1 The Ozone Verta ssage Shower and Duo Blaster Jets are non adjustable Note 2 Never shut all the jets off at the same time JETZONES Bullfrog Portable Spas...

Page 24: ...tZone Divider 3 Remove the headrest 4 Using your hands remove the SnapCap by lifting it upward 5 Push the JetPak forward until you have enough room to reach the two PVC unions 6 Using your hands loosen the two PVC water unions as well as the air line union 7 Pull the manifold out from between the two unions and then remove the JetPak from the JetPod 8 Remove the JetZone Divider Fig R and reattach ...


Page 25: ... that s comfortable for the user and in preventing damage to the spa and its equipment Using the scale of 0 14 pH is the measure of acidity and basicity in the water pH levels under 7 0 are acidic while pH levels over 7 0 are basic The proper pH range for a spa is 7 4 to 7 6 High pH levels over 7 6 can cause the following Scale build up on the spa and its equipment cloudy water a prematurely dirty...

Page 26: ...ed Bullfrog Spa Dealer test the Calcium Hardness CH of your spa water and adjust as per your dealer s recommendation the correct level of CH depends on your overall water conditions 4 Test and adjust the Total Alkalinity TA to the range of 125 150 PPM parts per million 5 Test and adjust the pH to the range of 7 4 7 6 6 After the spa water has circulated for approximately one hour add 1 2 teaspoon ...

Page 27: ...verage use Super Sanitation may be required more than once per week Note 2 With ozone it may not be necessary to shock on a weekly basis see your dealer Stain Scale Control Use a STAIN SCALE INHIBITOR as per the instructions on the manufacturer s label Do not add this chemical until 3 4 days after Super Sanitation Foam Control As needed use a FOAM REMOVER as per the instructions on the manufacture...

Page 28: ...st JetPak on the left side of the spa nearest the filter assembly 3 Remove the filter s from the filter housing unit 4 Install the power drain unit on the water output side of the 2 plumbing entering the 1st JetPak recess this will be the fitting closest to the control panel 5 Unroll the drain hose and direct where the output of the water will go 6 Start Jets 1 button on low speed water output vol...

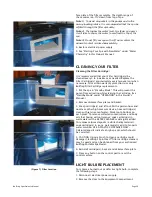
Page 29: ...e cleaning the cartridge See Standby Mode under OPERATION in this Owner s Manual 2 Remove skimmer face plate and basket 3 Grasp cartridge s and lift out With a garden hose and nozzle or other high pressure device hose cartridge s clean with jet stream of water Work top to bottom on each pleat To remove collected suntan lotions and body oils that hosing will not remove soak cartridge s in warm wate...

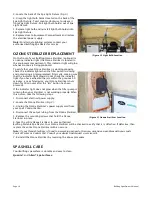
Page 30: ...he jets within the previous 30 minutes as a safety device your Ozone Sterilizer shuts down for 30 minutes after the Jets button has been pressed If the indicator light does not glow when the filter pump is running then your Sterilizer is not working properly When this occurs take the following steps 1 Disconnect electrical power supply 2 Locate the Ozone Sterilizer Fig V 3 Unplug the Ozone Sterili...

Page 31: ...staining every 3 9 months Use an oil based stain that absorbs into the wood See your authorized Bullfrog Portable Spa Dealer for the right stain Note 1 Avoid sealers that cover only the outside of the wood causing the inside to dry out and crack or even warp Note 2 To prevent stain from getting on other surfaces use drop cloths at the base of the spa and use painter s tap around the top lip of the...

Page 32: ...minutes before each use to heat the spa to the desired level No Use for 1 2 Weeks If you plan to not use your spa for one two weeks then we suggest that you not make any changes in operating your spa Substantially reducing the water temperature in well insulated spas for short periods of time has proven to increase heating costs No Use for 2 6 Weeks If you plan to not use your spa for two six week...

Page 33: ...VICE If your Bullfrog Portable Spa fails within the warranty period and within the scope of its warranty contact your authorized dealer and schedule a service call You will be required to show proof of purchase by provided your dealer with a copy of your original sales receipt Note Damage caused by repairs made by someone other than an authorized Bullfrog Portable Spa technician will not be covere...

Page 34: ...___________________________________D ATE YOU PURCHASED YOUR SPA Dealer Information ____________________________________________________ Dealer Name ____________________________________________________ Street Address ____________________________________________________ City State Zip Code ____________________________________________________ Phone Number ...

Page 35: ...tomatic timer has completed its 30 or 120 minute cycle Solution Turn on the pump at the Control Pad Cause 2 Pump has overheated due to vents in equipment door being blocked Solution Clear items away from vents in equipment door Cause 3 The pump motor is defective Solution Contact your authorized Bullfrog Portable Spa Dealer PROBLEM Spa will not heat Cause 1 Slice Valve is partially or fully closed...

Page 36: ...pen the air bleed valve on each pump housing and allow air to bleed out of system Be sure to tighten each air bleed valve as soon as water starts to flow out Cause 4 The Suction Fitting s are blocked Solution Remove any item or debris that is blocking each Suction Fitting Cause 5 The JetZone Divider is not installed This only applies to spas that have two pumps Solution Re install in the appropria...

Page 37: ...M JetPak Foot Jets Floor Drain Auxiliary Control Pad Custom spas only Filter Assembly Face Plate Filter Assembly SnapCap Light Master Control Pad Equipment Compartment Drain Hose inside Product Specifications Label inside Suction Fitting Headrest Ozone Jet Pump 1 Control Center Union Heater Underwater Light back side Slice Valve Pump 2 ...

Page 38: ...Page 38 Bullfrog Spas Owner s Manual NOTES ...

Page 39: ...Page 39 Bullfrog Spas Owner s Manual NOTES ...

Page 40: ...Page 40 Bullfrog Spas Owner s Manual Bullfrog International L C 686 West 14600 South Bluffdale Utah 84065 801 565 8111 FAX 801 565 8333 www bullfrogspas com E mail info bullfrogspas com ...

Reviews: