background image

Audio

Network  port

USB port

PTZ control

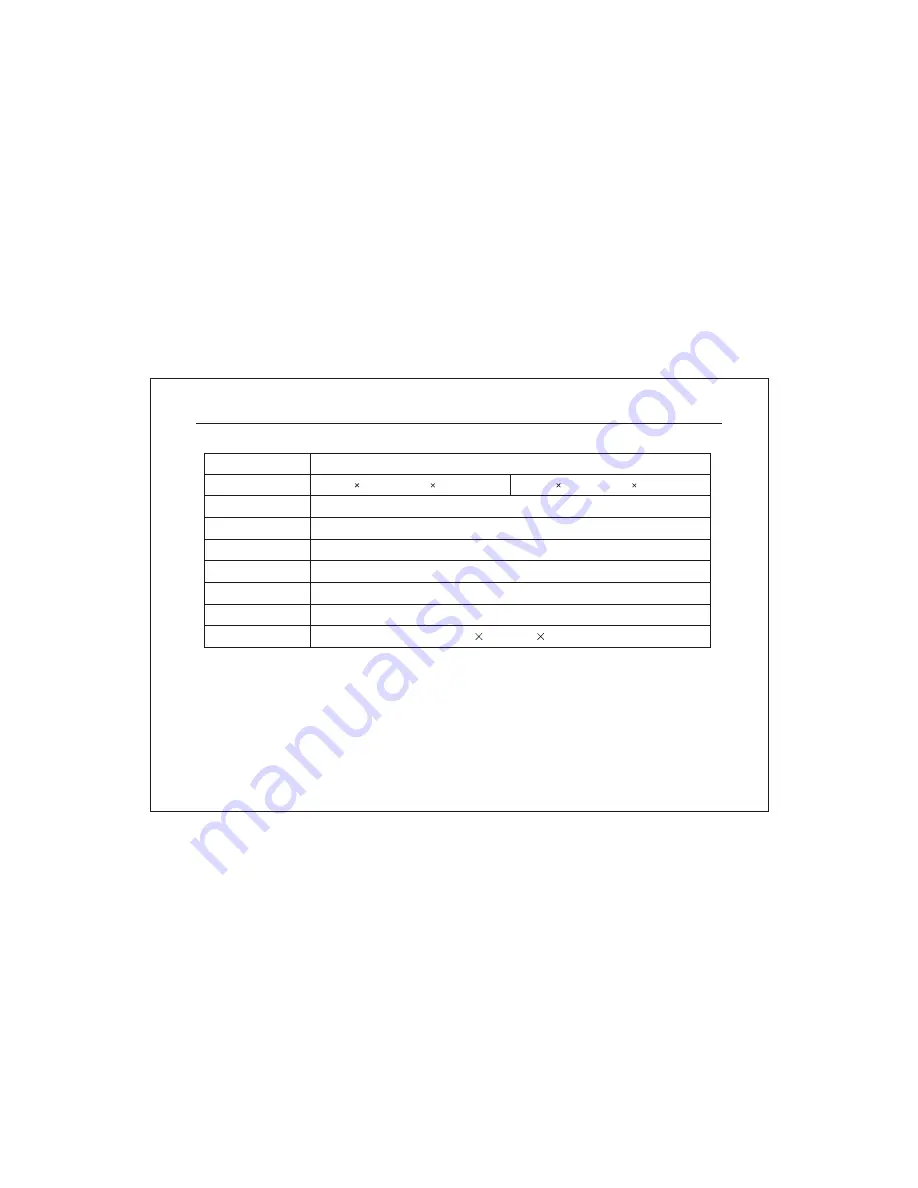
HOST 2.0 

RS485

RJ-45 

AV 4CH input,  AV 1CH output

AV 8CH input,  AV 1CH output

Hard disk

Each interface supports a hard disk with maximum capacity 2000G SATA HDD.

DC 12V / 5A

Power

Weight

About 3.1kg with package

335mm(L)

250mm(W)

65mm(H)

Dimension

Network Digital Video Recorder                                                                                               Operation Manual ( V1.0 )

47

CIF each channel >20 fps

Network resolution/fps

Summary of Contents for SS-HDR-8704

Page 1: ......

Page 2: ...it under high humidity circumstance This DVR cannot be installed at the places with much dust and avoid potential mechanical vibration or impact Install this DVR under good air circulation conditions Do not place it near the heater or under direct sunlight Please choose high quality hard disk HDD which could meet the working demand of the DVR For its quality please purchase hard disk from regular ...

Page 3: ... DVR can be restarted only after being checked by qualified servicemen If the DVR is not in use for a long period of time please disconnect the power supply and pull the power line plug out from the power socket This is a precise instrument No internal part can be repaired by the users If fault occurs it is necessary to ask qualified servicemen to repair it or contact the dealer Network Digital Vi...

Page 4: ...eatures 2 1 Description of front panel 2 2 Description of rear panel 2 3 Connection figure of rear panel 2 4 Description of alarm port in the rear panel 2 5 Remote control operation 2 6 Mouse operation Chapter III Menu Setup 3 1 Summary of menu operation Network Digital Video Recorder Operation Manual V1 0 14 19 18 15 6 8 11 3 ...

Page 5: ...arm 3 7 PTZ setup 3 8 Network setup 3 9 Alarm setup 3 10 Disk management 3 11 User setup 23 22 25 26 27 28 29 30 31 31 31 24 34 35 Chapter IV Basic Operations 4 1 Turn on DVR 4 2 Live screen 4 3 Software update 4 4 PTZ control Network Digital Video Recorder Operation Manual V1 0 4 20 ...

Page 6: ... 48 42 4 5 System information 4 6 Log list 4 7 Recording preparation 4 8 Recording operation 4 9 Search playback and backup 4 10 Audio setup 4 11 SEQ 4 12 Spot output 4 13 User login 4 14 PC Client software instruction 4 15 Power off Network Digital Video Recorder Operation Manual V1 0 5 37 ...

Page 7: ...r and embedded operating system and integrates with latest technologies in IT field such asvideo frequency audio frequency compression decompression large capacity hard disk storage TCP IP network remote control etc investing the system with high intellectualization and stability This equipment supports various networks including Ethernet and Internet to realize remote audio video synchronization ...

Page 8: ... and DVD Writer Support HDMI VGA output Support Remote Control and Control Keyboards operation Convenient precise video searching Control PTZ and speed dome through RS485 Specially designed dedicated file system for video to increase more than 10 times of service life of hard disk Fully independent from PC platform and free from computer breakdowndue to improper operations complicated management o...

Page 9: ...anel Description Name No Network Digital Video Recorder Operation Manual V1 0 8 1 Number keys a input numbers b keystroke 1 9 select channels Press it once to input number 0 Press it twice to input number 10 c 0 10 d input password 1 9 0 10 Icon 1 2 3 7 6 4 4 5 ...

Page 10: ...o play again In PTZ mode it is used as Z key in the remote control In playback mode press it to stop playing and return to search menu in video recording mode press it to stop recording in PTZ mode press itto view preset image Press it in live record playback mode to change the screen into four split screen Press it in live record playback mode to change the screen into night split screen To modif...

Page 11: ...sequence Press it to pop up audio setup menu Press it to pop up the main menu Press it to pop up SPOT setup menu Lock the machine 3 4 5 LOCK a are direction keys In menu mode select the listed options upward downward leftward rightward in PTZcontrol mode control the dome to rotate upward downward leftward rightward confirm the selection and operation b c rewind and forward in playback mode Change ...

Page 12: ...nnected to USB pendrive or mouse and used for system software upgrade or video file backup It supports hot plug IR Receiver Receive signal from remote control Do not cover 6 7 2 2 Description of rear panel 11 11 Rear panel B of 4 channel Rear panel B of 8 channel 11 ...

Page 13: ...trol Receiver connector 485 ALARM IR USB NET VGA Audio output Audio input Connected to USB pendrive or mouse and used for system software upgrade or video file backup It supports hot plug Port No Description Power Standard RJ 45 network port connected to network cable and used for remote browse or control VGA video signal output port connected with the VGA port of a computer monitor Connected with...

Page 14: ...hannel DVR as example to show how to connect camera1 camera8 video output SPOT output Video input 2 3 Connection figure of rear panel alarm port Remote IR Receiver Port VGA output network port power Input power switch audio output audio input port PTZ USB port 13 ...

Page 15: ...tion 1 1 8 is alarm input NC NO COM Alarm relay output NC is normal close NO is normal open COM isthe public terminal 2 It is ground wire Prompt To make the machine work well please follow the above figures to connect Please power off each device before connection 4 channel 8 channel alarm input alarm output 12V PTZ alarm input alarm output 12V PTZ 14 ...

Page 16: ...ght in the front panel is on and the icon on the top right of the monitor screen turns to blue The DVR can be controlled by the remote control Note If you don t want to use the remote control you couldset in the systemsetup menu Set the item REMOTE ID as OFF Then the IR Receiver light in the front panel will be off and the operation of the remote control is invalid If the DVR can not be controlled...

Page 17: ...to play Press it to play press it again to pause Press it to stop playing press it once to pop up a tool menu on the top right of the screen press it again to enter into system information menu press it three times to pop up log list menu 1 9 Select channels or set up password Input nunber 0 Press it twice to select channel 10 Combined number keys 1 9 to select the channels from channel 11 to 16 I...

Page 18: ...ay quad screen Press it to set preview point in PTZ mode The monitor display eight split screen Press it to preview in PTZ mode The monitor display sixteen split screen Press it to decrease the data in PTZ mode Sequence Spot output PTZ AUTO Zoom in out Focus SEQ SPOT PTZ AUTO Z Z F F In live preview mode press this key to automatically switching full screen images Press it to increase the data in ...

Page 19: ...rt of the rear panel 1 Select or cancel in the item 2 Input password in user log in interface 3 Click the close icon on the top right of the screen to exit from the main menu 4 In split screen mode click one of the channels to make it full screen Click it again to return to split screen Switch single channel screens 5 In menu mode it could modify the data Left click the mouse 1 In live or playback...

Page 20: ...s in the front panel in the remote control or left right click with the mouse to change the parameter value in the sub menu Press key intheremotecontrolor in the frontpanelto move the cursor or move by the mouse Click to save the value and click to exit from the menu Move the mouse 1 Move the cursor 2 Move the cursor to the bottom of the screen to pop up the mouse tool bar Move the cursor onto the...

Page 21: ... DISP POS display position of time and date top middle bottom middle no display are optional 4 Border DISP to select the color of borders green black white off are optional 5 Video format to select the video mechanism PAL NTSC optional When change and save it the system will restart automatically Main menu Network Digital Video Recorder Operation Manual V1 0 20 ...

Page 22: ...the full image of the channel will pop up in the live screen 9 Transparency set the transparency of the menu The larger value the higher transparency 10 HD output display VGA output resolution 11 Mouse display mouse cursor could display and move in one output device monitor and HDMI monitor are optional Select the mouse cursor display monitor 12 OSD Language display the language of the operating s...

Page 23: ... the picture central point 8 Image V delay used to adjust the vertical position of the picture central point 9 SPOT time set the time interval of spot output for the correspond channel i e the display time of each channel 10 Mask area setup Mask area to shield some area by black square It will turn to black in surveillance or record mode Network Digital Video Recorder Operation Manual V1 0 a Left ...

Page 24: ...o set the quantities of images that recorded in one second 25fps PAL and 30 fps NTSC is real time recording 4 Audio click the box to select or cancel the audio recording means audiorecording is selected Audio input could be set for each channel 01 HIGH 25 352 288 02 352 288 HIGH 25 03 352 288 HIGH 25 04 352 288 HIGH 25 SAVE SAVE EXIT EXIT 01 HIGH 25 352 288 02 352 288 HIGH 25 03 352 288 HIGH 25 04...

Page 25: ...o type of relevant time range The time could be set from 00 00 to 24 00 Record type could be time alarm motion alarm motion Note The start time must be earlier than the end time or it will report errorand won t exit After exiting from this menu please press key or click the record icon or the schedule record won t start up REC ALL ALL 00 00 00 00 00 00 00 00 24 00 00 00 00 00 00 00 MOTION TIME MOT...

Page 26: ...optional from 1 10 The bigger number the higher sensitivity 3 Detect area setup drag the mouse to set the detection area as light blue square When motion occurs the area turn to red CAMERA 01 006 015 335 015 230 SAVE SAVE EXIT EXIT Network Digital Video Recorder Operation Manual V1 0 25 ...

Page 27: ...responding to the current channel PTZ 4 Protocol set communication protocol corresponding to the current channel PTZ 3 7 PTZ setup Note the above parameters of each channel must be consistent with the setting of PTZ or it cann t becontrolled CAMERA 01 9600 01 PELCO_D2 SAVE SAVE EXIT EXIT Network Digital Video Recorder Operation Manual V1 0 26 ...

Page 28: ...ress of the router 4 DVR port Transfer date stream such as video and audio frequency 5 DNS1 DNS2 If IP allocation is DHCP DDNS the DVR will get an IP fron DNS server automatically It could be modified manually If it is modified and saved the DVR will restart 6 IE port Download ActiveX control Default 0080 Note If IP allocation is DHCP DDNS IP gateway subnet mask DNS will display If no network conn...

Page 29: ...lude three alarm modes 1 Video loss alarm Loss 2 Video motion detection alarm Motion 3 Sensor input alarm Sensor Setup way Press key on the remote control or click with the mouse to display or cancel in the small boxes 01 02 03 04 SAVE SAVE EXIT EXIT 01 02 03 04 05 06 07 08 SAVE SAVE EXIT EXIT 28 Four channel DVR Eight channel DVR ...

Page 30: ...video will be replaced in turn when the hard disk is full If not record will stop When you record again the system will prompt open overwrite function orformat the hard disk 2 Disk name select disk If a USB disk is inserted USB is optional 3 Disk capacity used to display capacity of the current disk 4 Remain capacity used to display percentage of the remaining capacity of the current disk 5 Bad ar...

Page 31: ...N _ _ _ _ _ _ 3 11 User setup Password is needed to log in by admin Input the password by click the numbers in the menu or press the numbers in the remote control the front panel is used to clear the former number is used to clear all Numbers Then click to enter USER SETUP menu ADMIN _ _ _ _ _ _ OK OK ADMIN0 _ _ _ _ _ _ OK OK EXIT EXIT ADMIN0 000000 SAVE SAVE EXIT EXIT Network Digital Video Record...

Page 32: ...tem connection is correct input output equipments are connected well and the power supply is on before turning on DVR Please make sure video format PAL or NTSC of video input and the monitor format meet the requirements After checking without problems plug in the power cableof DVR then turn on the power switch on the rear panel of DVR If it is in video recording mode before turning off last time i...

Page 33: ...is recording by sensor alarm Image lost in the process of record It is recording by time DVR is waiting for video event triggered in auto recording mode Image lost in the process of waiting for record No record Image lost in no record mode Network Digital Video Recorder Operation Manual V1 0 3 Icons in top right of the screen is exit icon Press ESC key in the front panel or remote control could ex...

Page 34: ... enter into audio setup menu Hard disk is normal Click it to pop up info menu Hard disk is full Click it to pop up info menu No hard disk Click it to pop up info menu Network Digital Video Recorder Operation Manual V1 0 4 In live mode Right click the mouse will pop up the mouse tool icons in the bottom left of the screen Press ESC key on the front panel or remote control or click the icon in the m...

Page 35: ... it to pop up a menu for turning off the power or not 4 3 Software update Copy the new version software to the root directory of USB pendrive the file name is fireusb Turn off the DVR Insert the USB pendrive with software into USB portin DVR front panel thenpoweron again 30 seconds later it will pop up Software updating and Time s on the screen the system update automatically When Update ok reboot...

Page 36: ...reakdown and don t pull out USB pendrive or update will be unsuccessful Make sure U disk works in good condition so as to avoid abnormal performance in the process of update 4 4 PTZ control Network Digital Video Recorder Operation Manual V1 0 In live or recording mode press PTZ key in the remore control the front panel or cli ck the icon in mouse menu to enter PTZ control interface 35 ...

Page 37: ... PTZ control PTZ control parameters of each channel can be modified in the system menu Press PTZ key again or press ESC key or click the icon to exit from PTZ control mode In PTZ control mode the following mouse tool icons will display in the bottom left of the screen Control the dome camra to rotate automatically Click the icon again to stop it Zoom icon Control the focal dista nce of zoom Shut o...

Page 38: ...ATA then press 9ch split key on remote control or click icon by mouse 4 5 System information Network Digital Video Recorder Operation Manual V1 0 1 074 099 000 000 2009 08 19 11 40 00 2009 09 07 10 20 00 EXIT EXIT Sep 15 2009 12 01 47 6802 192 168 001 207 www dvrserver net 25A0001 Sep 14 2009 16 05 08 Sep 12 2009 02 32 39 Press INFO key twice in the front panel remote control or click the icon wit...

Page 39: ... 01 10 2009 08 19 2009 08 19 EXIT EXIT SEARCH SEARCH 4 6 Log list Press INFO key in the front panel remote controlthree times in the front panel or remote control to pop up log list menu It is used to check the information of power on off and recording etc Set the time segment then click Search it will display the information Make sure all the equipment is power on before recording Make sure that ...

Page 40: ... you press icon in the remote control the front panel Also you could click icon by mouse to be back to live Press ESC key and select YES to stop recording time alarm motion alarm motion by press key or click disk name with mouse 39 Press key or click icon in live or record mode to enter search menu this menu is used for search playback and backup video file Adjusting time to search and select vide...

Page 41: ...hed it will turn back to the search menu automatically 5 Before backup please calculate the capacity of the video first Click the icon to calculate the video you need to backup If the video capacity is large it will remind you waiting until calculation finished 6 Before backup please connect the backup device to DVR e g USB pendrive USB HDD etc You Network Digital Video Recorder Operation Manual V...

Page 42: ...it will display the playback mode Network Digital Video Recorder Operation Manual V1 0 Right click the mouse in playback mode it will display the mouse tool icons in the bottom left Press ESC key on the front panel or remote control or click the icon in the mouse toolto exit Take 8 channel DVR as example the mouse tool icons are as follows click this icon to fast rewind when playback click this ic...

Page 43: ...Manual V1 0 ENTER ENTER Note No audio output when multiple split playback at the same time CH01 CH02 CH03 CH04 CH05 CH06 CH07 CH08 ENTER ENTER Press SEQ key on the frontpanel or the remote control or click the icon in the mouse tool icons to start SEQ Then it will display the icon on top right of screen Take 8 channel DVR as example start SEQ in single screen mode it will switch automatically one ...

Page 44: ...r Camera setup menu Move the cursor on SPOT TIME then you could set the time by pressing key or left right click with the mouse It could be set as 0 second or 5 30 seconds If output interval of some channel is 0 second that channel won t output For example 8 seconds for channel 1 0 seconds for channel 2 3 seconds for channel 3 then in spot output mode channel 1 will turn to channel 3 after the ima...

Page 45: ...Manual V1 0 Press the LOCK key on remote control or click the icon on the top right screen with mouse the icon will turn to red It means the system is locked Then you need to press LOCK ESC key in the remote control the front panel or click the icon with mouse to enter user login interface Press key or click the User name box with the mouse to select user name and input password Please refer to 3 ...

Page 46: ...left of screen And select Enter to make it power off When power off the Power LED light will turn green If you want to restart DVR press the key on the remote control for 3 second and it will power on Abnormal power off Abnormal power off refer to shut off thepower supply when it isrunning especially under recording Please try your best to avoid such accident ...

Page 47: ...arm input Alarm output Alarm mode Sensor alarm motion detection video loss HDD full alarm Relay output NO NC COM 4CH 8CH 1280 1024 VGA output resolution Record resolution Network Digital Video Recorder Operation Manual V1 0 46 4CH D1 or 4CH CIF real time compression 1CH D1 or 4CH CIF real time playback at the same time 8CH CIF real time compression 8CH CIF real time playback at the same time 8D1 n...

Page 48: ...V 8CH input AV 1CH output Hard disk Each interface supports a hard disk with maximum capacity 2000G SATAHDD DC 12V 5A Power Weight About 3 1kg with package 335mm L 250mm W 65mm H Dimension Network Digital Video Recorder Operation Manual V1 0 47 CIF each channel 20 fps Network resolution fps ...

Page 49: ...o it can t be done For the reason of safty we can t delete a partof video file in HDD Ifyou want to delete them please try to format HDD 4 Why alarm is not workable Default cause 1 The schedule setup is wrong 2 Alarm setup is wrong 3 Alarm cable connection is wrong 4 Alarm input signal is wrong 5 It is not recording 5 Why cannot find the video file in search menu after recording Default cause 1 Th...

Page 50: ...order Operation Manual V1 0 6 Why there are no video output when connect DVR with camera Default cause 1 BNC connector not connect well 2 The system format is different between DVR and camera 3 Modified the system date back 49 ...

Page 51: ...al is for reference only Products may vary Products are subject to update without further notice Please contact the customer service department for latest program and supplimentary informaton Any disputes or doubts in products description are subject to our final explanation 50 ...

Reviews: