20
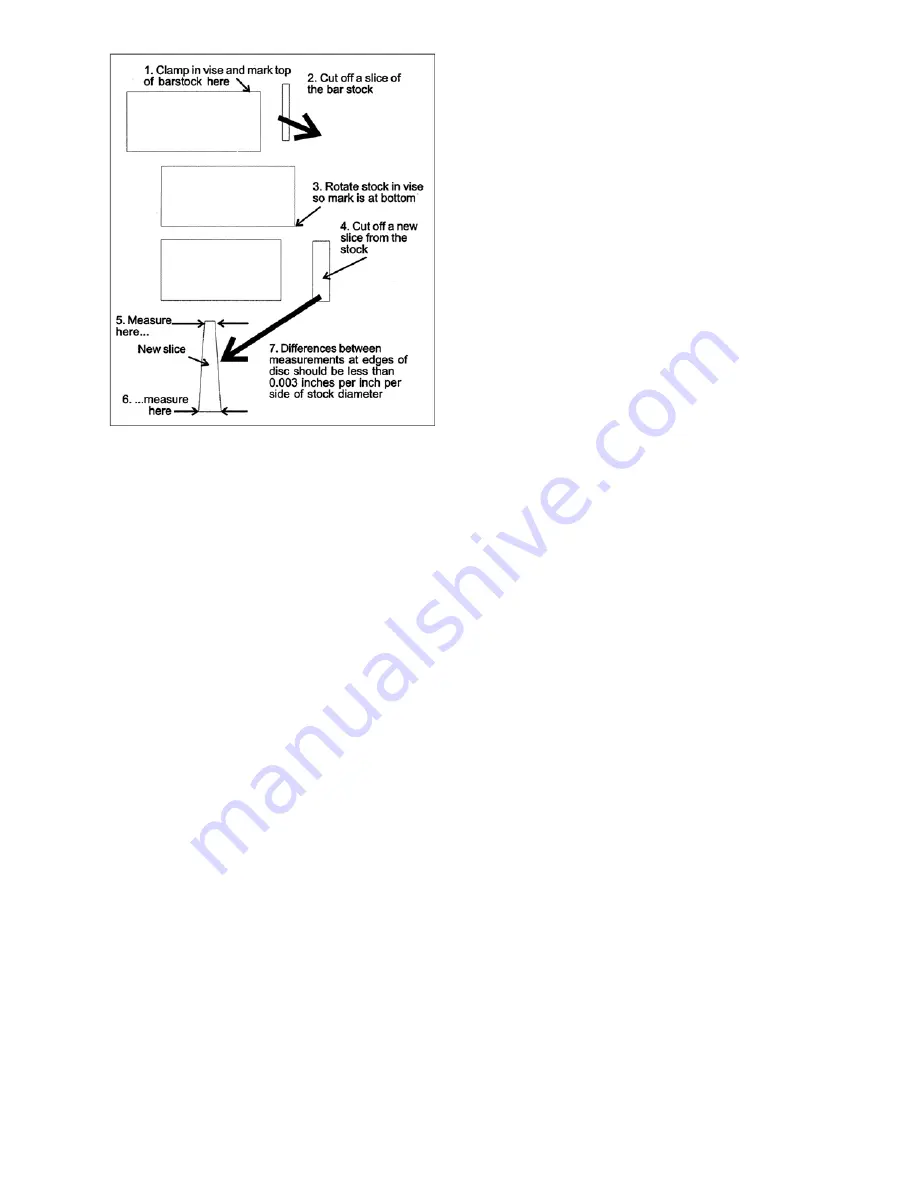
Figure 31
If you do not have a piece of 2-inch bar stock
available for a test cut, use a larger diameter test
piece rather than a smaller one. The maximum
thickness variation on any test piece should be no
more than 0.003 inch, per side, per inch of stock
diameter.
13.8
Blade Selection
The band saw is provided with a 1” wide x 0.035”
thick x 138” long saw blade that is adequate for a
variety of cut-off jobs on many common materials.
Refer to a machinists’ handbook for the speeds
recommended for various materials.
A coarse blade could be used for a solid steel bar
but a finer tooth blade would be used on a thin-wall
tube.
In general, the blade choice is determined by the
thickness of the material; the thinner the material,
the finer the tooth pitch.
A minimum of three teeth should be on the
workpiece at all times for proper cutting. The blade
and workpiece can be damaged if the teeth are so
far apart that they straddle the workpiece.
For very high production on cutting of special
materials, or hard-to-cut materials such as
stainless steel, tool steel, or titanium, you can ask
your industrial distributor for more specific blade
recommendations. Also, the supplier who provides
the workpiece material should be prepared to
provide you with specific instructions regarding the
best blade (and coolant or cutting fluid, if needed)
for the material and shape supplied.
13.9
Blade Break-In Procedure
New blades are very sharp and therefore have a
tooth geometry which is easily damaged if a careful
break-in procedure is not followed. Also, breaking-
in will lengthen the service life of the blade and
produce optimum efficiency.
Consult the blade manufacturer’s literature for
break-in of specific blades on specific materials.
The following general procedure should be
adequate for break-in of JET-supplied blades on
lower alloy ferrous materials.
1. Follow the usual clamping and operating
methods shown in this manual, with the
exception of the following:
2. Reduce the blade speed to half of its normal
speed.
3. Lengthen the bow downfeed rate to 2 to 3
times that of normal.
4. Listen for any unusual or metallic sounds from
the blade. If these occur, repeat the cut. (A
minimum of 5 complete cuts of an 8” diameter
workpiece is a good standard by which to
perform this.) Also, watch the chip formation
until cutting is at its most efficient rate (see
“Evaluating Cutting Efficiency”).
When breaking-in is complete, return the settings
to their normal levels.
Summary of Contents for AB-1012W
Page 27: ...27 19 1 1 Base Assembly Exploded View...
Page 30: ...30 19 2 1 Bow Assembly Exploded View...
Page 34: ...34 19 3 1 Vise Transfer Assembly Exploded View...
Page 37: ...37 19 4 1 Vise Gearbox Assembly Exploded View...
Page 40: ...40 19 5 1 Bearing Guide and Brush Assemblies Exploded View...
Page 42: ...42 19 6 1 Accessories Exploded View...
Page 44: ...44 19 7 1 Electric Box and Control Panel Assembly Exploded View...
Page 47: ...47 20 0 Electrical Connections...
Page 48: ...48...
Page 49: ...49...
Page 50: ...50...


