INSTALLING YOUR CLEAR-CUT STOCK GUIDES TS
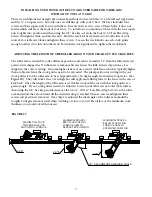
Your Clear-Cut TS Stock Guides come with a 30” track for mounting your stock guides to your table
saw or router table fence. The track has three sets of eight holes on the track. One set is used as a
guide for drilling the pilot holes for using the self tapping screws. The second set is for use with the #10
self tapping screws and the third set is for use with the 1/4” – 20 Low Head Cap Screws when
mounting the track to a standard ¼” t-slot track common on router table fences and on some table saw
fences. See
Figure #1
below that shows the layout of the three hole sets on the track.
(8) COUNTERBORED HOLES FOR 1/4" - 20 LOW
HEAD CAP SCREW
(8) COUNTERBORED HOLES FOR # 10 SELF TAPPING TORX DRIVE SCREW
(8) #19 GUIDE HOLES TO BE USED FOR FOR DRILLING #19 PILOT HOLES FOR
#10 SELF TAPPING SCREWS
0.500
30.000
0.500
0.500
0.500
29.000
0.500
0.500
20.375
1.000
0.500
9.625
1.452
0.500
FIGURE #1
MOUNTING USING SELF TAPPING SCREWS
Most table saw fences are of the style that are made using square steel tubing with some type of plastic or
laminate fence faces, this type of fence requires the use of self tapping screws to attach your Clear-Cut TS
track to the fence. The track should be mounted to allow maximum travel in front and behind the blade.
We have found that the best placement of the track is in the center of the table saw table, below the fence.
The track can be mounted forward or backward of this position if desired.
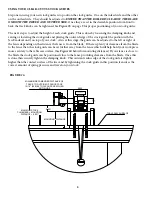
A typical table saw top is 27” from front to back and the track is 30” so this would mean that the track
should be mounted overhanging 1.5” on the front and back of the saw. (See
Figure #2
)
Back of Saw
Front of Saw
TRACK MOUNTING HOLE LAYOUT
5.


