background image

20

UNPLUGGING YOUR CAMERA FROM THE COMPUTER

Windows 98SE:

Unplug the Mini-USB from the camera directly.

Windows ME/2000/XP:

1.  Turn the camera off.
2.  Click once on the 

“Unplug or Eject Hardware”

 icon on the right 

hand side of your task bar. (fig. 1.1)

3.  Select “Stop USB Mass Storage Device”
4.  Click [OK] in the “Safe to Remove Hardware” prompt.
5.  Unplug the Mini-USB from the camera. (fig. 1.2)

USING THE CAMERA AS A WEB CAMERA (FOR WINDOWS ONLY)

 
 Note: 

You must install the camera driver before using the camera as web cam.

1.  Install the camera’s driver (p.18)
2.  Plug the larger end of the supplied USB cable into your PC’s USB port.
3.  Power on the camera and press the 

Review

 mode button to set the camera to Capture mode. 

4.  Plug the smaller end of the USB cable into the USB port of the camera. The camera LCD shows 

PC Camera.

5.  Launch the web cam software. For example, you may use the Ulead Photo Explorer 8 bundled in 

the supplied CD-ROM to capture live view video by following steps below:
1)  Launch the program by clicking 

Start>Program>Ulead Photo Explorer 8.0 Basic.

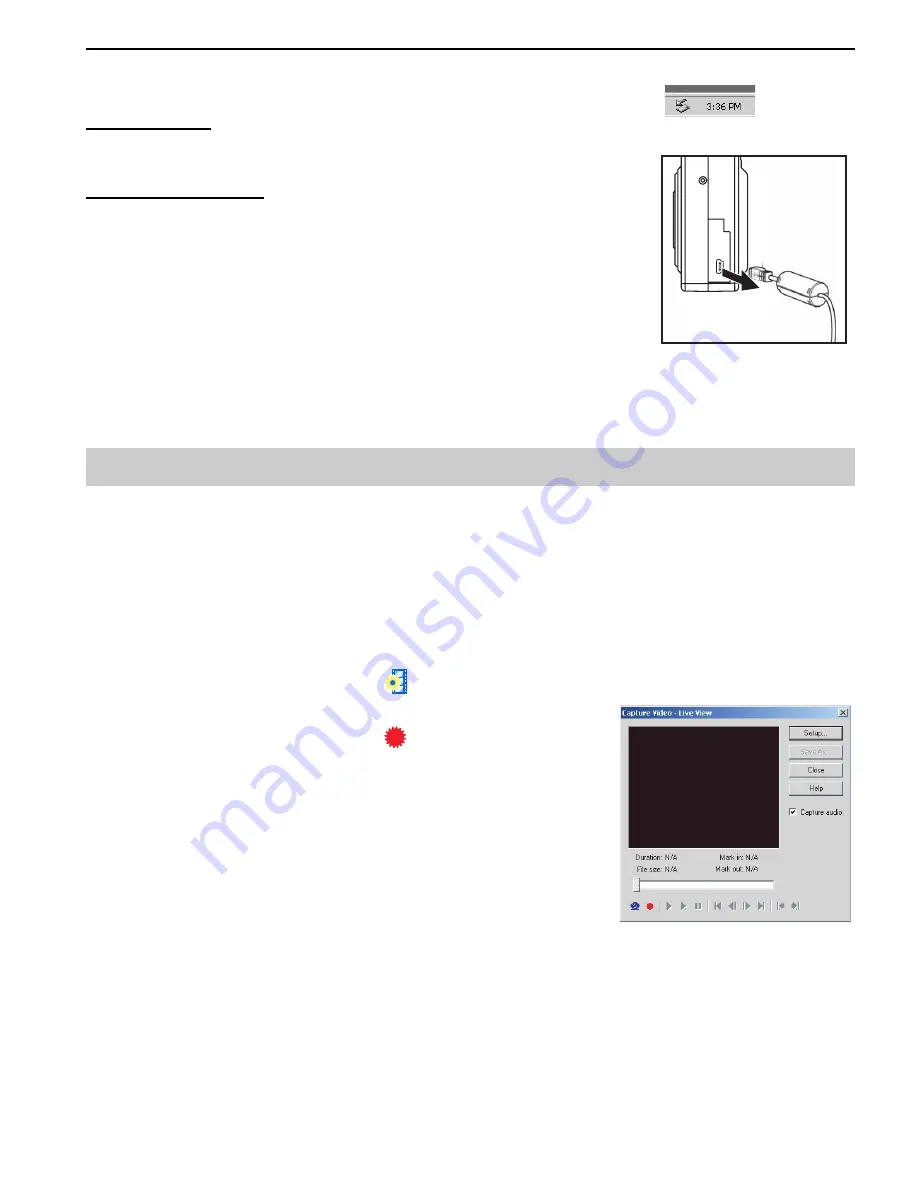
2)  Click on the capture video icon ( 

 ) or click 

Video> Capture Video

. A separate window as 

below will appear:

3)  Click on Setup to adjust the settings.
4)  Click on the red Record button ( 

 ) to start record live 

video.

CONNECTING TO PC

fig.1.1

fig.1.2

Summary of Contents for C 3.0 C

Page 1: ...GETTING STARTED 1 User s Guide User s Guide www jenoptik camera com 3 Megapixels Digital Camera C 3 0C...

Page 2: ...ly engineered and manufactured to give you dependable operation Read this manual before operating the camera to become more familiar with it This manual has been written and formatted with depth and d...

Page 3: ...mage Quality 11 Setting Image Color 11 Setting Exposure Compensation 11 Setting White Balance 12 Setting Image Sharpness 12 Taking Video Clips 13 CUSTOMIZING YOUR CAMERA SETTINGS Setting Auto Power Of...

Page 4: ...3 Using the Camera as A Web Camera 20 APPENDIX Troubleshooting 21 Specifications 23 Getting Help 24 Safety Tips and Maintenance 25 Regulatory Information 27...

Page 5: ...es Camera Driver Photo editing software multi lingual User s Guide etc Battery charger Optional camera case SYSTEM REQUIREMENTS Windows PC with processor better than MMX Pentium 400 MHz Windows XP 200...

Page 6: ...0 Wrist Strap Holder 11 Battery Memory Card Door 12 Move up Button 13 Move to right Button 14 MENU Button 15 Move down Button 16 Flash Button 17 Review Button 18 LCD On Off Button 19 Move to left Butt...

Page 7: ...and then pressing the Menu button INSERTING AN SD CARD The camera uses a Secure Digital SD memory card to store images and or video clips Before proceeding to shoot picture with the camera you need t...

Page 8: ...ld the Power button for a few seconds Note Refer to page 14 to adjust auto power off timing TURNING THE LCD ON OR OFF The camera has a 1 4 LCD which can frame subjects for image and video clip capture...

Page 9: ...ideo clips To switch between Capture mode and Review mode When the camera is powered on it is at either one of the above capturing modes or at review mode You may press the Review button to change the...

Page 10: ...m SETTING THE FLASH By default the flash is set at Off mode When taking pictures at night indoor or outdoor in heavy shadows you may press the Flash button to turn the Flash on Press the Flash button...

Page 11: ...other capture mode SETTING IMAGE RESOLUTION The camera provides four image resolutions Mode Resolution Indicator Description or Super 2304 x 1728 interpolated Large picture size produces higher pictur...

Page 12: ...osure White Balance and Sharpness settings to suit your purpose 1 Power on the camera 2 Make sure the camera to set at Single capture mode p 8 3 Press the Menu button 4 Press or button to highlight Co...

Page 13: ...on the LCD 2 Press the or button to select the desired setting 3 Press the Menu button again to confirm Setting Image Sharpness You can select whether you want the image to have sharp or soft outlines...

Page 14: ...amera 2 Set the camera to one of the two video capture modes p 8 3 Use the viewfinder or camera screen to frame your subject 4 Press the Shutter button to start recording the video The elapsed recordi...

Page 15: ...t the Date and Time when you first use your camera or when the batteries are removed The date and time information will be displayed when the pictures are reviewed if you selected Display while settin...

Page 16: ...ides 10 languages LCD display Select the language you like by following steps below 1 Power on the camera 2 Press the Menu button 3 Press or button to highlight Language 4 Press the or button to highl...

Page 17: ...NG PICTURES While reviewing pictures you can press the button to enlarge the picture and then press the button to zoom out or return to the normal The pictures can be enlarged up to 4 times To pan thr...

Page 18: ...ress the Menu button 3 Press or button to highlight Erase 4 Press the or button to highlight Protect and then press the Menu button The selected file will be locked A lock icon will be shown on the up...

Page 19: ...lete 360 panoramic or wide angle panoramic scene for an immersive viewing experience Optional Adobe Acrobat Reader Enables you to view the electronic version of the User s Guide Optional User s Guide...

Page 20: ...e first time to connect the camera with your computer the computer will take a few seconds to recognize the camera Please wait until it is completed and then proceed to the next step 4 Double click on...

Page 21: ...lug the larger end of the supplied USB cable into your PC s USB port 3 Power on the camera and press the Review mode button to set the camera to Capture mode 4 Plug the smaller end of the USB cable in...

Page 22: ...cture Video clip Cannot take a picture or a video clip The camera is in correct mode Set the camera to correct mode p 8 The flash is charging Wait until the flash finishes charging p 9 The SD card mem...

Page 23: ...raphs White balance is not properly Reset the white balance feature to Auto or for the specific lighting in the surrounding area The pictures show on the LCD very slowly The picture size is large Sele...

Page 24: ...xposure Control Auto Manual 1 5EV 1 5EV Self Timer 10 Seconds Resolution Image capture Super 2304x1728 High 2048x1536 Medium 1600x1200 Low 1280x1024 Video recording QVGA 320x240 QCIF 192x144 Compressi...

Page 25: ...a com to view the Frequently Asked Questions FAQ Website Customer Support If the problem you are encountering is not listed in the FAQ section please send us an email through our web site by clicking...

Page 26: ...camera in any way This may cause a fire electric shock or severe damage to the camera Do not use the flash in close proximity to people or animals When taking photographs never point the lens of the...

Page 27: ...ost if the card is affected by strong static electricity electrical shock during card repair or malfunction When using SD Memory Cards do not change the attributes read only etc of the files pictures...

Page 28: ...omply with the limits for a class B digital device pursuant to Part 15 of the FCC Rules These limits are designed to provide reasonable protection against harmful interference in a residential install...

Page 29: ...handling of this product If your equipment contains easy removable batteries or accumulators please dispose these separately according to your local requirements The recycling of materials will help t...

Page 30: ...29 Visit Concord on the Internet www jenoptik camera com JDC 3 0C User s Guide Copyright 2006 Concord Camera Corp Version 1 0 586104 00 R1...

Reviews: