


WARNING! (Continued)
with eyes or skin. Change clothing as soon
as possible, if there is any contact with
clothing.
•
Tire Service Kit Sealant solution contains
latex. In case of an allergic reaction or
rash, consult a physician immediately.
Keep Tire Service Kit out of reach of chil-
dren. If swallowed, rinse mouth immedi-
ately with plenty of water and drink plenty
of water. Do not induce vomiting! Consult a
physician immediately.
Sealing A Tire With Tire Service Kit
Whenever You Stop To Use Tire Service Kit:
1. Pull over to a safe location and turn on the
vehicle’s Hazard Warning flashers.
2. Verify that the valve stem (on the wheel with
the deflated tire) is in a position that is near to
the ground. This will allow the Tire Service Kit
Hose to reach the valve stem and keep the
Tire Service Kit flat on the ground. This will
provide the best positioning of the kit when
injecting the sealant into the deflated tire and
running the air pump. Move the vehicle as
necessary to place the valve stem in this
position before proceeding.
3. Place the transmission in PARK and cycle
the ignition in the OFF position.
4. Apply the parking brake.
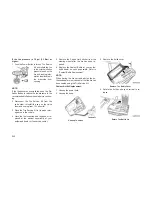
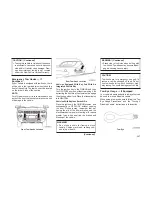
Setting Up To Use Tire Service Kit:
1. Uncoil the Sealant Hose and then remove
the cap from the fitting at the end of the hose.
2. Place the Tire Service Kit flat on the ground
next to the deflated tire.
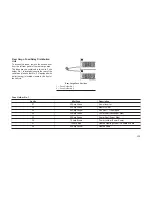
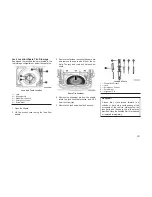
3. Remove the cap from the valve stem and
then screw the fitting
at the end of the
Sealant Hose onto
the valve stem.
4. Uncoil the Power Plug and insert the plug
into
the
vehicle’s
12 Volt power outlet.
NOTE:
Do not remove foreign objects (e.g., screws or
nails) from the tire.
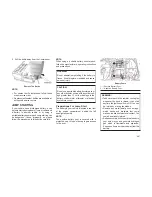
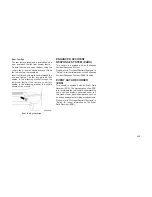
Injecting Tire Service Kit Sealant Into The
Deflated Tire:
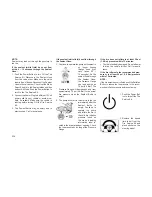
1. Always start the vehicle before turning ON
the Tire Service Kit.
2. Ensure the Mode Select Knob is to the
Sealant Mode posi-
tion.
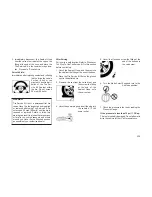
3. After pushing the Power Button, the sealant
(white fluid) will flow
from
the
Sealant
Bottle
through
the
Sealant
Hose
and
into the tire.
237
Summary of Contents for COMPASS 2018
Page 2: ......
Page 3: ......
Page 5: ...2 ...
Page 10: ...2 GRAPHICAL TABLE OF CONTENTS FRONT VIEW 8 REAR VIEW 9 INSTRUMENT PANEL 10 INTERIOR 11 7 ...
Page 12: ...REAR VIEW Rear View 1 Rear Lights 2 Rear Windshield Wiper 3 Liftgate 9 ...
Page 15: ...12 ...
Page 50: ...Uconnect 4 4C NAV With 8 4 inch Display Automatic Climate Controls 47 ...
Page 57: ...Operating Tips Chart 54 ...
Page 71: ...68 ...
Page 73: ...INSTRUMENT CLUSTER Base Instrument Cluster 70 ...
Page 74: ...Premium Instrument Cluster 71 ...
Page 139: ...136 ...
Page 253: ...250 ...
Page 277: ...274 ...
Page 326: ...11 CUSTOMER ASSISTANCE IF YOU NEED ASSISTANCE 324 323 ...
Page 328: ...325 ...
Page 329: ...326 ...
Page 330: ...12 INDEX 327 ...
Page 338: ...٣٧٢ ...
Page 347: ...١٢ س ا ٣٦٣ ...
Page 348: ...٣٦٢ ...
Page 349: ...٣٦١ ...
Page 351: ...١١ ء ا ة ٣٦٠ ة ا إ a ا إذا ٣٥٩ ...
Page 352: ...٣٥٨ ...
Page 400: ...٣٥٧ 6 j إ ت ٣٥٧ 0 ا اص Zm ا ٣١٠ ...
Page 402: ...٣٠٨ ...
Page 410: ...٣٠٠ ...
Page 433: ... ور ا 9 ا 3 ا ف ن B وا ا u آ I را ور ا ٢٧٧ ...
Page 436: ...٢٧٤ ...
Page 474: ...٢٣٦ ...
Page 560: ...١٥٠ ...
Page 614: ...٩٦ ...
Page 636: ... س ا أ ة A Am ا س ا أ ة ٧٤ ...
Page 638: ...٧٢ ...
Page 652: ... 01 ا دات V إر ول ٥٨ ...
Page 659: ... ت Q 8 4 Q ض V V R f E E أو رة 8Q ارة ا در 6 f ا E Q ود ّ ا Uconnect 4 4C NAV م G ٥١ ...
Page 696: ...١٤ ...
Page 699: ... S G S G 3 ا اء 1TY ا 1 3 ا ج I2 ا E 2 ة w ا ب 5 3 ١١ ...
Page 701: ...٢ ت ا ول ا ١٠ أ G ١١ S G ١٢ س Z أ ة ١٣ S ا ا ٩ ...
Page 702: ...٨ ...
Page 704: ... ز ا م 3 4 ا ز 1 ا ا ول ا I را ا 9 ه ا د ت E 7 أو ر ٦ ...
Page 708: ...٢ ...
Page 710: ......
Page 711: ......


