


NOTE:
•
For vehicles equipped, do not attempt to
install a center cap or wheel cover on the
compact spare.
•
Refer to “Compact Spare Tire” and to
“Limited-Use Spare” under “Tires—General
Information” in “Servicing And Maintenance”
for additional warnings, cautions, and infor-
mation about the spare tire, its use, and
operation.
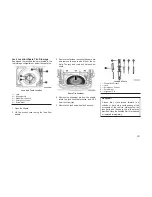
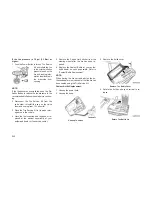
9. Install and lightly tighten the wheel bolts.
WARNING!
To avoid the risk of forcing the vehicle off the
jack, do not tighten the wheel nuts fully until
the vehicle has been lowered. Failure to
follow this warning may result in serious
injury.
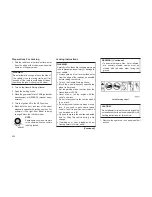
10. Lower the vehicle to the ground by turning
the jack handle counterclockwise.
11. Finish tightening the wheel bolts. Push
down on the wrench while at the end of the
handle for increased leverage. Tighten the
wheel bolts in a star pattern until each wheel
bolt has been tightened twice. Refer to
“Wheel And Tire Torque Specifications” in
“Technical Specifications” for the proper lug
bolt torque. If in doubt about the correct
tightness, have them checked with a torque
wrench by your authorized dealer or at a
service station.
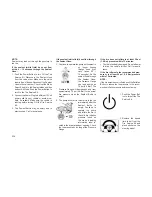
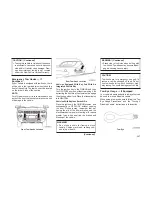
12. Place the jack on the foam tray and open it
far enough so that it is secured. Once
placed in position, rotate it clockwise to lock
it in. Replace the alignment pin in the center
hole to lock the jack in place.
WARNING!
A loose tire or jack thrown forward in a
collision or hard stop could endanger the
occupants of the vehicle. Always stow the
jack parts and the spare tire in the places
provided. Have the deflated (flat) tire repaired
or replaced immediately.
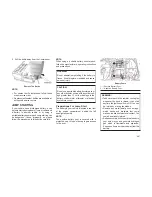
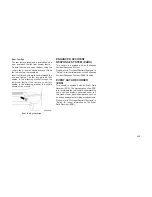
Road Tire Installation
1. Mount the road tire on the axle.
2. Install the remaining wheel bolts with the
threaded end of the wheel bolt toward the
wheel. Lightly tighten the wheel bolts.
WARNING!
To avoid the risk of forcing the vehicle off the
jack, do not tighten the wheel bolts fully until
the vehicle has been lowered. Failure to
follow this warning may result in serious
injury.
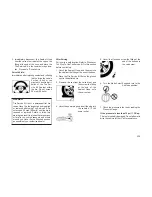
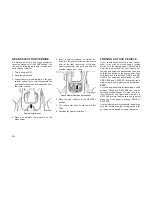
3. Lower the vehicle to the ground by turning
the jack handle counterclockwise.
4. Finish tightening the wheel bolts. Push down
on the wrench while at the end of the handle
for increased leverage. Tighten the wheel
bolts in a star pattern until each wheel bolt
has been tightened twice. Refer to “Wheel
And Tire Torque Specifications” in “Technical
Specifications” for the proper lug bolt torque.
If in doubt about the correct tightness, have
them checked with a torque wrench by your
authorized dealer or service station.
5. Lower the jack until it is free. Remove the
wheel blocks. Reassemble the lug wrench to
the jack assembly and stow it in the spare tire
area. Secure the assembly using the means
provided. Release the parking brake before
driving the vehicle.
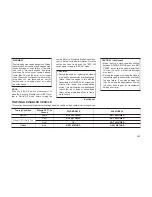
6. After 25 miles (40 km), check the wheel bolt
torque with a torque wrench to ensure that all
wheel bolts are properly seated against the
wheel.
234
Summary of Contents for COMPASS 2018
Page 2: ......
Page 3: ......
Page 5: ...2 ...
Page 10: ...2 GRAPHICAL TABLE OF CONTENTS FRONT VIEW 8 REAR VIEW 9 INSTRUMENT PANEL 10 INTERIOR 11 7 ...
Page 12: ...REAR VIEW Rear View 1 Rear Lights 2 Rear Windshield Wiper 3 Liftgate 9 ...
Page 15: ...12 ...
Page 50: ...Uconnect 4 4C NAV With 8 4 inch Display Automatic Climate Controls 47 ...
Page 57: ...Operating Tips Chart 54 ...
Page 71: ...68 ...
Page 73: ...INSTRUMENT CLUSTER Base Instrument Cluster 70 ...
Page 74: ...Premium Instrument Cluster 71 ...
Page 139: ...136 ...
Page 253: ...250 ...
Page 277: ...274 ...
Page 326: ...11 CUSTOMER ASSISTANCE IF YOU NEED ASSISTANCE 324 323 ...
Page 328: ...325 ...
Page 329: ...326 ...
Page 330: ...12 INDEX 327 ...
Page 338: ...٣٧٢ ...
Page 347: ...١٢ س ا ٣٦٣ ...
Page 348: ...٣٦٢ ...
Page 349: ...٣٦١ ...
Page 351: ...١١ ء ا ة ٣٦٠ ة ا إ a ا إذا ٣٥٩ ...
Page 352: ...٣٥٨ ...
Page 400: ...٣٥٧ 6 j إ ت ٣٥٧ 0 ا اص Zm ا ٣١٠ ...
Page 402: ...٣٠٨ ...
Page 410: ...٣٠٠ ...
Page 433: ... ور ا 9 ا 3 ا ف ن B وا ا u آ I را ور ا ٢٧٧ ...
Page 436: ...٢٧٤ ...
Page 474: ...٢٣٦ ...
Page 560: ...١٥٠ ...
Page 614: ...٩٦ ...
Page 636: ... س ا أ ة A Am ا س ا أ ة ٧٤ ...
Page 638: ...٧٢ ...
Page 652: ... 01 ا دات V إر ول ٥٨ ...
Page 659: ... ت Q 8 4 Q ض V V R f E E أو رة 8Q ارة ا در 6 f ا E Q ود ّ ا Uconnect 4 4C NAV م G ٥١ ...
Page 696: ...١٤ ...
Page 699: ... S G S G 3 ا اء 1TY ا 1 3 ا ج I2 ا E 2 ة w ا ب 5 3 ١١ ...
Page 701: ...٢ ت ا ول ا ١٠ أ G ١١ S G ١٢ س Z أ ة ١٣ S ا ا ٩ ...
Page 702: ...٨ ...
Page 704: ... ز ا م 3 4 ا ز 1 ا ا ول ا I را ا 9 ه ا د ت E 7 أو ر ٦ ...
Page 708: ...٢ ...
Page 710: ......
Page 711: ......


