- 14 -
If we now repeated the second bend, using the same 12 5/8" from the end of the tubing + 2" for the extra tubing we allowed,
we would end up with a hoop 1/2" too wide. This is because the 1/4" stretch developed in the first bend will also be developed in
the second bend, giving us 1/2" total increase in width. Not a good deal if you only want a 40" wide hoop. So what's the solution.
Actually there is two ways to do it.
FIRST METHOD:
Look at figure 27 and notice the second bend starts at the top of the hoop and not at the top of the upright as the first bend did.
Also the start of the second bend is drawn as 13 1/2" from the center mark. If you take the 13 1/2" measurement and subtract
the 1/4" of growth that was developed in the first bend and another 1/4" to compensate for the second bend's growth you end up
with 13". Subtract another 3/4" to account for the 3/4" Bend Start location on the Bending Die set and we have a final setting of 12
1/4". Notice we did not subtract an 1/8" for springback. This is accounted for already in the 1/4" we added for the second bend's
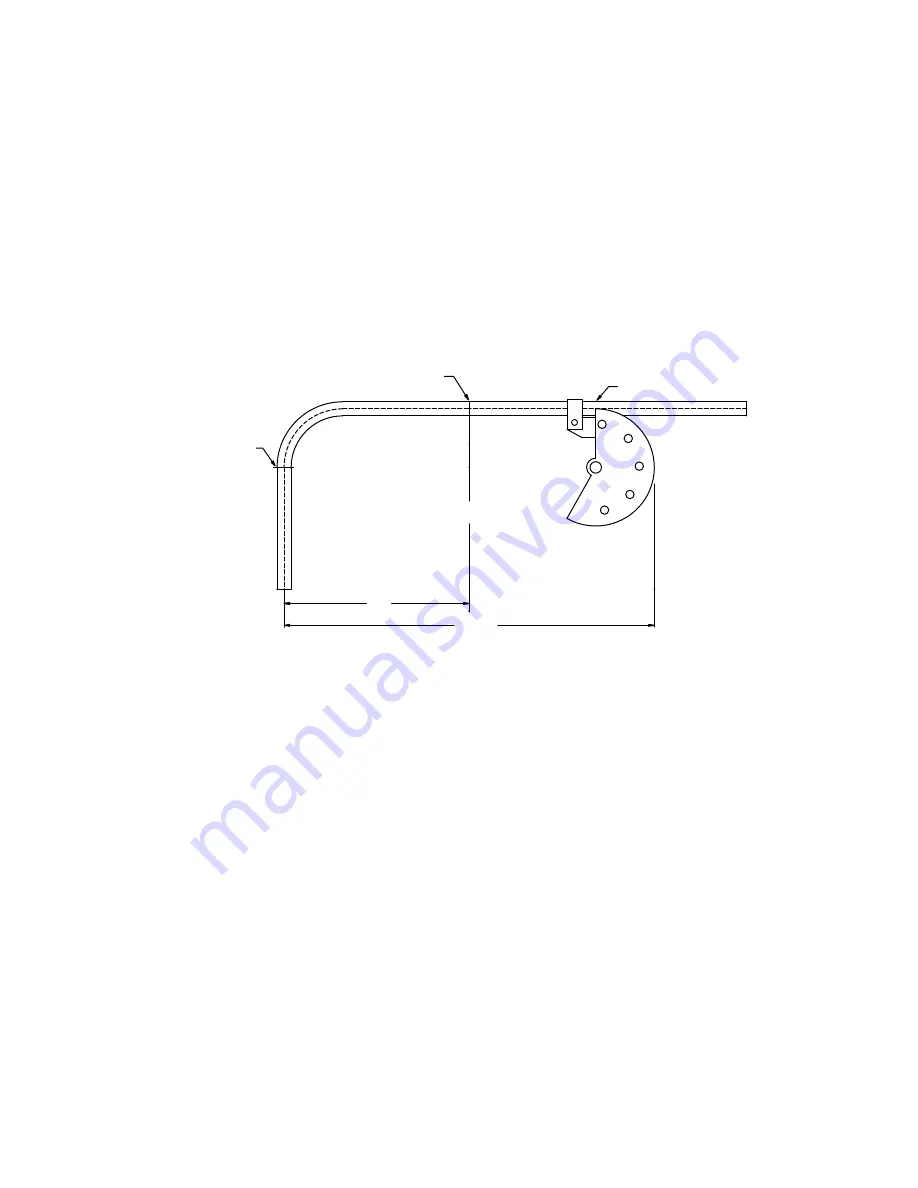
growth. Set the tube so that the Bending Dies edge is exactly 12 1/4" from the center mark. Make sure the universal protractor
reads '0' and the carpenter's level is centered. As one final check you can also measure from the far side of the completed bend
to the edge of the bending die. See figure 28. This measurement should read:
40" (width of hoop) - 3/4" (radius of tube not in bending die) - 1/8" (springback allowance) = 39 1/8"
Make the second bend. Measure the height of the second upright and cut off the extra tubing we allowed for earlier.
SECOND METHOD:
The second method is basically the opposite of the first method. The second bend will start at the bottom of the upright and
NOT
at the top of the hoop as in the first method and as shown in figure 28. We use the same method as used to bend the first bend
with a few exceptions. First calculate the starting point for the second bend as shown below:
20" (total height of hoop) - 6 1/2" (CLR of bending die) - 3/4" (Bend Start) = 12 3/4"
Add 2" to account for the extra tubing we allowed earlier. Also add the 1/4" growth developed in the first bend and another 1/4" for
the second bend. DO NOT ADD 1/8" SPRINGBACK. Once again this is already accounted for in the 1/4" growth of the second
bend. We end up with:
12 3/4" + 2" (extra tubing) + 1/2" (growth for both bends) = 15 1/4"
Set the tube's end at 15 1/4" from the Bending Die's edge. Make sure the universal protractor reads '0' and the carpenter's level is
centered. Make the second bend. Measure the height of the second upright and cut off the extra tubing we allowed for earlier.
Thank you for purchasing a JD Squared bender. Any further questions please contact us.
21"
39 1/8"
Start of 2nd bend
Center mark on tube
Start of 1st bend
CL
Figure 28


