background image

- 8 -

First, you need to make a template. For our example, 

we are going to use 1 1/2” o.d. x .120” wall welded seam 

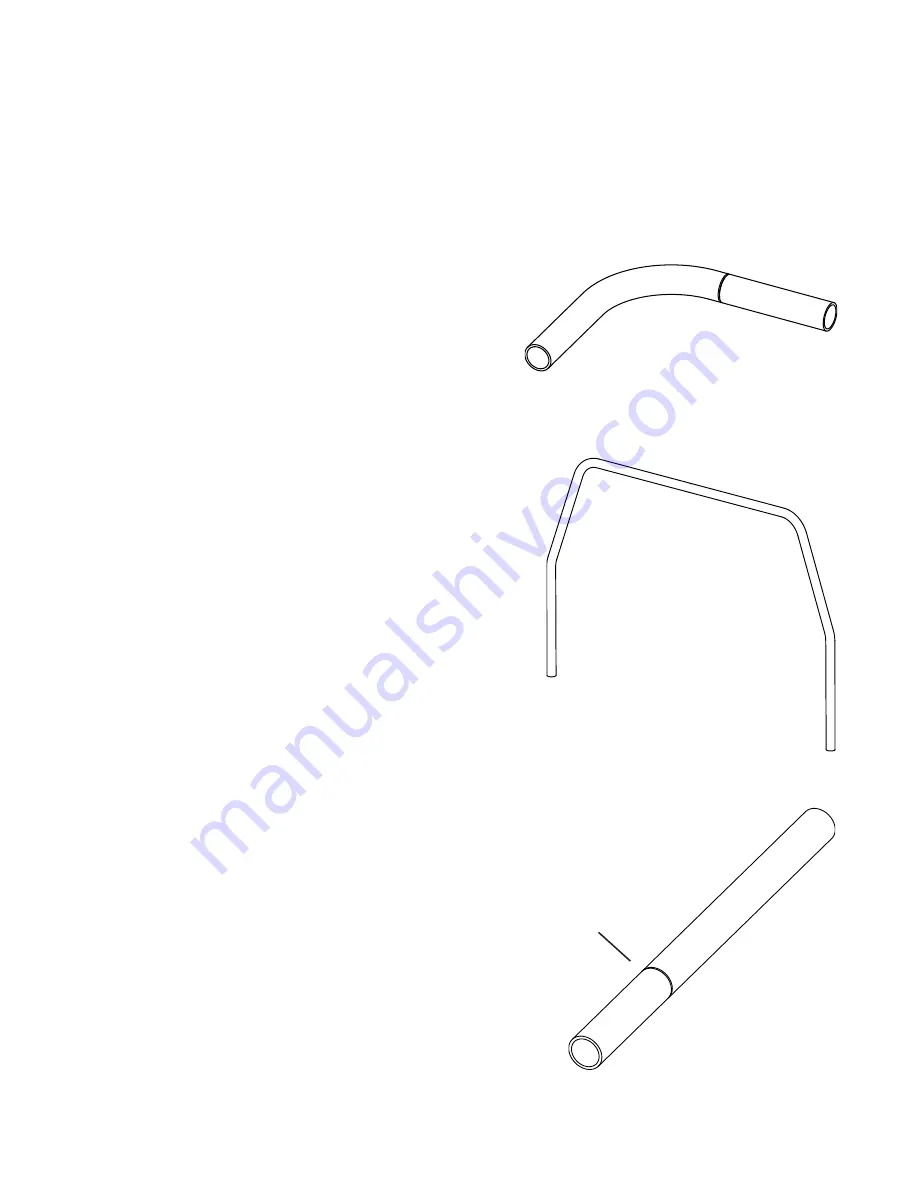
mild steel tubing. As shown in Figure 15, the tem plate is a 

piece of tubing bent to 90 degrees with approximately 6” 

of straight tubing on each side of the bend. Cut a piece of 

tubing roughly 30” long. Next, scribe an accurate line all 

the way around this tubing 6” from the end. An accurate 

and  easy  way  to  do  this  is  to  use  an  in ex pen sive  pipe 

cutter. Your local home supply store should carry them in 

the plumbing de partment. A small lathe with a sharp cutter 

also does a good job. Scribe the line deep enough, roughly 

.015”, so that when you paint the tem plate, the line is still 

clearly visible. Hand scribing this line is diffi cult and not rec-

ommended. The tube should now resemble Figure 17.

Learning the operation of a bender is fairly easy. The real challenge is accurately placing the tubing 

into the bender so that the bend comes out in the right position. This short tutorial ex plains the simple 

process of template bending.

Make a sample bend called the 

Template

 as shown in Figure 15. A permanent mark scribed on the 

template allows you to  measure and visualize where the bend should be placed in the tubing. Once bent 

the tubing will spring out to a larger radius than the forming 

die’s size in di cates. The larger the O.D. or the stronger 

the  tubing,  the  greater  the  springback.  For  in stance, 

chromemoly tubing  will springback roughly twice as far 

as the ex act same size and wall thickness of welded seam 

mild steel tubing. By using a tem plate bend with the same 

kind of tubing you are going to bend, you do not have to 

worry  about  this  springback  be cause  the  template  has 

already sprung out to its fin ished size.

You  may  ask  if  buying  bending  software  is  a  good 

idea. I believe bending software can only jus tified for two 

reasons: Creating part drawings if the software supports that 

function and for setting up a fully automatic CNC bender 

for the initial test of a part with multiple bends. Even using 

the software the bend locations usually need to be hand 

tweaked for accu racy before going into production. Most 

pro fessional fabricators use a method similar to what is 

de scribed here. It is ex tremely easy, accu rate and fast. 

However, what if you need to bend 500 pieces. How would 

you use this process? Don’t worry, it’s a simple technique  

that I will explain later but first let’s just complete a single 

piece job. To do this I’m going to go through the whole 

process that I use to make a four bend rollbar for a racecar 

as shown in Figure 16. This is a great ex ample be cause it’s 

a common request, there are no simple 90 de gree bends, 

and it is generally a one-off piece. So hold on to your lug 

nuts, here we go.

Bending Method #1 - Using Template Bends

The Easy Way To Position Bends

Figure 15 - Sample Template Bend

Let’s Make A Bend Template...

Figure 16

Sample Rollbar

Figure 17

Template Line

Summary of Contents for 3

Page 1: ...Model 3 Tube Bender Assembly Operating Instructions J D Squared Inc 2244 Eddie Williams Rd Johnson City TN 37601 423 979 0309 FAX 423 979 2426 http www jd2 com Copyright 2009 by J D Squared Inc...

Page 2: ...lar on one of the two Spacer Tubes 1 OD tubes Do not tighten collar E Install the Upper Frame Link Ratchet assembly and 1 Spacer Tubes as shown above Hand tighten the bolts F Insert the 1 Frame Pin in...

Page 3: ...ed simply obtain a length of 1 pipe 1 315 o d and cut it to the desired length You also need to drill a 7 16 hole near one end so the pull pin may be installed 3 The two Drive Links are assembled next...

Page 4: ...m the bender s frame Notice that through the hydraulic swivel block is machined a 2 1 4 x 14 TPI thread and a slight shoulder The shoulder should face away from the drive links towards the rear of the...

Page 5: ...ng Die This is the part that the tube or pipe actually bends around It has a circular groove machined around its circumference Please note that this groove is machined with a specially designed profil...

Page 6: ...1 and 2 Line 1 runs from the center of the forming die s center hole to approximately the middle of the angled rear insert Line 2 runs from that point parallel to the tubing This illustrates the basi...

Page 7: ...breath spoil break annihilate brutalize makeinoperable or otherwise extinguish its very existence just visit your local welding supply to get a new one Pointer Die Block Figure 12 Pointer installed o...

Page 8: ...ie s pointer is at 0 degrees and then hand tighten the nut to secure it into position Now you re ready to bend Pull on the handle in a clockwise direction until the Ratchet Lever cannot rotate any fur...

Page 9: ...r the tubing the greater the springback For in stance chromemoly tubing will springback roughly twice as far as the ex act same size and wall thickness of welded seam mild steel tubing By using a tem...

Page 10: ...d tubing However for this application I think it s a waste of time Timeusuallycostmorethantubing so here s the fast way Take the total width of the rollbar 62 and add it to twice the height 40 which g...

Page 11: ...e of bend indicators this is easily accomplished Once you know the correct over bend required you may want to record it for future reference BEND 2 Place the template above therollbartubewiththetempla...

Page 12: ...UCTION BENDER USING THE TEMPLATE METHOD As I stated earlier this method can be used for production bending The idea of making the bends from the center out doesn t usually work well in production Most...

Page 13: ...simply unbend it Obviously this only works for small amounts of overbend If the tubing is under bent it will be necessary to put it back into the bender D With the tube bent correctly to 90 degrees lo...

Page 14: ...ght 13 1 2 for the right upright 74 1 2 of tubing needed It s usually a good idea to leave a couple of inches extra on the end Remember it s easier to remove tubing then to add it So let s add 2 to 74...

Page 15: ...far side of the completed bend to the edge of the bending die See figure 28 This measurement should read 40 width of hoop 3 4 radius of tube not in bending die 1 8 springback allowance 39 1 8 Make th...

Reviews: