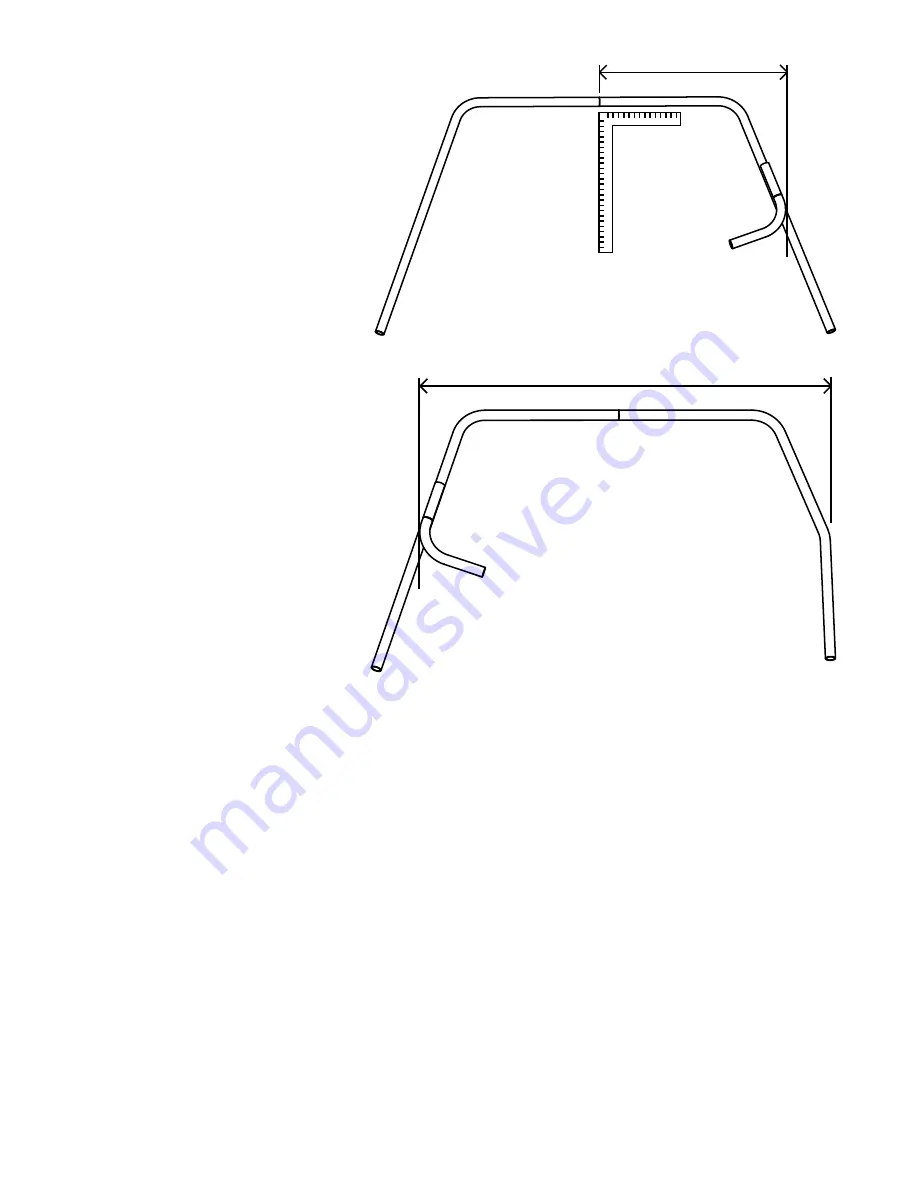
31”
62”
Figure 23 - 3rd bend position
Figure 24 - 4th bend position
BEND 3:
At this step you may want to use
a large 90
o
square to help position the
template. Position the template above
the rollbar tube with the template line
facing up towards the top of the rollbar
as shown in figure 23. Slide the template
up or down the rollbar tube until its
outside is 31” from the rollbar’s center.
Mark your tube and make the bend.
BEND 4:
Position the template with the
template line facing up towards the
top of the rollbar as shown in figure
24. Slide the template up or down the
rollbar tube until its outside is 62” from
the outside of the 3rd bend. Also, verify
the bend is the same distance down
the tube from the top of the rollbar. If
all is correct mark the tube and make
the bend.
Lastly, cut the ends of the tube
to make the rollbar 40” tall and your
done.
Finished!
PROCEDURE FOR SETTING UP A PRODUCTION BENDER USING THE TEMPLATE METHOD
As I stated earlier, this method can be used for production bending. The idea of making the bends
from the center out doesn’t usually work well in production. Most production bending is done by feeding
the tube through the bender and making each bend as needed, thereby eliminating the need to remove
the tube from the bender and flip it around. For this you would want a setup sheet with the locations of
where to place the marks on the tubing for each bend location. The problem with template bending is that
the template has the tube stretch and springback already in it. Since the tubing will grow in length as you
make bends in it, how can you measure it accurately once it’s bent? Unfortunately, you can’t. What you
must do is place marks down the tube, for example 10” apart, starting at the one end before you start
bending. Now whenever you transfer the mark from the template to the tube being bent you can easily
measure the distance from one of the 10” marks to determine where the mark would of been placed on
an unbent piece of tube.
- 11 -


