background image

ENGLISH 


OPERATION MANUAL 


JB SYSTEMS

®


5/15 

USB 1.1 REC 


1.  POWER [ON/OFF] switch:

 switches the player on and off.  

2.  DISC TRAY

: Use the [OPEN/CLOSE] button to open disc tray and put the CD in place. 

3.  [USB 1] connection:

 this is the first (type-A) USB-connection, used to connect any USB mass storage 

device that was formatted in FAT or FAT32. By default this input is used to connect an occasional USB-
drive like USB-sticks etc. 

4.  [USB 2]  connection:

  this is the second (type-A) USB-connection, used to connect any USB mass 

storage device that was formatted in FAT or FAT32. By default this input is used to connect a hard disk. 

Attention:

 because the power supplied by the USB-output is limited, it is highly recommended to use a 

hard drive with separate power supply. HDD capacity should also be limited to 500GB max. 

5.  UNBALANCED AUDIO output: 

Output for the audio signals from the  player. Use the supplied 

cinch/cinch cable to connect this output to a CD/line input of your mixing unit. 

6.  BALANCED AUDIO output:

 the same audio signal as on the cinch outputs (5) but balanced output via 

XLR-connectors. To be used in case of long audio lines: use optional good quality XLR/XLR cables for 
optimal performance!   

7.  MAINS input: 

connect the player to the AC mains, using the supplied power-cord. 

8.  IR-receiver:

 make sure that this IR-receiver is not covered, otherwise your wireless remote will not work 

properly! 

9.  UNBALANCED AUDIO input :

 Input for the audio signals from external “line level” (1V

max

)


sources. Use 

an optional cinch/cinch cable to connect this input to the output of a CD-player or a mixer. 


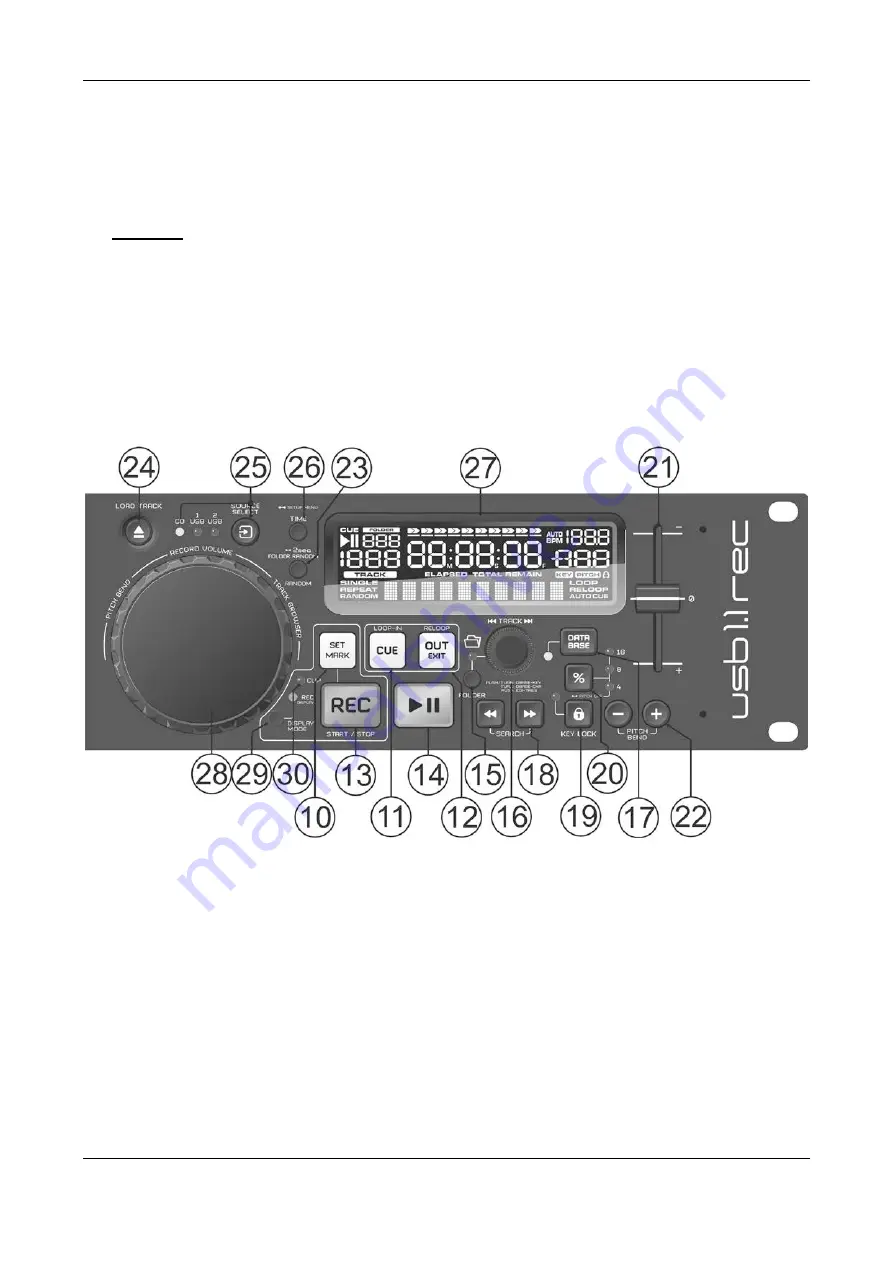
10. [SET MARK] button:

 Allows you to set a marker while recording. The recording continues on a new 

file.  

11. [CUE] button:

 Used to set the startpoint to creat a loop. Once this startpoint is set, the button can be 

pushed to create a [STUTTER]-effect. Keeping the button pushed will start playing the track from the 
startpoint. Releasing the button will stop the playing of the track. While having the button pushed you 
can push the [PLAY]-button (14) to continue playing the track the normal way. 

12. [OUT]  button: 

This button is  used to set the endpoint of a loop.  Push the button on the desired 

endpoint of the loop. It will start blinking  and [RELOOP] will appear on the display. Pushing the 
button a second time will lit it and makes the player go out of the loop and continue playing the track. 
Pushing the button again will restart the programmed loop. 

13. [REC] button:

 Pressing the [REC] button starts recording immediately. Pushing the button again will 

stop the recording. 

14. [PLAY/PAUSE]  button:

  every time you press the [PLAY/PAUSE]  button the player changes from 

play to pause or from pause to play. The button blinks as long as the player is set to pause. 

15. [FOLDER]  button:

  changes the function of the [TRACK]  knob (16) while the search key is set to 

“Std” (standard track/folder search without Track-Indexer database). 


Summary of Contents for USB 1.1 REC

Page 1: ......

Page 2: ......

Page 3: ...tracks with certain genre or from a certain artist or album avoids mix up of 2 completely different music styles perfect for bars clubs restaurants IR remote with loop speed control track search selec...

Page 4: ...ENGLISH OPERATION MANUAL JB SYSTEMS 2 15 USB 1 1 REC...

Page 5: ...ly off when the power cord is squashed or damaged It must be replaced by the manufacturer its service agent or similarly qualified persons in order to avoid a hazard Never let the power cord come into...

Page 6: ...damaged scratched or deformed they can damage your appliance To prevent fire or shock hazard do not expose this appliance to rain or moisture In order to prevent electric shock do not open the top co...

Page 7: ...rwise your wireless remote will not work properly 9 UNBALANCED AUDIO input Input for the audio signals from external line level 1Vmax sources Use an optional cinch cinch cable to connect this input to...

Page 8: ...EXT TRACK function will be used while searching on CDs and mass storage devices that don t have the Track Indexer database system files installed You can only search on track and folder numbers DATABA...

Page 9: ...ent functions Change time display The TIME button switches between elapsed playing time remaining time in a selection and total remaining time of the disc standard remaining track The total remaining...

Page 10: ...s time information of current track 8 SECOND Shows seconds time information of current track 9 FRAME Shows frame time information of current track 1 frame 1 75 th sec 10 ELAPSED REMAIN indicates that...

Page 11: ...lay only REPEAT is lit the current directory is repeated REPEAT TRACK when on the display both REPEAT and SINGLE are lit the current track is repeated 15 Battery compartment Replace only with CR2025 o...

Page 12: ...ing signal on the output 9 Version upgrading use this option to check and or upgrade the firmware versions Turn the TRACK knob 16 to select the 2 firmware parts o CON xx shows the version of the contr...

Page 13: ...ve letter was assigned to it Click on the Track Indexer icon to start the software the main screen is shown In the upper center choose your USB drive Press the BUILD button The software starts scannin...

Page 14: ...ination of FOLDER button and TRACK knob to browse the different directories Option 2 Press the DATABASE button 17 to start the lookup function both the FOLDER and TRACK displays start blinking Turn th...

Page 15: ...choose Press the RANDOM button 23 for about 2 seconds until RANDOM starts blinking in the display Press the PLAY button 14 to start random playback only from the tracks of the selected genre Remark1 t...

Page 16: ...4sec CD Electronic tracking Full automatic digital tracking MP3 FORMAT Possible file extensions mp3 MP3 mP3 Mp3 WAV ISO9660 max 63 character style Joliet max 63 character style CD ROM sector format m...

Page 17: ...NGLISH OPERATION MANUAL JB SYSTEMS 15 15 USB 1 1 REC Every information is subject to change without prior notice You can download the latest version of this user manual on our website www jb systems e...

Page 18: ......

Page 19: ......

Page 20: ......

Reviews: