background image

13

D S C   S Y S T E M   C O N N E C T I O N

Caution:

Always make certain that the controller and the subwoofer are turned off before connecting 

or disconnecting anything.

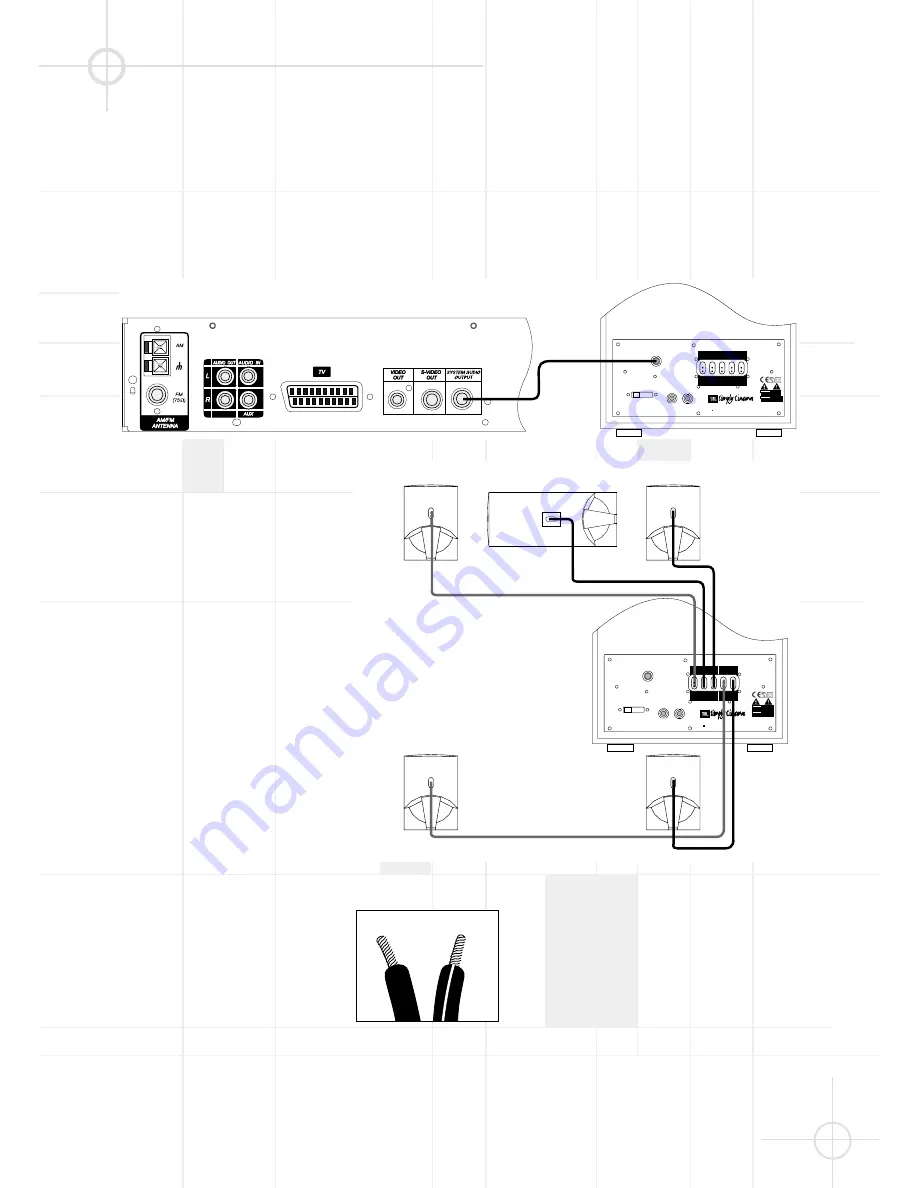
Connecting the Controller to
the Subwoofer

Connect the special multi-pin cable
(included) to the output marked
"System Audio Output" on the
controller and to the input marked

"System Audio Input" on the
subwoofer. This sends the bass/Low
Frequency Effects signal to the
subwoofer's own 100 Watt amplifier
and sends the three front and two
rear channels to the five 35 Watt
amplifiers 

conveniently built into the subwoofer
to power your DSC satellite speakers.

(DSC400 Only)

Connect the special error-proof
connectors at the loudspeaker end
of each cable to the correct loud-
speaker. Make certain to connect the
right front output on the subwoofer
to the right front speaker, center
output to center speaker, etc.

(DSC800 Only)

Remove 1/2 cm of insulation from the
loudspeaker end of each cable.
Connect the "+" conductor (marked
with a stripe) to the red "+" terminal

of the appropriate loudspeaker and
the "-" conductor to the black "-"
terminal of the loudspeaker. Make
certain to connect the right front
output on the subwoofer to the right
front speaker, center output to center
speaker, etc. It is important to
connect all speakers correctly, with
plus wire to plus terminal and minus
wire to minus terminal. Incorrect "out
of phase" wiring will result in thin
sound, weak bass and a poor stereo
image.

Connecting the Subwoofer
to the Satellites

Your DSC system includes cables for
connection of all five satellite
speakers to the subwoofer. Connect
the special error-proof connectors at
the subwoofer end of each cable to
the appropriately marked sockets on
the rear of the subwoofer. Owners of
the DSC400 system should follow the
instructions in the section marked
"DSC400 Only" for cable connection to
the DSC400 satellites. Owners of the
DSC800 system should follow the
instructions in the section marked
"DSC800 Only" for cable connection to
the DSC800 satellites. To place the
speakers in your room, see the
recommendation on pages 11 and 30.

Right Front Speaker

LOUDSPEAKER OUTPUTS

ON / STANDBY

OFF

           AC 
230 - 240V ~ 50Hz
         450W

WARNING

A V IS

                        NE PA S O UV RIR

RISQUE DE  CHOC  ELECTRIQUE

                       DO  NO T  OPEN

RISK O F ELECTRIC  SHOCK

For use with
DSC400 System

JBL, Incorporated

Northridge, CA

 SUB400

A Harman International Company

Manufactured:

THIS PA NEL A ND ITS  A BO V E 
HEA TSINK A RE DESIG NED TO  
BEC O ME Q UITE W A RM  DURING  
NO RM A L O PERATIO N

Impo rta nt de ta ils re g a rding  
the use o f a uto ma tic  Turn 
O n  /   Sta ndby  /   O ff  a re     in 
yo ur o wne r's ma nua l.

RIGHT

CENTER

LEFT

LEFT

RIGHT

FRONT 
SPEAKERS

SURROUND
SPEAKERS

SYSTEM AUDIO

INPUT

<

"WARNING :

"AVIS :

 FOR 

CONTINUED PROTECTION 
AGAINST A RISK OF FIRE, 
REPLACE ONLY WITH SAME 
FUSE TYPE."

 UTILSER UN FUSIBLE

DE RECHANGE DE 
MEME TYPE."

4A / 250V  TYPE T

 POWER

TM

Left Front Speaker

Subwoofer

Center Speaker

Right Surround Speaker

Left Surround Speaker

LOUDSPEAKER OUTPUTS

ON / STANDBY

OFF

           AC 
230 - 240V ~ 50Hz
         450W

WARNING

A V IS

                        NE PA S OU VRIR

RISQUE DE  CHOC  ELECTRIQUE

                       DO  NOT O PEN

RISK O F ELECTRIC  SHOC K

For use with
DSC400 System

JBL, Incorporated

Northridge, CA

 SUB400

A Harman International Company

Manufactured:

THIS PA NEL A ND ITS  A BO V E 
HEA TSINK  A RE  DESIG NED  TO  
BEC O ME Q UITE W A RM  DURING  
NO RM A L O PERATIO N

Impo rta nt de ta ils re g a rding  
the use o f a uto ma tic  Turn 
O n  /  Sta ndby  /   O ff  a re     in 
yo ur o wne r's ma nua l.

RIGHT

CENTER

LEFT

LEFT

RIGHT

FRONT 
SPEAKERS

SURROUND
SPEAKERS

SYSTEM AUDIO

INPUT

<

"WARNING :

"AVIS :

 FOR 

CONTINUED PROTECTION 
AGAINST A RISK OF FIRE, 
REPLACE ONLY WITH SAME 
FUSE TYPE."

 UTILSER UN FUSIBLE

DE RECHANGE DE 
MEME TYPE."

4A / 250V  TYPE T

 POWER

TM

Subwoofer

Summary of Contents for DSC 800

Page 1: ...hrill of live performance and movie sound to the home environment by calling on JBL s professional engineering leadership SATELLITE TYPE Titanium laminate dome tweeter SUBWOOFER TYPE Bass reflex enclo...

Page 2: ......

Page 3: ...tions for changing them are found in the second half of the manual This system was designed to provide you with many years of reliable operation with a minimum of care and maintenance Every component...

Page 4: ...g the On Screen Display OSD Language 27 Screen Saver Setting SCR Saver 27 TV Display Setting 28 TV Type Setting Multi NTSC PAL 28 Video Out Setting 29 Angle Mark Setting 29 Speaker Setup 30 Audio Mode...

Page 5: ...water or other liquids near the controller In the event that liquid should enter the cabinet unplug the unit immediately and contact your authorized JBL dealer immediately Do not remove the cabinet T...

Page 6: ...e copy pro tection code prevents the videotape copy from playing normally For Optimum Performance The controller is a precision device that is constructed using extremely accurate technology Soiling o...

Page 7: ...listening to the radio page 36 press this button to tune to a higher frequency For automatic tuning press and hold it for more than 1 second A STOP page 18 Stop playing a disc G B PLAY PAUSE page 18 P...

Page 8: ...tion is received DTS Illuminates when the disc playing outputs DTS audio FM AM Frequency In AM mode kHz lights up In FM mode MHz lights up Wide page 36 Illuminates when Pro Logic Wide or 3 Stereo Wide...

Page 9: ...ry when using DSC loudspeaker system and subwoofer connection AUX Audio In page 15 Connect to a line level analog audio source TV tape player Minidisc PC etc SCART In Out page 15 Connect to a TV SCART...

Page 10: ...must be on GO TO page 23 Selects a starting point to play Numbers page 17 20 23 Select the items or settings or tracks directly with discs or presets with tuner PROGRAM page 22 Stores CD tracks for pr...

Page 11: ...hen playing DVD LANGUAGE page 34 Selects audio language and format when playing DVD DISPLAY page 24 Switches item displayed on screen and or on front panel display DVD page 18 Selects the input from a...

Page 12: ...disc Do not expose the disc to direct sunlight or sources such as hot air ducts or leave it in a car parked in direct sunlight as there can be a considerable rise in temperature in side the car After...

Page 13: ...tly behind the listening position and ideally should face each other and be at a level higher than the listeners ears If that is not possible they may be placed on a wall behind the listening position...

Page 14: ...rrounds DSC400 Satellites and Surrounds On shelves On the wall Wall brackets are included On optional stands On shelves On the wall Wall brackets are an optional extra WB300S On optional stands FS300S...

Page 15: ...the rear of the subwoofer Owners of the DSC400 system should follow the instructions in the section marked DSC400 Only for cable connection to the DSC400 satellites Owners of the DSC800 system should...

Page 16: ...g the FM wire antenna keep it as horizontal as possible Move it until you receive the best reception If you have poor FM reception Use a 75 ohm coaxial cable not included to connect the system to an o...

Page 17: ...t a line level stereo analog audio source such as a Sat receiver tape deck phono preamp of a record player etc to the controller s rear panel AUX Input sockets to enjoy the benefits of your DSC system...

Page 18: ...ress TEST TONE again to cancel the test tone function You can skip step 4 and go to the next section 4 If the level of all 5 speakers does not sound the same at your normal listening position you can...

Page 19: ...ars in the display approximately 4 seconds otherwise the station will not be memorized 7 Repeat steps 2 to 6 to enter up to 40 stations in the tuner memory Recalling Preset Stations 1 Press STANDBY on...

Page 20: ...enu or title menu may appear on the TV screen see page 20 When playing a VCD CD or MP3 disc the player will go to stop mode With CDs and MP3 discs the number of all tracks on the disc will be displaye...

Page 21: ...g or repeatedly If the playing disc is a DVD you can select the following search speeds FF1 FF2 FF3 FF4 or FR1 FR2 FR3 FR4 If the playing disc is a CD you can select the following search speeds FF1 FF...

Page 22: ...le or chapter you want to play Depending on the disc you can use the number buttons 0 9 10 to select the title or chapter 3 Press ENTER The player starts playing the selected title or chapter Notes De...

Page 23: ...s useful when you want to memorize lyrics or repeatedly watch a portion of the DVD 1 When playing a disc press A B one time to set the starting point A of the specific portion you want to play repeate...

Page 24: ...he program mode the system will interrupt and exit the program setting mode In program play mode press STOP A once to stop program play The program sequence remains in memory Notes The program remains...

Page 25: ...example key in 0 1 2 3 4 5 3 Press ENTER to start playing from the point of 01 23 45 This is not needed with VCD s the player will skip to the time selected at once 4 Press GO TO again to exit time m...

Page 26: ...playing a CD or VCD 1 Press DISPLAY for track number selected total track number on disc and the single track elapsed time 2 Press Display repeatedly for single track remaining time then total disc e...

Page 27: ...ge then press ENTER to go to the selected page Note The Preferences Page cannot be selected while a disc is playing If a disc is playing press SETUP again to exit the SETUP Menu page and press STOP to...

Page 28: ...ENCES GENERAL PAGE TV DISPLAY NORMAL PS NORMAL LB WIDE 16 9 TV TYPE MULTI NTSC PAL VIDEO OUT S VIDEO RGB ANGLE MARK ON OFF OSD LANG ENGLISH FRENCH ITALIAN GERMAN SPANISH SCR SAVER ON OFF MAIN PAGE SPE...

Page 29: ...guages for the audio track subtitles and disc menus appro priately see pages 31 32 if available on the disc If the disc you are viewing does not support the On Screen Display OSD language you selected...

Page 30: ...nually when 4 3 content is played otherwise it will be shown compressed vertically TV Type Setting Multi NTSC PAL Your TV is either a PAL or multi system TV The initial Default TV Type setting of this...

Page 31: ...rent video output setting They are for information only Your system has been preset to the S VIDEO setting and it must remain in the S VIDEO setting in order to view the picture on your TV 1 Press SET...

Page 32: ...atically as default setting Notes With all discs containing no Dolby Digital or DTS audio the default listening mode will be stereo as indicated in the front display no Pro Logic indicator is on and t...

Page 33: ...retained Select dynamic range compression to fit your individual listening situation The variable range is from FULL 7 8 to 1 8 or OFF OFF Audio with uncompressed dynamic range 7 8 1 8 Audio with par...

Page 34: ...ed depending on the age of the users The parental control function in this system allows restricted access to be set by the parent The default setting is NO PARENTAL Movie ratings if any are as follow...

Page 35: ...x Enter it again in the Confirm Pwd box Press ENTER once more to confirm your new password To avoid locking forever you must memorize and remember your password Please make a note of your new password...

Page 36: ...ff even if you set the subtitle function to off During some scenes the subtitles may not appear immediately after you turn them on Some DVD s allow you to make subtitle selections and turn subtitles o...

Page 37: ...tune to another stronger RDS station Open Close Power DVD VCD CD MP3 Headphone Select Source Volume Volume STANDBY REPEAT A B SUBTITLE TITLE SETUP DVD 1 GOTO 2 RETURN AUDIO DISPLAY ANGLE 5 4 3 6 7 8 Z...

Page 38: ...ressing ADJ VOL or 5 The system s Dolby Pro Logic decoder may be used for enhanced listening to a stereo source For details see Selecting Listening Modes below Selecting Listening Modes This system ha...

Page 39: ...ls and a special dedicated low frequency channel PRO LOGIC The standard mode for analog surround sound decoding It uses information encoded in a two channel stereo recording to produce four distinct o...

Page 40: ...play At the same time a listing of all the directories appear on the screen if the disc contains several directories see figure 1 below With discs without directories a listing of up to 12 tracks on t...

Page 41: ...to the differences in various versions of the MP3 format and the many differences between the CD R machines used to record MP3 discs on a computer it is possible that some MP3 discs may not play on th...

Page 42: ...the volume of one or more speakers individually insert a DVD movie disc with a Dolby Digital or DTS 5 1 channel soundtrack and begin playback Then press the SELECT button on the remote control to sel...

Page 43: ...ess the E D buttons the zoom point shifts allowing you to pan the zoomed picture Some discs may not respond to the zoom feature Zooming does not work on subtitles or menu screens included on DVDs The...

Page 44: ...Turn off the system eliminate the short circuit problem and turn on the power again The audio interconnect is damaged Replace it with a new one The system is in pause mode or in slow motion play mode...

Page 45: ...play mode turn the PBC Playback Control off by pressing MENU PBC on the remote an appropriate message will appear on the TV screeen not available with DVD Messages do not appear on the TV screen in th...

Page 46: ...ls are recorded discretely and processed digitally Manufactured under license from Digital Theater Systems Inc US Pat No 5 451 942 and other worldwide patents issued and pending DTS and DTS Digital Su...

Page 47: ...EIAJ 2kHz CD More than 85 dB EIJA FM Tuner System PLL quartz locked digital synthesizer system Tuning range 87 50 108 00 MHz Antenna terminals 75 ohms unbalanced Intermediate frequency 10 7 MHz AM Tun...

Page 48: ...RMS Bass midrange drivers 2 x 75 mm paper cone 2 x 100 mm paper cone magnetically shielded magnetically shielded High frequency driver 12 mm Titanium laminate dome 12 mm Titanium laminate dome magneti...

Page 49: ...47...

Page 50: ...DSC400 800 O W N E R S G U I D E PRODUCT LINE DSC 400 230V DSC 800 230V DESIGN GOAL Bring the thrill of live performance and movie sound to the home environment by calling on JBL s professional engin...

Reviews: