background image

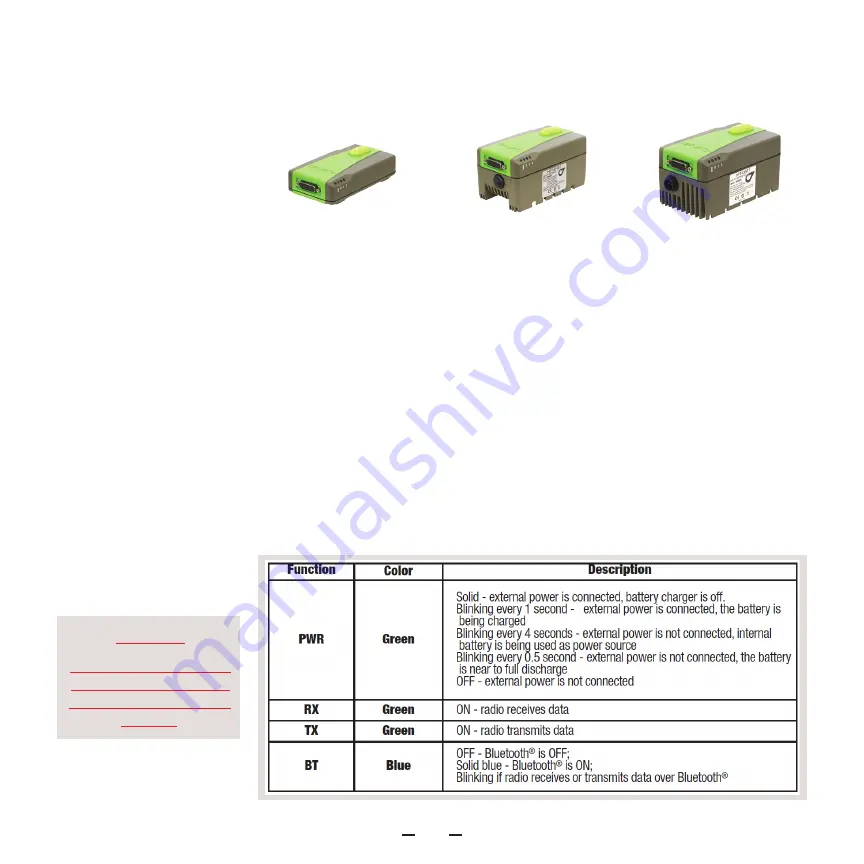
HPT404BT                 HPT401BT/901BT           HPT435BT

TRIUMPH-2 START GUIDE

3

To operate TRIUMPH-2 

as RTK base station it 

could be equipped with 

Bluetooth® capable 

external radio like either 

one of three UHF 406.1-

470 MHz radio trans-

ceivers: 35W HPT435BT, 

4W HPT404BT, 1W 

HPT401BT or license 

free frequency hop-

ping 902-928 MHz 1 W 

HPT901BT radio trans-

ceiver. 

TRIUMPH-2 communicates with radio via Bluetooth wireless link. Up to 50 ft 

(~15 m) is the practicable range of the communication between TRIUMPH-2 

and HPT401BT/HPT404BT. Actually in the field they keep reliable connection 

up to 130 ft (~40 m). TRIUMPH-2 and radio are paired at the factory, so they 

automatically connect together after power applied.
To turn ON the radio without the internal battery, connect the external power 

using the cable included to the kit.
To turn ON the radio with the internal battery, either connect the external 

power or press and hold the power button for more than 5 seconds to operate 

from the battery. To charge the internal battery, connect the external power.

External radio status indication:

WARNING! 

To avoid serious damage 

of the equipment, do not 

use the radio without the 

antenna!

Summary of Contents for TRIUMPH-2

Page 1: ...Last revised July 30 2018 TRIUMPH 2 Start Guide ...

Page 2: ...eries Input voltage 10 16 VDC The USB port is used for high speed data transfer and com munication between the receiver and an external device How to clear NVRAM 1 Turn the receiver OFF with ON OFF button 2 Press and hold the Record button 3 Turn the receiver ON by pressing ON OFF button 4 Wait till all LEDs will flashing yellow except battery LED 5 Release the Record button The bottom 1 4 20 thre...

Page 3: ... TRIUMPH 2 and HPT401BT HPT404BT Actually in the field they keep reliable connection up to 130 ft 40 m TRIUMPH 2 and radio are paired at the factory so they automatically connect together after power applied To turn ON the radio without the internal battery connect the external power using the cable included to the kit To turn ON the radio with the internal battery either connect the external powe...

Page 4: ... the battery means external power is connected 2 Effective number of satellites are total number of satellites tracked minus the number of non GPS sys tems tracked For example if 8 GPS and 5 GLONASS are tracked the effective number of satellites is 12 3 RECORDING LED blinks on each recording TRIUMPH 2 START GUIDE 4 ...

Page 5: ...WLAN Figure 1 Note How to connect your TRIUMPH 2 to PC see Appendix A 3 Set WLAN Mode to adhoc 4 Assign the WLAN Access Point SSID name e g triumph103 5 Enter the IP address e g 192 168 0 1 gateway e g 192 168 0 1 and Network mask e g 255 255 255 0 6 Set the WLAN Key N values to 7 Set the DHCP parameters client to off and server to on Click Apply 8 Open Server tab Figure 2 Configure ac cess to the...

Page 6: ...14 In the Connection dialog enter the same IP port and IP address as you set for TRIUMPH 2 or click the Set Default button 15 On the Connection page type the IP ad dress of the internal network its port and login password The application will connect to your TRIUMPH 2 receiver Surveying After the connection is successfully es tablished you can see the receiver s ID and serial number Click Connect ...

Page 7: ...g on the receiver that means the data recording is on Alternatively you can connect at any time to the re ceiver to monitor its status and to cancel the surveying using the Close File button For the Trajectory surveying you have to close the recording file by tap ping the Close File or pressing the recording button on the receiver Satellites and receiver files After the connection with the receive...

Page 8: ...eeded files can be deleted y tapping Delete To down load the files to the iPhone iPad select them and tap Download Figure 7 OPUS Processing The files downloaded to your device can be processed on the OPUS server Tap the OPUS tab to see the list of the raw files local files Select the needed files by tap ping The files can be deleted by tapping Delete or sent to the OPUS by tapping the Process butt...

Page 9: ...installed application will appear and you can select the needed ap plication Figure 9 Figure 9 Sending files to a server FTP Connection To get data from your iPhone iPad use the embedded FTP server You can switch to FTP tab to see current device IP address and configure the access On your desktop you can use any FTP client application e g your browser Just type the IP address in format e g ftp 172...

Page 10: ...be required After the pairing TRIUMPH 2 will be always in this list till manual disconnection with out new search 3 If WiFi connection is selected config ure your Android device as Mobile Access Point aka HotSpot Note This procedure may differ depend ing on device Connect to TRIUMPH 2 initially using Blue tooth and then tap Reconnect to WiFi but ton Select the WiFi with MobileAP radio button on th...

Page 11: ...ct the needed profile to start the connection Surveying The Data collection is performed in the Survey screen Set the following parame ters before starting the surveying Receiver file name Antenna ID Antenna Height Occupation Time Logging Rate Elevation Mask Tap Static Trajectory or Stop and Go but ton to start the survey The screen with remained surveying time and number of collected epochs appea...

Page 12: ...PUS RINEX files can be send for processing as well To convert the jps file to RINEX select it set required parameters of conversion and tap Convert button RINEX file s will be stored in the same folder as initial jps file s OPUS Processing For working with NGS OPUS server you can use standard web browser on your Android device Follow the on screen in structions to upload your data file to the syst...

Page 13: ...nal modem connects automatical ly to TRIUMPH 2 via Bluetooth Note How to connect modem to the re ceiver see Appendix B To setup receiver and modem use NetView Modem 1 Click Networking Modems and ensure the value dev blt b is selected in Receiver Port Click Apply Figure 15 2 Set auto in Modem Mode 3 Configure the modem parameters dif ferent for UHF and FH modems CONFIGURING TRIUMPH 2 AS RTK BASE WI...

Page 14: ...nce between dBm and mW for the most frequently used power values is represented in the Table 1 mW 30 100 250 500 1000 2000 4000 dBm 15 20 24 27 30 33 36 mW 10000 15000 20000 25000 32000 35000 dBm 40 42 43 44 45 46 Operation frequency in UHF Modem Fre quency field in Hz the frequency should be a multiply of 6500Hz Protocol Type simtx for base Call sign in UHF Call Sign field Switch to Simplex proto...

Page 15: ...ick Apply Then set Modem Mode to auto Click Apply again You will see fast blinking modem s Bluetooth blue LED indicating that TRIUMPH 2 is configuring the modem 5 To turn on corrections go to Ports 4 Bluetooth and enable data output for Bluetooth b port the UHF modem is connected to e g you can use RTCM 3 x correction and select RTK RTCM3 GGD full Figure 19 Set Input Mode for Bluetooth b to none 6...

Page 16: ...lected W84 WGS84 ITRF2008 is default If you want to transmit corrections in an other datum e g NAD83 or ETRS89 with out applying transformation please type in that base coordinates in that datum and select W84 7 Optionally you can set base Id and some parameters depends on corrections you set RTCM Settings The Station ID edit box allows the user to assign a separate station ID to each refer ence s...

Page 17: ...t from the list Click Connect Appendix B Pairing TRIUMPH 2 and an external modem Once TRIUMPH 2 and a JAVAD external modem are paired the turn on connec tion will be established automatically ev ery time Use the NetView Modem software to pair TRIUMPH 2 and a modem 1 Connect TRIUMPH 2 to PC using USB port and connect the modem to a PC s se rial or USB port Start NetView Modem 2 Click Parameters Net...

Page 18: ...900 Rock Avenue San Jose CA 95131 USA Phone 1 408 770 1770 Fax 1 408 770 1799 www javad com All rights reserved JAVAD GNSS Inc 2018 ...

Reviews: