background image

www.javad.com


15

Click Install to continue. Keep the default installation 

location or select a new location. If desired, create a 

shortcut on the computer’s desktop for quick access 

to NetView.

JAVAD GNSS NetView software provides an inter-

face for various configuration, monitoring, and man-

agement functions for the receiver.

To configure, manage files, or maintain the receiv-

er, connect the receiver and a computer using one of 

the following methods and start NetView:

•  a USB cable and a computer/controller with the 

JAVAD GNSS USB driver installed;

•  a Bluetooth®-enabled external device (comput-

er/controller).

Once you have established a connection between 

the receiver and the computer/controller, you will be 

able to configure the receiver and its components, 

send commands to the receiver, download files from 

the receiver’s memory; as well as, upload new firm-

ware, upload an OAF, and upload configuration files 

to a receiver, using NetView

Establishing  an USB connection

Make sure the computer has JAVAD GNSS’s USB 

driver installed (available from www.javad.com) be-

fore continuing.

Using the USB cable, connect the USB port on the 

receiver to a USB port on the computer.

Press the power buttons on the receiver and com-

puter to turn them on.

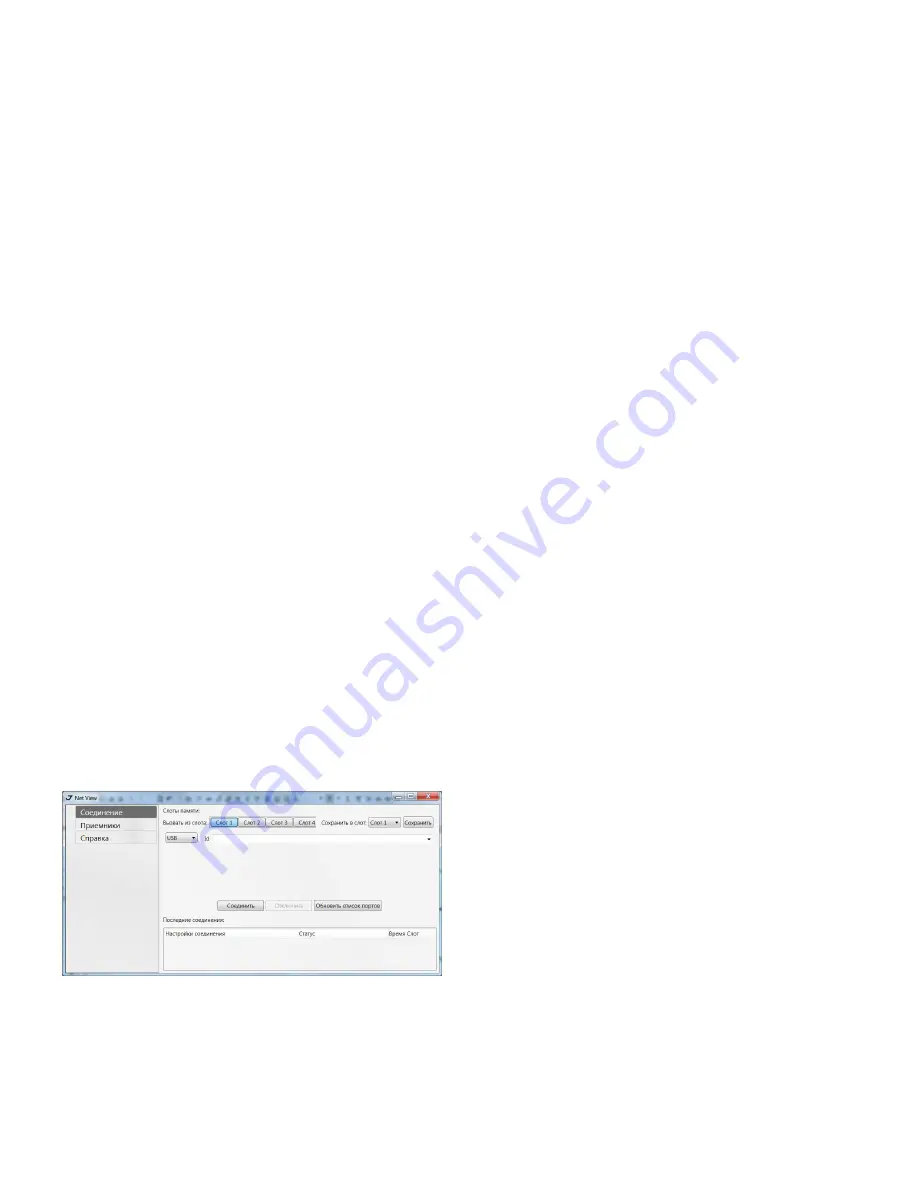
Start NetView and select USB as type of connection 

mode and select USB port ID from the list

Figure 8. 

NetView: USB connection

Establishing a Wireless Connection

The TRIUMPH-1M receiver contains Bluetooth® 

wireless technology that allows file transfer and syn-

chronization between the receiver and any other ex-

ternal device that supports Bluetooth® wireless tech-

nology. TRIUMPH-1M and external device connection 

procedure varies slightly depending on the type of 

external device used. 

Refer to your Bluetooth®-enabled external device documentation for more detailed 

connection information.

In general, the connection procedure with PC is as fol-

lows:
1. Turn on a Bluetooth®-enabled PC and your receiv-

er. The default external device mode is Master; the re-

ceiver’s Bluetooth® module mode is Slave.
2. Instruct the external device (Master) to search for 

the receiver (Slave).
3. Once the Master device detects the receiver, use 

the procedure described in the external device’s doc-

umentation to connect it with the receiver.
4. Start NetView, select SER as type of connection 

mode, and specify the port the receiver is connected 

to

CONFIGURING RECEIVER

Both Base and Rover receivers must be configured 

according to the desired survey method. 

•  In applications where real-time positioning re-

sults are required, the Base receiver provides the 

correction information needed to properly cal-

culate the location of the Rover receiver. A Base 

station is normally set up over a known point and 

collects GPS/GLONASS data from satellites. As the 

receiver picks up satellite data, it measures the 

carrier and code phases to accurately compute 

and verify its location. Then, the receiver transmits 

this information via radio (UHF or GSM) to the Rov-

er receiver. 

•  The Rover receiver applies correction informa-

tion from the Base station to its current location 

to accurately calculate one or more points. Rovers 

are mobile GNSS receivers on a survey pole or bi-

pod that compares the information from the Base 

station to the data it logs from satellites and ap-

plies correction algorithms to accurately calculate 

a new point.

•  In applications intended for post-processing, the 

receivers typically log code phase and/or carrier 

phase measurements separately from common 

satellites and during the same time interval. This 

data is then processed using post-processing soft-

ware (for example, Justin).

Summary of Contents for TRIUMPH-1M

Page 1: ...served The information contained herein may not be used accessed copied stored displayed sold modified published or distributed or otherwise reproduced without express written consent from JAVAD GNSS TRIUMPH 1M GNSS RECEIVER User Manual VERSION 1 2 LAST REVISED MAY 26 2019 ...

Page 2: ... JAVAD GNSS Inc 2019 www javad com ...

Page 3: ...FF 12 CHARGING THE BATTERIES 12 POWER SUPPLY REQUIREMENTS 12 POWERING THE RECEIVER 13 SIM CARD SLOT 13 DATA AND POWER PORTS 13 EXTERNAL ANTENNA CONNECTOR OPTIONAL 14 ATTACHING UHF GSM ANTENNA 14 MOUNTING 14 CABLES 14 OPTION AUTHORIZATION FILE OAF 14 MANAGING AND OPERATING RECEIVER USING NETVIEW 14 ESTABLISHING AN USB CONNECTION 15 ESTABLISHING A WIRELESS CONNECTION 15 CONFIGURING RECEIVER 15 MINPA...

Page 4: ...DING FILES TO A COMPUTER 23 MANAGING RECEIVER OPTIONS 23 CHECKING AN OAF 23 LOADING OAFS 23 CLEARING THE NVRAM 23 USING MINPAD TO CLEAR NVRAM 24 USING NETVIEW TO CLEAR NVRAM 24 CHECKING FIRMWARE VERSION 24 LOADING NEW FIRMWARE 24 TROUBLESHOOTING 24 CHECK THIS FIRST 24 RECEIVER PROBLEMS 24 TECHNICAL SUPPORT 26 ...

Page 5: ...rademarks of JAVAD GNSS Windows is a registered trademark of Microsoft Corporation Bluetooth word mark is owned by the Bluetooth SIG Inc Product and company names mentioned herein may be trademarks of their respec tive owners DISCLAIMER OF WARRANTY EXCEPT FOR ANY WARRANTIES IN THIS MANUAL OR A WARRANTY CARD ACCOMPANYING THE PRODUCT THIS MANUAL AND THE TRIUMPH 1 RECEIVER ARE PROVIDED AS IS THERE AR...

Page 6: ...de by an employee or independent contractor of JAVAD GNSS modifies these Terms and Conditions including the Software license warranty and limitation of liability SAFETY Improper use of TRIUMPH 1 can lead to injury to persons or property and or malfunction of the product The TRIUMPH 1 receiver should only be repaired by authorized JAVAD GNSS warranty service centers Users should review and heed the...

Page 7: ... Equipment Regulations Cet appareil numérique de la classe А respecte toutes les exigences du Réglement sur le matériel brouilleur du Canada RF EXPOSURE EVALUATION FOR MULTI TRANSMITTER PRODUCT PROCEDURES Inmobileexposureconditions simultaneoustrans mission MPE test exclusion applies when the sum of the MPE ratios for all simultaneous transmitting an tennas incorporated in a host device based on t...

Page 8: ... www javad com the following calculation of RF exposure compliance is performed Note N7NMC7700 can transmit only in any one of four modes in time of operation The worst case is transmitting in Cell band ...

Page 9: ...mputed from the ephem eris data transmitted to the receiver in navigation messages When using a single satellite system the minimum number of satellites needed to compute a position is four In a mixed satellite scenario GPS GLONASS Galileo the receiver must lock onto five or more satellites to account for the different time scales used in these systems and to obtain an absolute po sition Achieving...

Page 10: ... port 480 Mbps Full duplex 10BASE T 100BASE TX Ether net port Wi Fi IEEE 802 11b g Bluetooth V2 0 EDR Class 2 supporting SPP Slave Profile External Power port 1 port Radio Specifications 4G LTE Mini Card LTE HSPA HSDPA HSUPA WCDMA GSM GPRS EDGE up to 100 Mbps LTE EV DO 1xRTT CDMA up to 100 Mbps MicroSIM card slot User accessible fully sealed Radio Modem Internal 406 470MHz UHF radio Internal 902 9...

Page 11: ...e batteries SIM card and SD card slots a Bluetooth wireless technology module a multi system receiver board and a radio modem Figure 2 TRIUMPH 1M Figure 3 95 8 277 8 61 7 5 8 11 5 8 11 25 4 177 5 183 177 5 183 Dimensions in mm MINPAD The MinPad is the receiver s minimum interface used to display and control data input and output Figure 4 TRIUMPH 1М MinPad The BAT battery LED displays the power sta...

Page 12: ... The Record button starts stops data record ing TURNING ON OFF To turn ON the receiver press and hold the pow er button until the LEDs briefly flash To turn OFF the receiver press and hold the power key for more than one and less than four seconds until both the SAT and the REC LEDs are off CHARGING THE BATTERIES Warning Risk of explosion if battery is replaced by an incor rect type Dispose of use...

Page 13: ...ed a sharp blow been dropped or otherwise damaged Do not disassemble the supply Before connecting the external power source and the receiver make sure that the power source match es the receiver s voltage and current requirements POWERING THE RECEIVER To check the status of the internal batteries view the BAT LED or check the status using JAVAD GNSS software Check the BAT LED for battery status To...

Page 14: ...nector p n 14 578101 01 SAE to SAE cable extension connects SAE con nectors over longer distances p n 14 578102 01 PowersupplywithSAEconnector p n22 570101 01 Cable Power Charger Euro p n14 508053 01 Ca ble Power Charger US p n 14 508052 01 OPTION AUTHORIZATION FILE OAF JAVAD GNSS issues an Option Authorization File OAF to enable the specific options that customers purchase An Option Authorization...

Page 15: ...of external device used Refer to your Bluetooth enabled external device documentation for more detailed connection information In general the connection procedure with PC is as fol lows 1 Turn on a Bluetooth enabled PC and your receiv er The default external device mode is Master the re ceiver s Bluetooth module mode is Slave 2 Instruct the external device Master to search for the receiver Slave 3...

Page 16: ...te one or more points Rovers are mo bile GNSS receivers on a survey pole or bipod that compares the information from the Base station to the data it logs from satellites and applies correction algorithms to accurately calculate a new point In applications intended for post processing the receivers typically log code phase and or carrier phase measurements separately from common satel lites and dur...

Page 17: ... cd code differential DGPS mode wd wide area code differential mode WDGPS sp single point positioning mode1 Open the Rover tab and set up the following pa rameters RTK Position Computation Mode se lect Extrapolation for RTK float kine matic or Delay for RTK fixed static If Extrapolation is selected the rover will extrapo late the base station s carrier phase measurements when computing the rover s...

Page 18: ...path reduction mpnew as well mpnew Figure 15 Multipath Reduction 11 Click Apply to save the made changes and settings into receiver s memory and close the dialog window The receiver configuration will be kept in the receiver till you will change them or will clear NVRAM Note For detailed description of settings and parameters see NetView Software Manual MINPAD CONFIGURATION The TRIUMPH 1M s simple...

Page 19: ...ng specifies what pre fix will be added to the names of the receiver files created via MinPad i e by pressing FN The pre fix can be up to 20 characters long Default is log Enable Implicit Management of Specific en ables disables the management of Implicit Mes sage Output Period Function Key Figure 16 Funktion Key TriPad FN Button Action This drop down list box is used to program how the receiver w...

Page 20: ...onto a two dimensional plane The receiver calculates the coordinates of the an tenna s phase center To determine the coordinates of the station marker the user must specify the follow ing Measured height of the antenna above the sta tion marker Method of measuring the antenna height Model of the antenna used Antennas have two types of measurements Vertical measured from the marker to the an tenna ...

Page 21: ...l kinds of baselines short medium long At least two receiver antennas plumbed over survey marks simultaneously collect raw data at each end of a baseline during a certain period of time These two receivers track four or more common satellites have a common data logging rate 5 30 seconds and the same elevation mask angles The length of the obser vation sessions can vary from a few minutes to sev er...

Page 22: ...ly the receiver will start to output the coor dinates of the antenna s phase center along with the solution type within 10 30 seconds However UHF ra dios and GSM phones may take as long as 60 seconds to synchronize The geodetic coordinates displayed on the Location tab are always computed in WGS84 and have four solution types Standalone where the receiver computes 3D coordinates in autonomous mode...

Page 23: ...ion of the option Current shows if the option is in force at the present or not Purchased if the option is purchased or not Leased if the option is leased or not Date the date the leased option will be dis abled if applicable Loading OAFs JAVAD GNSS dealers provide customers with OAF files For any OAF related questions E mail at sup port javad com Please have your receiver ID num ber available Con...

Page 24: ...o load new firmware use NetView Connectyourreceiverandcomputer StartNetView Establish connection between NetView and receiver Click on the receiver name on the left panel On the right appears the information about receiver Click Action4Update firmware Select the file with the mew firmware and click Open TROUBLESHOOTING This chapter will help you diagnose and solve some common problems you may enco...

Page 25: ...ptions may be dis abled or expired See Managing Receiver Options for details on how to check current options Order a new OAF with the desired options activated to enable or extend validity of the corresponding re ceiver options Contact your dealer or visit the JAVAD GNSS website for details Refer to the NetView Software Manual for a detailed description of options There are not enough common satel...

Page 26: ...ur radio antennas if possible The receiver does not start data logging The memory option is disabled or expired Check that the memory option is enabled For de tails see Checking an OAF The receiver s memory has no free space Download and or delete data files to free up space for new files Use the AFRM feature Technical Support If the troubleshooting hints and tips in this Operator s Manual fail to...

Page 27: ...900 Rock Avenue San Jose CA 95131 USA Phone 1 408 770 1770 Fax 1 408 770 1799 www javad com All rights reserved JAVAD GNSS Inc 2019 ...

Reviews: