


MC 11000
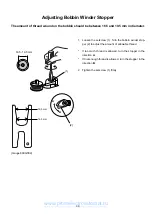
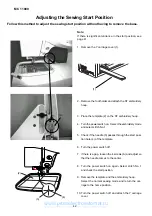
Follow this method to adjust the sewing start position without having to remove the base.
Adjusting the Sewing Start Position
Note:
If there is significant variance in the start position, see
page 41.
1. Remove the Y carriage cover (1).
2. Remove the foot holder and attach the ST embroidery
hoop.
3. Place the template (2) on the ST embroidery hoop.
4. Turn the power switch on. Select the embroidery mode
and select stitch No.1.
5. Check if the needle (3) passes through the start posi-
tion hole (4) of the template.
6. Turn the power switch off.
7. If there is a gap, loosen the 4 screws (A) and adjust so
that the needle comes to the center.
8. Turn the power switch on again. Select stitch No. 1
and check the start position.
9. Remove the template and the embroidery hoop.
Select the normal sewing mode and return the car-
riage to the home position.
10.Turn the power switch off and attach the Y carriage
cover.
(A)
(1)
(2)
(4)
(3)
42
www.promelectroavtomat.ru