background image

XG100WM User Manual 


9-1 

Janam Technologies LLC


Bluetooth  

Overview


Bluetooth is a short-range wireless communications technology.  Devices with Bluetooth capabilities can beam 

to exchange information over a distance of about 10 meters (30 feet). 


Unlike infrared, you don't need to line up the devices to beam information with Bluetooth.  You can even beam 
information to a device in a different room, as long as it's within range. 


You can use Bluetooth as follows: 


Beam information, such as files, appointments, tasks and contact cards, between devices that have 

Bluetooth capabilities. 


Use a Bluetooth service. Once you connect to another device or computer using Bluetooth, you can 
locate and use any of the services available on that device.  There are several ways to set up your 

computer for wireless access, and the following section details the general instructions needed to set 

up Bluetooth on your Janam XG100WM. Please note that complex or custom installations may require 

additional expertise from Janam’s technical and support team.  


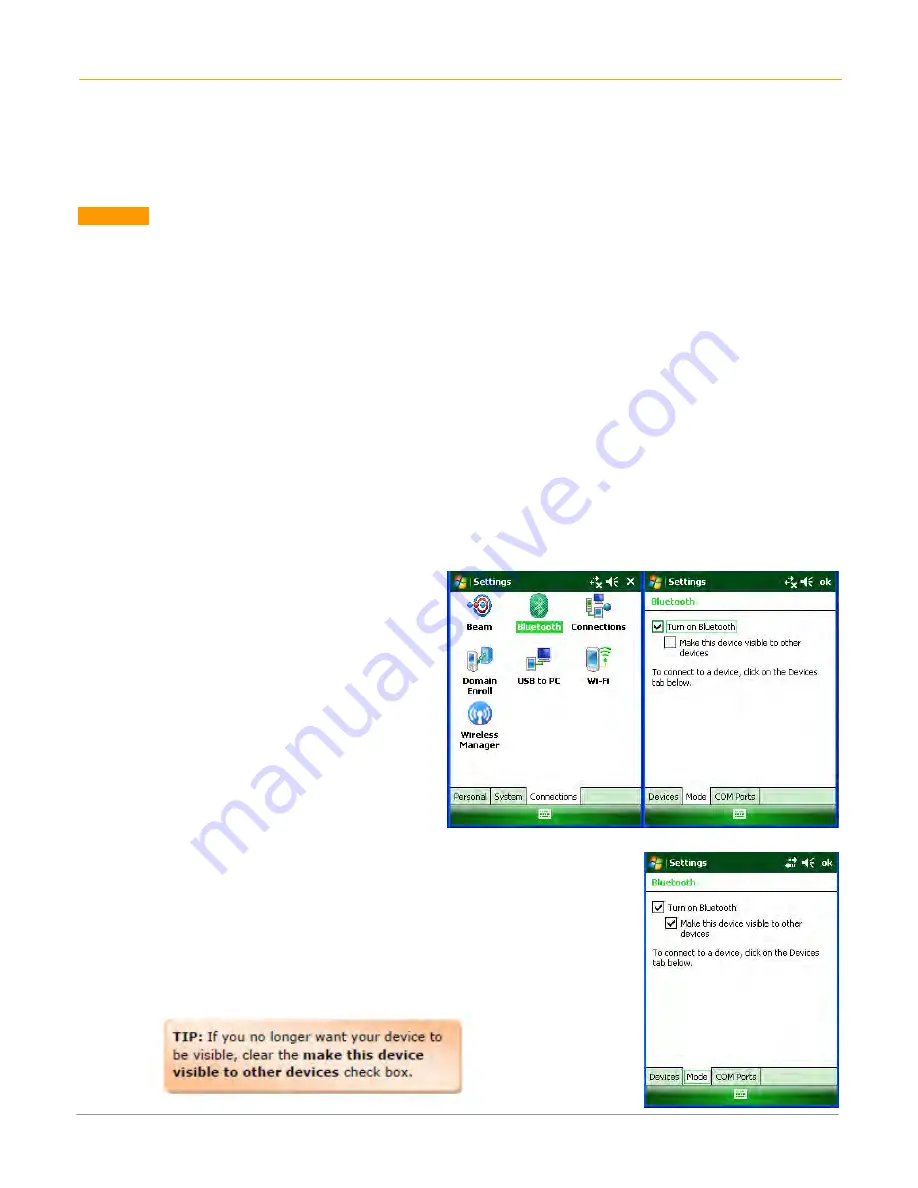
To Turn Bluetooth On/Off 


1.


Tap Start menu > Settings 

Connections tab. 

2.


Tap Bluetooth

3.


Select or clear the turn on Bluetooth 

check box. 

 
NOTE: By default, Bluetooth is turned off.  If 

you turn Bluetooth on, then turn off the 

XG100WM, Bluetooth also turns off.  When you 

turn on the device again, Bluetooth will 
automatically turn on. 


To make a device visible 


Other devices with Bluetooth capabilities can detect your device and attempt to 

beam information to it, establish a partnership, or use a Bluetooth service. 

1.


Tap Start menu > Settings Connections tab. 

2.


Tap Bluetooth

3.


Select the Turn on Bluetooth check box, and then select the Make 

this device visible to other devices check box. 


Summary of Contents for XG100WM Series

Page 1: ...Version 4 April 2012 XG100WM User Guide...

Page 2: ...s in a rotating test chamber Further enhancing its value the XG100WM features integrated 1D barcode scanning as well as built in 2D barcode scanning capability Janam s 2D scanning solution enables use...

Page 3: ...Power On Off Function key 2 Programmable keys Navigation keys Escape key Control key Syncing Charging Connector Barcode Scan Window Scan Trigger Rear LED Indicators Syncing Charging Connector Gun Han...

Page 4: ...XG100WM User Manual 1 3 Janam Technologies LLC Bottom View Battery Battery Lock Rear LED Indicators Speaker on bottom housing Battery Chamber MicroSD Card Slot Compartment Upper Handstrap Connectors...

Page 5: ...of Battery Battery Release Plunger Lower Handstrap Connector Upper Handstrap Connectors left and right side MicroSD Memory Card Door MicroSD Memory Card Door Screws Syncing Charging Connector Upper H...

Page 6: ...100 MB available hard disk space CD ROM drive One available serial or USB port Mouse Janam XG100 SDK The Janam XG Series Software Development Kit enables programmers to develop applications for Janam...

Page 7: ...1 3 Pull the entire length of the handstrap through the loop to fasten one end of the handstrap to the device 4 Clip the metal hook to the lower handstrap connector near the base of the handle Attach...

Page 8: ...r 2 Push the stylus now attached to the stylus tether through the stylus tether s loop that comes through the slit on the adjustment slider 3 Pull the entire length of the stylus tether and the stylus...

Page 9: ...er will click and lock the battery into place REMOVING THE BATTERY 1 To remove the battery fully press the battery release plunger and hold while rotating the battery counter clockwise until it stops...

Page 10: ...The battery is fully charged in approximately 5 hours 6 For Single Slot cradle only Charge a spare battery by placing the battery in the spare battery well with connectors lined up An LED will illumi...

Page 11: ...XG100WM User Manual 2 6 Janam Technologies LLC Understanding the Desktop Command bar Your XG100WM mobile computer desktop has following features What do the Status Icons Mean...

Page 12: ...Panel Components 1 microSD Card Slot located under microSD card cover Remove 2 screws using cross head screwdriver Remove the cover and insert a microSD card into the slot Replace card slot cover 2 US...

Page 13: ...eme for the background To choose add a custom background image 1 Select the use this picture as the background check box and tap Browse button to view a list of your picture files 2 Select the folder...

Page 14: ...ge and input settings To change these settings follow the directions below The style in which numbers currency dates and times are displayed is specified in regional settings To change these 1 Tap Sta...

Page 15: ...b to set regular reminders 4 Choose More tab to add remove the clock on the title bar in all programs and the sound alarm even when the device is set to silent or vibrate Note During synchronization t...

Page 16: ...tab enter your personal information To display owner information on the today screen 1 Tap Start menu Settings Personal tab Owner Information 2 On the Options tab select the identification information...

Page 17: ...time the device takes to respond will get longer and longer until the device appears to be not responding If you forget your password you must reset your device To change your password 1 Tap Start me...

Page 18: ...ossible 4 Adjust the backlight settings using keypad To check the main battery and backup battery status 1 Tap Start menu Settings System tab Power 2 On the Battery tab Main Battery status and Backup...

Page 19: ...he on the top command bar 2 Move the indicator up or down to adjust volume 3 Click off to turn volume off completely 4 Click on the handheld s background to close the popup 5 Alternatively user can us...

Page 20: ...s with the same PC each device must have a unique name To change the device name 1 Tap Start menu Settings System tab About 2 Tap the Device ID tab 3 Enter a name The device name must begin with a let...

Page 21: ...pplications To open an application 1 Tap Start menu Programs 2 Select the application you want to open Remove Applications To remove a program 1 Go to Start menu Settings Remove Program 3 Select the p...

Page 22: ...o lock the device 1 Tap Start menu Today 2 Tap Device unlocked The lock icon will change to a closed lock 3 When the device is locked keypad and touch screen will not receive user input To unlock the...

Page 23: ...o factory settings removing ALL applications and data from the device Be sure that all data is backed up before performing a clean boot To perform a master reset clean boot do the following 1 Press an...

Page 24: ...ns of the scanner and determine if everything is working properly 3 Select each item individually to verify that all hardware is working properly 4 Tap OK to return to the main demo 5 Select Menu Setu...

Page 25: ...y using the Janam Barcode Test program Unlock 2D scanning All of Janam s mobile computers can be upgraded in the field to read both 1D and 2D barcodes with a simple firmware upgrade Part Number 2D XP...

Page 26: ...unlock code will be maintained in the unit s system after a soft reset or a hard reset but it will need to be re entered after a clean reset Enable ScanCapture feature The ScanCapture demo enables yo...

Page 27: ...s captured To use continuous preview 1 Select Cont or continue button 2 Aim the XG100WM at the subject hold the device steady and press the Cont button This will start video record 3 Press the Cont bu...

Page 28: ...or Region Of Interest This is the subset of the complete image that will be extracted Another field is Image Bit Depth which can be Gray or Binary If Binary is selected the returned image will be blac...

Page 29: ...barcodes into the handheld computer See chapter 5 for details Using the Input Panel The input panel provides access to the various input methods available on your device By default input panel appears...

Page 30: ...ry is possible 1 In a program tap the Input Selector arrow and then Keyboard 2 Enter text by tapping keys on the onscreen keyboard To increase the size of the keyboard keys 1 Tap the Input Selector ar...

Page 31: ...XG100WM User Manual 6 3 Janam Technologies LLC a Using Input Selector arrow b Using Input on Settings screen...

Page 32: ...n text 1 Tap Start menu Settings System tab Screen ClearType tab 2 Select the enable ClearType check box To increase or decrease the size of text on the screen 1 Tap Start menu Settings System tab Scr...

Page 33: ...s when entering text check box and specify the settings 3 Tap OK To turn on automatic scrolling You can change input settings so that as you enter text in a program scrolling occurs automatically when...

Page 34: ...ers numbers symbols and punctuation which are converted into typed text Block recognizer is available when text entry is possible To enter text using Block Recognizer 1 From a program tap the input se...

Page 35: ...punctuation and symbols by tapping in either area of the box and then writing the desired character Using Transcriber Transcriber works transparently in the background of programs that accept user inp...

Page 36: ...nd option Select the intro screen check box to display the short introductory screen when transcriber first opens Select the sound check box to turn on transcriber sounds To set transcriber text entry...

Page 37: ...t the writing direction picture that best matches the slant of your handwriting Use letter shapes to eliminate letter shapes that you do not use or to learn methods of writing characters that will mak...

Page 38: ...under Shorthand tap Settings 3 In the Transcriber Shorthand dialog box tap Add 4 Tap Text expansion and tap Next 5 Write the Shorthand you want to use then enter the replacement text to display 6 Tap...

Page 39: ...se then select the program you want transcriber to run when you write the shorthand 6 Tap Finish then tap OK IMPORTANT NOTE The next time you write the shorthand text the appropriate program will open...

Page 40: ...sappear and the word will be highlighted 2 Do the quick correct gesture 3 On the alternates menu do one of the following To correct the selected word tap the word you want to replace it with To add th...

Page 41: ...a name for the user specific letter shapes profile and select the type LSS is the default and location for the file 5 Tap Save IMPORTANT NOTE To open a letter shapes profile tap File Open double tap t...

Page 42: ...ference you can use the onscreen keyboard or a handwriting recognition feature such as Block Recognizer Letter Recognizer and Transcriber to enter text in programs 1 Tap Start menu Settings Personal t...

Page 43: ...into a Janam XG100WM without associating that data with a user name To create a user profile 1 Tap Start menu Settings Personal tab 2 Choose Owner Information 3 Enter identification notes and display...

Page 44: ...is manual 2 Connect your Janam XG100WM to your PC 3 Microsoft ActiveSync dialog box prompts Tap OK to proceed 4 Synchronization Setup Wizard window appears Tap Next to setup the partnership connection...

Page 45: ...r mobile device and your computer Then tap Next 7 Note when you select Files an additional screen appears shown below with further information Read carefully before proceeding because your files may b...

Page 46: ...ice is connected to the desktop PC 10 Completing the Pocket PC Sync Setup Wizard window appears Tap Finish 11 Your partnership setup is completed Microsoft ActiveSync window appears with the device na...

Page 47: ...window appears Tap on Add button to add files to My Documents folder of the device and Remove button to delete files My Documents folder of the device 13 After adding and removing files the auto file...

Page 48: ...rtnership in the ActiveSync manager 2 Click Yes when confirmation screen appears 3 If there is Synchronized Files folder confirmation for folder deletion screen will appear Click Yes to proceed 4 Micr...

Page 49: ...Setup Wizard window appears Tap Cancel to setup a Guest connection 4 The guest connection is established as shown 5 Select Explore to manually copy the files on your handheld to your desktop computer...

Page 50: ...ip Settings To change partnership connection settings 1 Click the ActiveSync icon in your Windows system tray bottom right corner of taskbar 2 Choose File Connection Settings from the ActiveSync manag...

Page 51: ...ction details the basic 802 11 wireless configuration for your Janam XG100WM Wireless local area network access To set up network profile 1 Tap Start menu Settings Connections tab Wireless Manager 2 C...

Page 52: ...o ThirdPartyConfig 4 Tap Admin Login 5 Enter the password SUMMIT Note Use all uppercase letters for the password 6 Click Profile tab and double tap Scan button to search for nearby AP s 7 Select the d...

Page 53: ...Technologies LLC 8 Click Yes button to complete the new profile configuration 9 On the Main tab change active profile to the new profile created in the last step Eg SOFTWARE 10 Click tab Status tab t...

Page 54: ...ys to set up your computer for wireless access and the following section details the general instructions needed to set up Bluetooth on your Janam XG100WM Please note that complex or custom installati...

Page 55: ...tab 3 Tap Bluetooth Devices tab Add new device Your device searches for other devices with Bluetooth capabilities and displays them in the list 4 Tap the name of the device to be paired and tap Next...

Page 56: ...Tap the partnership to be renamed A pop up menu appears Select Edit 4 Enter a new name for the partnership and tap Save To Delete a Bluetooth Partnership 1 Tap Start menu Settings Connections tab set...

Page 57: ...less you set it up as follows 1 Tap Start menu Settings Connections tab Beam 2 Select the Receive all incoming beams check box 3 Ensure that your device is turned on visible and within close range of...

Page 58: ...port You have a Bluetooth enabled GPS receiver and your device has a GPS tracking program that expects to receive GPS data over a serial COM port You can create a Bluetooth partnership with the Blueto...

Page 59: ...device is currently connected to the other device via Bluetooth 2 Tap Start menu Settings Connections tab 3 Tap Bluetooth COM ports tab 4 Tap New Outgoing Port 5 Select a numbered COM port from the l...

Page 60: ...Part 15 of the FCC Rules Operation is subject to the following two conditions 1 this device may not cause harmful interference and 2 this device must accept any interference received including interf...

Page 61: ...nufacturer This Class B digital apparatus complies with the Canadian ICES 003 Cet appareil numerique de la Class B est conforme a la norm NMB 003 du Canada Operation is subject to the following two co...

Page 62: ...the image engine window and the LCD display with a clean non abrasive lint free cloth The terminal can be cleaned with a damp cloth For European Community users Janam Technologies complies with Direct...

Page 63: ...all instructions and warnings 2 Please retain this instruction for future reference WARNING 1 No user serviceable parts inside Do not open the charger The charger is not serviceable 2 If found any da...

Reviews: