background image

Page 53

TS-2030EN/TS-2076EN Series Progressive Scan Cameras

Appendix

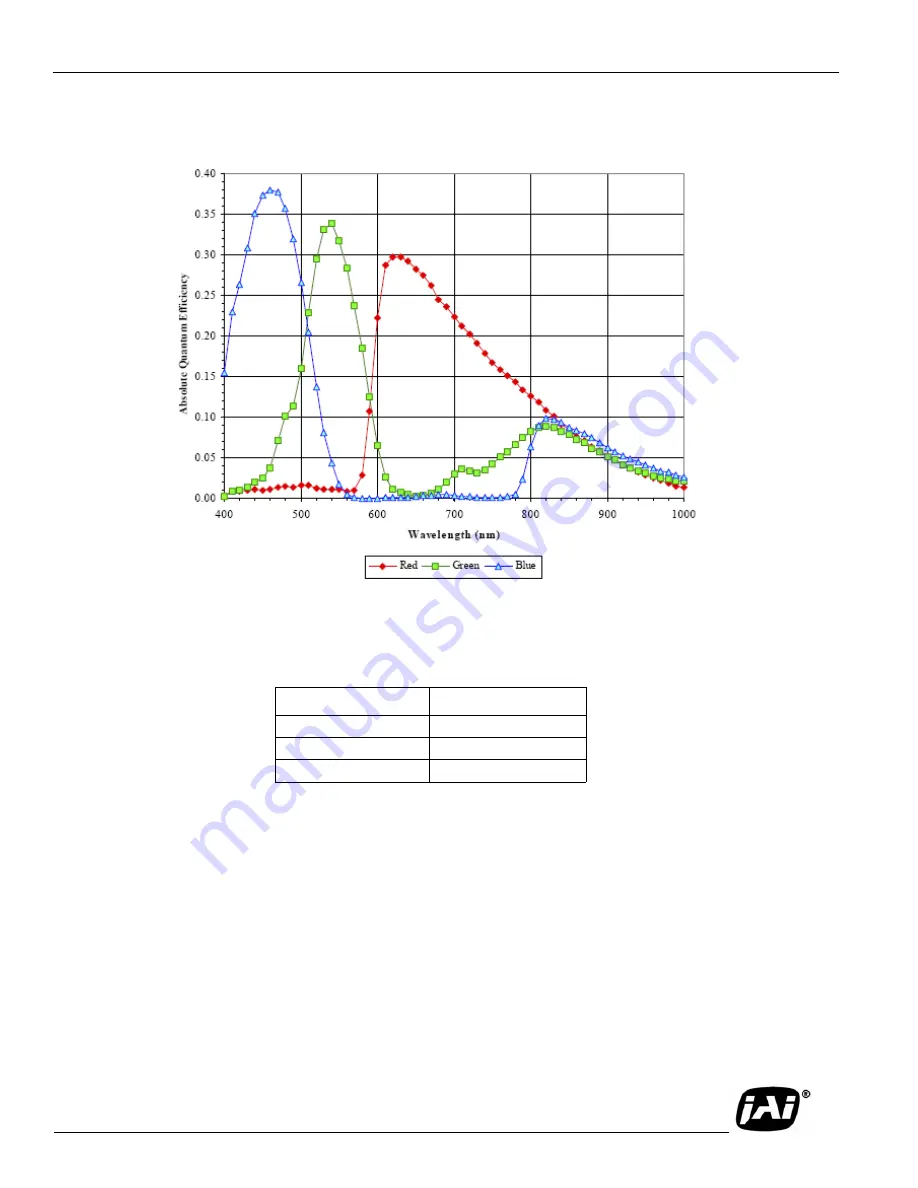
FIGURE 20.

Spectral Response (Color CCD for TSC-2030EN/TSC-2076EN)

TABLE 11.

TABLE 11.    IR Cut Filter Optical Characteristics


Wavelength

Transmission

 from 450 to 650 nm

 Average 80% above

 730 ±20 am

 Average 50%

 from 800 to 1,150 nm

 Average 10% below

Summary of Contents for Pulnix TS-2030EN Series

Page 1: ...TS 2030EN TS 2076EN Series Progressive Scan Cameras 10490 Rev A See the possibilities ...

Page 2: ...Page ii ...

Page 3: ...modifications may compromise electromagnetic com patibility and affect CE compliance Please note that the use of interconnect cables that are not properly grounded and shielded may affect CE compliance Contact JAI Inc Applications Engineering Department for further information regarding CE compliance FCC This equipment has been tested and found to comply with the limits for a Class A digital devic...

Page 4: ...Page iv ...

Page 5: ...ansfer 15 3 2 1 FTP Image Transfer 15 3 3 ADR Automatic Dynamic Range Control 16 3 3 1 Light Sensor Connection 16 3 3 2 Flash Nighttime Light Control 18 3 4 Time Synchronization 19 3 5 Static IP Address Assignment 20 3 5 1 DHCP Client 21 3 6 Maintenance 22 3 6 1 Debug Counters 22 3 6 2 Firmware Upgrade 23 3 6 3 RS 232 PowerPC Debug Port 24 4 Uploading the Firmware 29 4 1 To Verify Version Numbers ...

Page 6: ... 5 1 RS 485 40 6 5 2 Ethernet 41 6 6 Color Filter Array Color Version 41 6 7 Image Formats 42 6 7 1 TIF Format 42 6 7 2 JPEG Format 42 6 8 Image Transfer 43 6 8 1 UDP Image Transfer on Setup Channel 43 6 8 2 TCP Message Based Image Transfer on the Control Channel 43 6 9 Image Buffering 44 6 10FTP 44 6 11 NTP Network Time Protocol 45 7 Frequently Asked Questions and Troubleshooting 46 7 1 Problem 1...

Page 7: ... 7 11 Problem 11 Light Sensor Connection is Not reliable 48 7 12Problem 12 IO Board Communication Error 49 7 13Problem 13 Night Time Image is Too Bright and License Plate is Whited Out or Saturated 49 7 14Problem 14 The Day Time Image is too Bright and Whites Out or Sat urates the License Plate 50 7 15Problem 15 Flash_Erorr Appears in the Error Register 50 7 16Problem 16 Timestamp is Not Set to Cu...

Page 8: ...Page viii Table of Contents ...

Page 9: ... Image Button 13 FIGURE 10 Hardware Trigger Sniffing Mode 13 FIGURE 11 12 Pin Connector 32 FIGURE 12 26 Pin HD Sub Connector 32 FIGURE 13 Serial Communications Cable RS 232B 12 JAI Inc part number 310 132 19 33 FIGURE 14 12P 02S Interface Cable optional 35 FIGURE 15 Timing Chart 1 37 FIGURE 16 CFA Pattern 41 FIGURE 17 Enable TCP Image 41 FIGURE 18 Physical Dimensions 52 FIGURE 19 Spectral Response...

Page 10: ...Page x List of Figures ...

Page 11: ...Configurationr 33 TABLE 5 TS 2030EN TS 2076EN Exposure Times 55 0 ms x H 28 7 ms 38 TABLE 6 Factory Default Settings of the ADR Shutter Min and Max 39 TABLE 7 Gain Table BW EN Camera 39 TABLE 8 Gain Table Color EN Camera 40 TABLE 9 Factory Default Storage Setup of Image Buffering 44 TABLE 10 TS 2030EN TS 2076EN Series Product Specifications Table 51 TABLE 11 TABLE 11 IR Cut Filter Optical Characte...

Page 12: ...Page xii List of Tables ...

Page 13: ...er 69 1198 Vehicle Imaging System 300 400 Installation Manual 1 3 Key Functions of the TS 2030EN TS 2076EN Camera Sensitive high speed 1 progressive scan CCD camera 10 100 Mbit BaseT Ethernet interface External event trigger function for full frame single multiple image capture Triggering capability using Ethernet TTL or serial RS 485 Built in PowerPC processor running Linux O S 64MB SDRAM for ima...

Page 14: ...s JPEG compression and automatic FTP transmission of captured images to a file server Typical applications for the TS 2030EN TS 2076EN include Automatic Number Plate Reader ANPR LPR vehicle fingerprints vehicle matching technology optical character recognition OCR and region of interest extraction ROI as used in the market for ITS Intelligent Transportation Systems The TS 2030EN TS 2076EN supports...

Page 15: ... number 31013219 2 2 Network Settings 2 2 1 Default Network Settings for the TS 2030EN TS 2076EN Camera The factory default network setting for the TS 2030EN TS 2076EN is as follows IP address 10 0 0 65 Subnet mask 255 255 255 0 Default gateway 255 255 255 255 disabled You must set up your computer network properly in order to allow it to communicate with the TS 2030EN TS 2076EN camera It is very ...

Page 16: ...ss of the camera 5 Right click on the camera icon and select Reboot This option will reboot the camera 6 The camera will now start up with a new IP address 2 2 2 b Changing the TS 2030EN TS 2076EN Camera IP Address Using the Debug RS 232 Serial Power Cable You can use the debug RS 232 serial power cable to access the BIOS menu and change the IP address of the camera To do so follow the steps below...

Page 17: ...steps below 1 1 Click the Properties button The software will automatically find all EN cameras currently on the net work 2 Select the EN camera you want to see in the left window All accessible registers are displayed in the right window 3 Click the Video button You can select the cameras in the left window in order to display either a live image or a triggered image You can display up to four ca...

Page 18: ...erations 3 1 Image Capturing 3 1 1 Start Up the EN Setup Software Find the EN Setup shortcut on your desktop or go to Start All Programs EN Setup EN Setup Start the EN Setup software Type the case sensitive user name Administrator and password Password You can create a new user and password from User Administration option From the Tools menu select User Administration as shown in Figure 2 below FI...

Page 19: ...76EN Series Progressive Scan Cameras Tutorial 3 1 2 Camera Properties FIGURE 3 Properties Click the camera icon on the left side of the window to see all the accessible config status registers BW EN Cameras Color EN Cameras ...

Page 20: ...The live image is generated by an internal trigger mechanism inside the EN camera This internal trigger is independent of either FTP or message based TCP image Also during live image display Flash is disabled at nighttime The Snap button captures only a single video image The Freeze button disables the Live image option Use the Live or Snap buttons only while the camera is being set up for those o...

Page 21: ...Page 9 TS 2030EN TS 2076EN Series Progressive Scan Cameras Tutorial FIGURE 5 Live Image Capturing ...

Page 22: ...Page 10 TS 2030EN TS 2076EN Series Progressive Scan Cameras Tutorial FIGURE 6 Focus Bar Use the Focus Bar button to make precise adjustments to the lens focus ...

Page 23: ...EN TS 2076EN Series Progressive Scan Cameras Tutorial FIGURE 7 Measuring Box Position Use the Measuring Box button to make sure the license plate or particular target is in the correct side of the video field of view ...

Page 24: ... cameras together cover a single lane Using the Half Size image button to capture two images one on the left side of camera1 the other on the right side of camera2 To activate Half Size click on the camera icon and drag it to either the left or right video frame Click the Live button to see the live image Use the focus tool to make precise adjustments to the lens focus ...

Page 25: ... and Last One trigger mode is for when you want the EN camera to take a single shot of video image as soon as it receives a valid TTL trigger Ethernet trigger or RS 485 serial trigger All trigger mode is continuous trigger sniffing mode Trigger sniffing is a mode of operation that allows the user to continuously and passively monitor images captured by the external trigger without disturbing the t...

Page 26: ...ingle Ethernet trigger command Rep Trigger sends a continuous Ethernet trigger command every second 3 1 4 Image Properties You can monitor the image properties of captured images whether it s Live Snap or Trigger Sniffing mode On the Video Window menu select Image Properties under View You can also use the EN setup software to monitor the image properties of saved images and FTP images ...

Page 27: ... Data is an image triggered by the first TTL trigger Ethernet trigger or RS 485 serial trigger If the second FPGA trigger is set Config Address 28 then the FPGA automatically generates the second hardware trigger predefined delay after the first hardware TTL trigger Image 2 Data defines image type of the second triggered image Normally you should ignore the Image 2 Data Subdirectories is normally ...

Page 28: ...n all ambient lighting conditions The ADR also decides when to turn on off auxiliary lighting as required to maintain proper plate illumination at night and during dawn dusk transitions ADR uses an external light sensor to provide the information required to operate properly ADR operation can be enabled disabled by the user at any time Make sure to set up Moxa RS 485 to Ethernet converter properly...

Page 29: ...e light sensor If the connection is successful you should see a live data change in the ADR Debug side A B registers Also you should see what camera parameters ADR decides to set In the above example ADR sets to exposure time 4H Dial 4 4H Gain 255 max Vtop 0 and Vbot 0 If there is a connection error then these register values will all remain zero Also check the Error Status register If there is a ...

Page 30: ...he Live or Snap button does not generate Flash because they are independent from normal trigger operation Normally Flash and Night Light are controlled by ADR and a light sensor To take advantage of this feature connect to the light sensor Set the Flash Auto Manual and Night Light Control registers as shown below In this setting in the evening when light sensor reading drops below 12 Flash and Nig...

Page 31: ...input This guarantees that the clock drift is within 10ms Set the NTP server IP address registers up to 3 NTP servers Then enable NTP Client Control register Reboot the camera After rebooting the camera check the Real Time Clock register to check if the current time is properly set Note that this time is GMT If the NTP drift file is empty then the NTP will take about 1 hour to optimize the time Du...

Page 32: ...r up Telnet If you know the current IP address of the camera you can telnet directly to the EN camera Login as User name root Password JAI PULNiX If you want to assign a new IP address temporarily you can use the ifconfig utility If you want to assign a new IP address permanently you can use the test_libcamera utility See Section 3 6 3 RS 232 PowerPC Debug Port on page 24 Serial terminal using the...

Page 33: ...orial 3 5 1 DHCP Client Make sure that you have a DHCP server in your network Change the Static Dynamic IP Address Allocation register from Static to Dynamic Reboot the camera In the next power up the camera will get the IP address dynamically from the DHCP server ...

Page 34: ...ers the following debug counters Trigger Filter Noise count number of hardware TTL triggers that failed trigger noise filter PRE Filter Noise count number of hardware TTL triggers that failed PRE filter POST Filter Noise count number of hardware TTL triggers that failed POST filter Valid Trigger count number of hardware TTL triggers that passed noise filter PRE filter and POST filter VINIT count n...

Page 35: ...rigger filter to 10ms but the TTL trigger has only 9ms stable PRE condition then only PRE Filter Noise count must be incremented However all other counters remain the same If you set the POST trigger filter to 10ms but the TTL trigger has only 9ms stable POST condition then the POST Filter Noise count must be incremented Unlike PRE trigger VINIT count is also incremented because trigger pulse is s...

Page 36: ...the serial port This is useful when Ethernet is not available In this tutorial we suppose we have accidentally assigned an invalid IP address to the EN camera and now we cannot communicate with the EN camera over Ethernet When this happens there are two recovery methods Firmware Name Description Filename conversion EN Application Top level application en_YYMMDDVR app FPGA Bit file EPGA firmware FP...

Page 37: ... Scan Cameras Tutorial The first method requires setting the Hyperterminal to the following setting 9600 8 N 1 No hardware handshake Power up the EN camera You should see the monitor message in the serial terminal Type the key within three seconds ...

Page 38: ... monitor menu Enter 3 to select Change IP addresses mode Enter 1 to select Ethernet interface 1 Enter 1 again to select Change local address Enter the new IP address After setting the new IP address type 0 to exit the monitor menu After the boot up sequence login to the serial terminal Username root Password JAIPULNiX ...

Page 39: ...his process To do so enter for example kill process_id Enter the command ifconfig to see if the network is up and running Eth0 is the network interface of the EN camera In the above example the EN s network is set to the following IP address 10 0 0 65 Subnet mask 255 255 255 0 If eth0 is not running or if you want to change to a different IP address you can set the temporary network setting just t...

Page 40: ... address permanently you can use the test_libcamera utility The test_libcamera utility allows access to EEPROM where all network settings are saved After starting test_libcamera you can use the following commands rc read IP assignment static or dhcp wc write IP assignment rp read IP address wp write IP address rs read Subnet mask ws write Subnet mask rg read Gateway wg write Gateway Change the IP ...

Page 41: ... or the EN setup software Both methods are explained below 4 1 1 RS 232 PPC Debug Serial Port Telnet To verify the version numbers of all firmware with the RS 232 PPC debug serial port telnet login to EN camera as ROOT with the following user name and password user name root password JAIPULNiX Type en v to see the version numbers for all firmware currently running Ex en v version txt more version ...

Page 42: ...s button 3 Right click on the camera and select Update Firmware 4 Select Update FPGA Bit file 5 Reboot the EN camera 4 4 Updating the Lib Drv File You can update the Lib Drive file by using the EN setup software To do so follow the steps below 1 Start the EN setup software 2 Click the Properties button 3 Right click on the camera and select Update Firmware 4 Select Update Library Driver 5 Reboot t...

Page 43: ...able 1 Log in user root password JAIPULNiX and change the directory to usr local bin 2 Type ps to see the process running Kill the dhcpcd process if it is running in the background 3 Assign a static IP address to the network interface Example To assign a static IP 10 0 0 65 and subnetmask 255 255 255 0 enter this command ifconfig eth0 10 0 0 65 netmask 255 255 255 0 4 Via FTP manually send the fir...

Page 44: ... 3M part number 10226 6212VC on the rear panel The connector pin out is shown in Table 3 on page 32 FIGURE 12 26 Pin HD Sub Connector TABLE 3 D Sub Connector Pinout Configuration 10226 6212 VC Pin Description Pin Description 1 GND 7 Reserved 2 12V DC 8 Flash strobe output 3 GND analog 9 Reserved 4 Test point 10 RXD RS 232 Power PC debug port 5 GND digital 11 Reserved 6 Trigger input 12 TXD RS 232 ...

Page 45: ...camera See Section 3 6 3 on page 24 and Section 4 7 on page 31 for detailed information on how to use the debug PowerPC port 6 Ethernet C spare 19 GND Analog Out 7 Ethernet C spare 20 Test point Out 8 Ethernet B In 21 Trigger Input Out 9 Ethernet B In 22 LC TxD TTL In 10 GND Digital Out 23 LC RxD TTL In 11 Flash Strobe Output Out 24 LC DIR Control TTL In 12 Flash Status Input In 25 Ethernet D Spar...

Page 46: ... and PD 12UEP power supplies are available with the 12 pin mating connector already attached to the leads from the power supply The PD 12UU and PD 12UE power supply can be connected to the JAI Inc power cable using a terminal strip or directly When wiring the PD 12UU and PD 12UE power supplies directly please note the following The lead ends must be twisted together and tin soldered for strength a...

Page 47: ...otate the connector while applying slight pressure until the keyways line up 2 Press the connector into place until firmly seated 3 Plug the power cord into the 100V AC socket This will power the camera up 5 4 Attaching the Camera Lens The TS 2030EN TS 2076EN camera accepts 1 or larger format size C mount lenses To attach the C mount lens to the camera carefully engage the threads and rotate the l...

Page 48: ...ines The TS 2076EN provides a full vertical resolution of 768 lines The interline transfer architecture is also important to generate simultaneous shuttering This is different from full frame transfer architecture which requires a mechanical shutter or strobe light in order to freeze the object motion The TS 2030EN model enables the 30Hz frame rate by scanning 512 lines out of the entire 1080 line...

Page 49: ...Page 37 TS 2030EN TS 2076EN Series Progressive Scan Cameras Camera Features FIGURE 15 Timing Chart 1 ...

Page 50: ...er Gain Gain in short Using EN setup software user can turn on or off ADR control by accessing Camera ADR Control config register Address 50 6 3 1 Electronic Shutter Normally exposure time is controlled automatically by ADR Automatic Dynamic Range control algorithm inside the EN based on the output from light sensor However during nighttime installations it is often convenient to manually adjust t...

Page 51: ...ettings of the ADR Shutter Min and Max 6 3 2 Video Amplifier Gain Control Normally video amplifier gain is controlled automatically by an ADR Automatic Dynamic Range control algorithm inside the EN based on the output from the light sensor However the user can manually change gain value by using the EN setup software See Section 7 2 on page 47 for more information Normally gain would be manually a...

Page 52: ...omthelight sensor The user can manually turn on and off the strobe and night light if necessary Youneedtobeable to accessthefollowingregistersbymeansoftheENsetupsoftware RegisterAddress10 NightLightControl RegisterAddress11 NightLight ONthresholdandFlashenable RegisterAddress12 NightLightOFF thresholdandFlashenable RegisterAddress50 CameraADRControl Thedistanceandangleofthestrobeunit towardthetarg...

Page 53: ...ddition to the message based TCP image transfer sniffing image on UDP is also supported Captured images are buffered inside EN camera and can be automatically transferred to FTP server Ethernet trigger can be used for applications where time critical response is not required as hardware TTL trigger All functions over Ethernet are accessible by EN setup software Please refer to VIS300 400EN Setup U...

Page 54: ...F and JPEG The TIF Format image is always ON and users cannot turn it off Image Acquisition 1 and Image Acquisition 2 config registers Address 3 and 9 respectively control which image format to choose Multiple image formats such as both TIF and JPEG can be selected Whether you choose TIF or JPEG format images sent by the EN cameras contain additional information other than just pixel information T...

Page 55: ...raw image format is the only one supported by the UDP setup channel JPEG is not supported UDP setup images are easy to enable and disable The user can access the EN Setup Trigger Source register Address 111 and EN Setup Image size register Address 112 to change the trigger source and image size Live image transfer can be slowed down by setting EN Setup UDP Inter Packet Delay register Address 110 I...

Page 56: ... When the index reaches the last image the user can select either to overwrite the oldest image or the first image or to stop writing Also the user can set the depth of the queue and the size of the JPEG image while TIF and ODD EVEN field image sizes are fixed These image queue buffer operations are done using EN setup software by accessing the Storage Setup command As a factory default the image ...

Page 57: ...feature EN camera supports up to 3 NTP servers IP addresses Config register address 61 62 and 63 For the first time when the EN camera is set up for NTP the EN camera optimizes the drift of the internal clock with regard to the NTP server in your LAN This takes approximately 1 2 hours to reach within a few millisecond range of the estimated error This Drift file is saved in non volatile memory and...

Page 58: ...f JPEG encoding or you will lose color information 7 4 Problem 4 EN Setup Software Does Not Find Any Camera in the Network 1 Make sure that your host PC and EN cameras have the same subnet address and that their IP addresses are not identical If the EN camera s IP address is 192 168 30 65 then you should not set the same IP address to the host PC 2 If you have a firewall set up on your Windows com...

Page 59: ...ondition filter may reject the trigger input to the camera TTL trigger must stay stable for a certain predefine pre time before the trigger edge and post time after the trigger edge If not then the trigger will not be generated The factory default of pre and post time trigger is 1ms 4 If TTL trigger pulse is noisy then the trigger noise filter may reject the trigger input TTL trigger pulse width s...

Page 60: ...tory default setting is 1000 files If the system allows several thousand files in the same subdirectory the FTP server performance degrades significantly 7 10 Problem 10 The EN Camera Does not connect to light sensor 1 Make sure to set the proper IP address and port number for the light sensor in the EN registers 2 Verify that the ADR register is set to Auto to connect to the light sensor 7 11 Pro...

Page 61: ...lem 12 IO Board Communication Error The IO board has a temperature sensor a housing open sensor and other event sensors When these events occur the IO board sends a warning to the EN camera through the 9600 bps UART If you are not using an IO board and a 26 pin HD Sub cable then you will have an IO board communication error message In this situation you can simply ignore this message If you are us...

Page 62: ...h Goes Low at alarm 2 If you use DC Flash Unit enter 2 to config register address 42 decimal so that flash status is Normally Low Goes High at alarm 3 After changing the register save the setting to FlashROM 7 16 Problem 16 Timestamp is Not Set to Current Local Time 1 Use the EN setup software to set local time In the Property window find the Real Time Clock register If NTP is OFF then the display...

Page 63: ...n Digital 1920 H x 512 V 1920 H x 768 V S N Ratio 50dB min BW 48dB min Color VideoOutput Digital output JAI Inc proprietary protocol over TCP IP Gamma Gamma 0 55 forBW Linear for Color Lens Mount C mount PowerReq 12V DC 10 450 mA typical at 25 C 800mA required at power up OperatingTemp 10 Cto55 C Random Vibration 7 Grams 10Hz to 2000Hz Shock 70G Weight 290 grams 10 2 oz TS 2030EN TS 2076EN Process...

Page 64: ...age 52 TS 2030EN TS 2076EN Series Progressive Scan Cameras Appendix 8 2 Physical Dimensions FIGURE 18 Physical Dimensions 8 3 Spectral Response FIGURE 19 Spectral Response B W CCD for TS 2030EN TS 2076EN ...

Page 65: ...an Cameras Appendix FIGURE 20 Spectral Response Color CCD for TSC 2030EN TSC 2076EN TABLE 11 TABLE 11 IR Cut Filter Optical Characteristics Wavelength Transmission from450to650nm Average80 above 730 20 am Average50 from 800 to 1 150 nm Average10 below ...

Page 66: ...Page 54 TS 2030EN TS 2076EN Series Progressive Scan Cameras Appendix ...

Page 67: ...Page 55 ...

Page 68: ...JAI Inc 625 River Oaks Pkwy San Jose CA 95134 Tel 408 383 0300 Tel 800 445 4444 w w w j a i p u l n i x c o m Email imaging jai com 10490 Rev A www jai com See the possibilities ...

Reviews: