


J-Dream Owner’s Manual
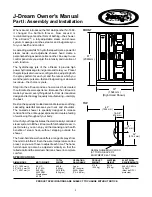
DIMENSIONS
60" ( 1524 mm) L
36" (914.4 mm) W
81" ( 2057 mm) H
PRODUCT SPECIFICATIONS ARE SUBJECT TO CHANGE WITHOUT NOTICE.
MOTOR/PUMP
0.5 HP
(0.37 kW)
240 VAC
3450 RPM
Single phase
60 Hz
SPECIFICATIONS
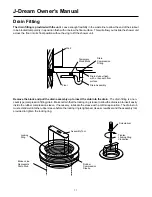
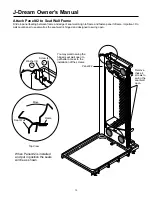
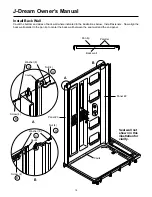
Part I: Assembly and Installation
When Jacuzzi
introduced the first whirlpool bath in 1968,
it changed the bathtub forever. Now Jacuzzi is
revolutionizing yet another form of bathing—the shower.
The J-Dream™, a fully-adjustable steam and shower
system, massages, soothes, steams, and invigorates you
for your health and comfort.
A cascading waterfall, 16 hydrotherapeutic jets, a powerful
steam nozzle, and adjustable shower head create a
personal bathing experience like no other. An easy-to-use
control panel lets you adjust the intensity and duration of
each function.
The hydrotherapy jets of the J-Dream II provide high
power hydromassage to invigorate and relax you. Preset
the jets to pulsate in various configurations, adjusting both
the spray pattern for each jet and the rate at which you
want the jets to pulsate—fast and invigorating or slow and
luxurious—the choice is yours.
Step into the J-Dream and see how Jacuzzi has created
the ultimate shower experience. Because the J-Dream is
made by Jacuzzi, everything about it—from its innovative
design and technology to quality manufacturing—is simply
the best.
Rest on the specially molded seat and relax as a soothing,
cascading waterfall caresses your neck and shoulders.
The cascade shower is specially designed to release
tension from the entire upper spine area to create a feeling
of well-being throughout your body.
A touch of your finger activates the electronically controlled
steam system to fill the J-Dream with full-bodied steam. In
just minutes, you can enjoy all the cleansing and health
benefits of steam heat—without stepping outside the
shower.
The hand-held shower head offers a range of sprays from
fine mist to full-flood. Even the water temperature can be
preset, so you won’t have to adjust it each time. The hand-
held shower can also be adjusted vertically so that the
tallest adult and the smallest child can shower in complete
comfort.
2
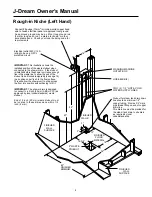
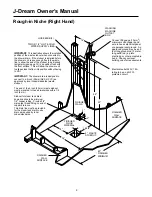
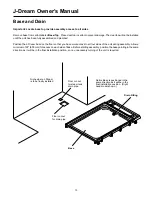
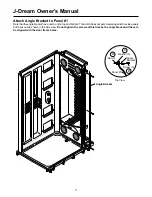
FRONT
81"
(2083mm)
60"
(1524 mm)
(Right Hand Shown)
60"
(1524 mm)
16-3/8"
416 mm)
18"
(457 mm)
36"
(914.4 mm)
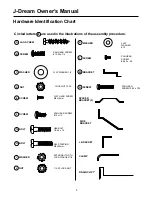
SERIAL NUMBER LOCATION
(AT TOP) ON BACK OF
EQUIPMENT SEAT WALL
TOP
OPERATING
GALLONAGE
3 gpm
(23 liter/min)
@ 20–65 psi
(1.4–4.6 Bar)
PRODUCT
WEIGHT
515 lb
(234 kg)
SHIPPING
WEIGHT
831 lb
(378 kg)
ELECTRICAL
REQUIREMENTS
240 VAC 60 Hz
15 AMP
(Must be GFCI
protected)
TOTAL
WEIGHT
665 lb
(302 kg)
4416 lb/ft
2
(20 kg/m
2
)
WHIRLPOOL
BATH
R


