background image

1-19

1

 P

RE

CAU

TIO

N

S

ARBUS 1000

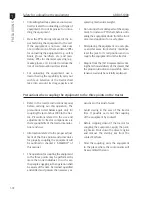
Safety for unloading the equipment

ATTENTION!

By disregarding the safety practices you are risking your own life and the life of all 
people around you.
This manual contains important safety warnings. Read it carefully and be on the 
alert to any possibility of personal accident. Keep all decals affixed to the machine 
and replace the same if necessary.

• 

The improper handling by untrained peo-
ple can give rise to serious or fatal accidents.

• 

Do not perform adaptations or impro-
visations; they compromise your equip-
ment and put your safety at risk. 

• 

Do not allow children, aged people or 
animals to stand close to the equipment 
during use, maintenance or even with 
the equipment stored.

• 

Keep hands, feet, loose clothing and long 
hair away from moving parts.

• 

Before performing any kind of service, 
adjustment or maintenance to your 
equipment, switch off the power take-
off and the tractor engine. 

• 

If the equipment was used, even if it 
has been washed and looks quite clean, 
wear all PPEs recommended for han-
dling the chemical. 

• 

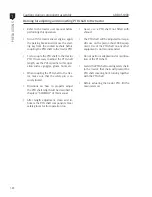
Do not touch PTO shafts, belts, fans or 
any other moving parts of the equipment 
with the PTO coupled of the tractor diesel 
engine running. 

• 

When uncoupling the machine, hold it 
on firm and level ground; if the equip-
ment is provided with parking brake, ac-
tuate the same! 

• 

Do not operate the pump without liquid.

• 

Do not allow the power take-off to oper-
ate in excess of 540 rpm. 

• 

Keep the machine in perfect upkeep at 
all times.

• 

Safety-related decals were applied across 
the equipment to orient on the risk of 
damage or accident that may occur to the 
operator or equipment. 

• 

Request a JACTO representative during 
the technical delivery of the equipment 
for a proper assembly instructions, main-
tenance, warranty instructions to be care-
fuly explained. 

• 

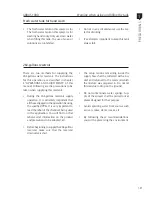
Use of PTO shafts not provided with pro-
tection covering is strictly forbidden. 

• 

Do not make maneuvers or brake abruptly. 

• 

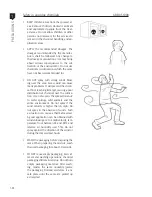
The transportation of people and any 
loads whatsoever in the sprayer is strict-
ly prohibited in any circunstances. 

• 

This sprayer was designed and manufac-
tured to support operations in the crops 
and on roads, tracks, trails or paths in-
side farms within the speed limit recom-
mended by Jacto (limit of 30 km/h in the 
routes inside the farm and 12 km/h when 
spraying). The use of the sprayer above the 
limits mentioned is not approved by Jacto.

Summary of Contents for ARBUS 1000

Page 1: ...z Miranda 1650 17580 000 Pomp ia SP Brasil Tel 55 14 3405 2100 Fax 55 14 3452 1916 CNPJ 55 064 562 0001 90 e mail export jacto com br www jacto com br ARBUS 1000 English Version MI 0103 Operator s Man...

Page 2: ......

Page 3: ...ARBUS 1000 3 Introduction 5 Precautions 1 7 Assembly 2 29 Technical Specifications 3 39 Operations and Adjustments 4 51 Maintenance 5 105 Warranty 6 127 Table of contents...

Page 4: ......

Page 5: ...aim is to prepare and guide the farm er on the proper use of the farm equipment manufactured by JACTO Therefore read carefully and understand thor oughly this manual before operating this sprayer and...

Page 6: ......

Page 7: ...nvironmental responsibilities 1 1 1 Safety decals 1 1 2 General safety recommendations 1 1 6 Safety for unloading the equipment 1 1 8 Cautions during component assembly 1 2 0 Warning when using and fi...

Page 8: ......

Page 9: ...nt It is important to remind that this equipment has been carefully developed to provide op timum performance with cost savings and ease of operation and safety For that purpose be always mindful of t...

Page 10: ...mmendations have been understood before putting this equipment in operation Owner responsibilities The equipment owner shall keep the ins tructions manual at a place where the ope rator can have free...

Page 11: ...ct municipal state and federal as well as guidelines to dispose of parts components or any other item of the equipment Batteries must be properly disposed of in places which have been approved to coll...

Page 12: ...mediately in case of damage by ordering them through the part numbers specified below P N 379248 WARNING Read the in structions manual before beginning any action on the machine P N 276220 ATTENTION L...

Page 13: ...ndatory use of protective clothing P N 379214 ATTENTION Maximum speed allowed for the machine is 30 km h P N 379115 WARNING mandatory use of protection mask P N 379065 ATTENTION Risk of serious injuri...

Page 14: ...hine is prohibited P N 515734 ATTENTION Clean the filter whenever filling the tank P N 379073 WARNING Hand washing water reservoir P N 380014 ATTENTION Do not get into the main tank of the sprayer P N...

Page 15: ...a P N 515601 Procedures for fan belts tension P N 428631 Instructions to connect the PTO shaft P N 379164 ATTENTION Nut torque table P N 391631 ATTENTION Tire pressure table P N 018630 Fan diameter 2...

Page 16: ...ection masks provided with filters suitable for each kind of product In case of doubts read the chemical label or contact the manufacturer of the same When checking the machine components that are in...

Page 17: ...mentioned speed limits is not approved by Jacto Jacto does not recommend or approve the towing of the sprayer by vehicles except tractors under the abovemen tioned conditions Usage under adverse and n...

Page 18: ...nical delivery of the sprayer that the proper instructions on assembly main tenance warranty be carefully explained Precautions when coupling the equipment to the three points on the tractor Refer to...

Page 19: ...lts fans or any other moving parts of the equipment with the PTO coupled of the tractor diesel engine running When uncoupling the machine hold it on firm and level ground if the equip ment is provided...

Page 20: ...the trac tor make sure that the safety pin is se curely locked Directions on how to properly adjust the PTO shaft length will be described in chapter 2 ASSEMBLY of this manual After length adjustment...

Page 21: ...r drain valve is shut The setup residue remaining inside the supply hose shall be collected with a bu cket and returned to the reservoir which the mixture was prepared in Do not let this residue to dr...

Page 22: ...e all protection equipment recommended by the chemical manufacturer AFTER the spraying operation take a shower and change clothing The used clothing shall be immediately washed and segregated from the...

Page 23: ...from one chemical to another one The chemical manufacturer should be consulted for the optimum nozzle option DO NOT clear nozzles vales or tubing with your mouth Use protection gloves for this operat...

Page 24: ...ing its target causing a poor distribution of chemical over the cultiva tion it can also carry the sprayed mixture to water springs wild animals and the entire environment Do not spray if the wind vel...

Page 25: ...the authorities and the chemical manufacturer STORING THE CHEMICAL Build a brick work storehouse for chemicals LINE THE FLOOR with waterproof mate rial Do not rest the product piles on the floor or ag...

Page 26: ...all the authorized technical assistance In case that no possibility exists of provid ing maintenance service to the equipment with the diesel engine shut down and out side sheds keep the shed doors an...

Page 27: ...d that the chemical res ervoir has been entirely drained after such washing Spill of setup leftovers al though minimal can endanger the life of people animals and cause serious dam ages to the environ...

Page 28: ......

Page 29: ...LY ARBUS 1000 Table of contents Choosing the tractor 2 31 Setting up the tractor 2 32 Mounting the sprayer to the tractor Arbus with fixed axle 2 34 Mounting the sprayer to the tractor 2 35 Adjusting...

Page 30: ......

Page 31: ...quivalent to the capacity of the reservoir Example Empty machine weight 1 223 56 lb Reservoir capacity 264 gallons approxi mately 2 204 62 lb Gross Machine Mass 3 428 18 lb Recommended tractor gross m...

Page 32: ...to vary the distance between the PTO shaft and the hitch point see figure A Set the tractor s drawbar so as to allow the sprayer to work on level after being hitched see figure B Invert the drawbar t...

Page 33: ...e the plastic straps used in the hitch fork A Place the fork in a horizontal position and insert the fork pin into the hole Place the tractor s draw bar between the hitch fork and remove the pin from...

Page 34: ...chain as shown in the figure below and give heed to the following Leave some slack on the chain so that it is not stretched when maneuvering The chain holder 1 must be mounted as close to the hitch p...

Page 35: ...ON If the sprayer is equipped with tracking axle it is necessary to leave a clearance between the sprayer s hitch and the PTO shaft enough for the normal operation of the sprayer figure C Next lock th...

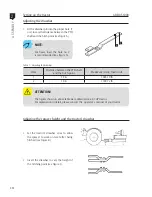
Page 36: ...PTO 75 Adjust the male and female tubes lengths recommended overlap 5 cm ATTENTION When maneuvering disengage the PTO and keep the tire from touching the sprayer s tongue otherwise this will damage t...

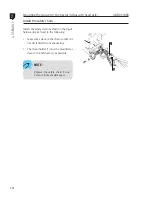
Page 37: ...to cut it To cut the power takeoff shaft proceed in the following manner Remove the protection covers and cut both pipes male and female to the de sired lengths figure M Remove any burrs left behind b...

Page 38: ......

Page 39: ...ARBUS 1000 Table of contents Equipment presentation Arbus EA EF 3 41 Technical Specifications 3 42 Equipment presentation Arbus Plus 3 44 Technical Specifications 3 45 Equipment presentation Arbus 10...

Page 40: ......

Page 41: ...resentation 1 PTO Shaft 2 Hitch 3 Jack 4 Suction filter 5 Level indicator 6 Nozzle branch 7 Belts tension 8 Fan 9 Flaps 10 Tank 11 Lever of the package washer 12 Clean water tank 13 Chemical control 1...

Page 42: ...ht 50 in Track width 50 in Ground clearance 14 in Main tank Material Fiberglass Capacity 264 gallons Clean water tank Material Fiberglass Capacity 3 96 gallons Level gauge Level indicator with graduat...

Page 43: ...1000 EA EF JP 75 Arbus 1000 EA EF JP 100 Fan diameter in 28 28 Pulley diameter in 3 509 4 Rotation rpm 2 000 1 800 Air speed mph 94 84 50 Air volume m min 342 307 Power consumption HP 14 10 OPTIONAL...

Page 44: ...tation 1 PTO Shaft 2 Hitch 3 Jack 4 Suction filter 5 Level indicator 6 Belts tension 7 Vertical deflector 8 Nozzle branch 9 Tank 10 Lever of the package washer 11 Clean water tank 12 Chemical control...

Page 45: ...indicator with graduated scale Agitation mechanical Pump Model JP 75 Pumping capacity 19 8 gp Maximum working pressure 28 kgf cm2 400 psi Power needed 5 3 HP at 540 rpm on the TDP Model JP 100 Pumping...

Page 46: ...th quick fitting Spray gun Pump JP 75 19 81 gpm NI Resiste Pump JP 75 19 81 gpm Pump JP 100 26 4 gpm Fixed axle 7 35 x 14 Fixed axle 11 L 15 Tires 11L 15 Tires 7 35 x 14 Articulator axle 11L 15 Articu...

Page 47: ...entation 1 PTO Shaft 2 Hitch 3 Jack 4 Suction filter 5 Level indicator 6 Nozzle branch 7 Belts tension 8 Fan 9 Flaps 10 Tank 11 Lever of the package washer 12 Clean water tank 13 Chemical control 14 G...

Page 48: ...al Fiberglass Capacity 15 liters Level gauge Level indicator with graduated scale Agitation Mechanical Pump Model JP 75 Pumping capacity 19 8 gp Maximum working pressure 28 kgf cm2 400 psi Power neede...

Page 49: ...n Pump JP 75 75 L min NI Resiste Pump JP 75 75 L min Pump JP 100 100 L min Fixed axle 7 35 x 14 Fixed axle 11 L 15 Tires 11L 15 Tires 7 35 x 14 Articulator axle 11L 15 Articulator axle 7 35 x 14 Defle...

Page 50: ......

Page 51: ...8 Assembly diagram 4 5 9 Line filters 4 6 0 Fan 4 6 1 PTO Shaft 4 6 3 Spray gun Optional 4 6 4 Spray discs series D 4 6 4 Filler unit Optional 4 6 5 Chemical control 4 6 6 Tracking axle 4 7 0 Package...

Page 52: ......

Page 53: ...move the pump Chemical pump Suction filter Located between the tank and pump the suction filter is specifically designed to prevent dirt or impurities from reach ing the pump It has a quick shut off v...

Page 54: ...pressure regulator control provides adjustments ranging from 2 to 35 kgf cm2 30 to 500 psi shown by the pres sure gauge Levers 1 2 3 have different func tions lever 1 opens and closes the chemical flo...

Page 55: ...the figures below BP pressure gauge kit Accessory The BP PRESSURE GAUGE KIT Low Pres sure was designed to check the actual spray pressure at the nozzles Can be installed on the sprayers that use both...

Page 56: ...volume With a simple 180 turn of the nozzle holder it is possible to turn off one nozzle and turn on the other Shutting the flow Just give the nozzle holder a 90 turn in relation to the mark A and th...

Page 57: ...rbus 1000 Plus has 2 clean water tanks for washing hands One is a fiber tank detail A and the other is plastic detail B each of them with 4 gallons capacity Located in an easily accessible place these...

Page 58: ...rightspraying segments Switch 4 Opens right spraying segment The electrical control EC 4400 should be pla ced within easy access over its mobile base wich can be adjusted longitudinally accor ding to...

Page 59: ...lectrical control ATTENTION Pay close attention to the position of harness connectors to avoid damaging the circuits 1 6 7 2 3 4 8 5 1 Chemical control 2 Main harness 3 Electrical control 4 Battery ha...

Page 60: ...line filters retain impurities of chem icals wich damage thespraying before they reach the electric valves segments and nozzle holders There is a line filter installed in the pressure line before each...

Page 61: ...oor To turn the fan off pull the lock and give it a quarter turn To turn it on set the lock back After these procedures close the ac cess door For tractors with independent PTO the follo wing is recom...

Page 62: ...y lance or the spray gun It reduces power consumption Procedure to turn fan ON or OFF Turn tractor OFF Release fan coupling lever by lifting the lock To turn the fan OFF push the lever to wards the ma...

Page 63: ...s that can be caused by tangling PTO Shaft This is an accessory for spot spraying as well as for applications to difficult of ac cess places It has two ceramic cone nozzles model JA 2 and trigger valv...

Page 64: ...t spraying on fruit trees due to its large application range as well as for cle aning sheds warehouses and agricultural equipment The spray discs are available with flow rate ranging from 1 31 to 11 8...

Page 65: ...he filling position After filling the tank set the main valve 2 lever back to the working position working position filling position ATEN O Em caso de formula o p mo lh vel desligue a bomba so mente a...

Page 66: ...justments that ranges from 2 to 35 kgf cm2 30 to 500 psi shown in the pressure gauge The levers 1 2 and 3 have different functions lever 1 turns the chemical flow on and off and levers 2 and 3 distri...

Page 67: ...the circuit and close the pressure gauge valve PTO Shaft The sprayer s PTO shaft is equipped with plastic protection guards to pre vent the operator and his clothes from touching the PTO shaft and av...

Page 68: ...ame head Connecting the PTO bomba 5 cm 5 cm TDP 75 Adjusting the PTO shaft length Before cutting the PTO shaft check if it is pos sible to use it without reducing its length Check The position on the...

Page 69: ...sions figure C Remove the burrs resulting from the cut ting operation as well as the filings re sulting from the burrs removal figure D Cut the guard tubes length using as measure reference the pieces...

Page 70: ...wheel steering system that approaches the implement wheel tracks to the tractor tracks As it is an articulating axle we recom mend that the machine operator is trained qualified and experienced in man...

Page 71: ...a container over it The package washer nozzle B rotates and auctioning the le ver without having a package over it could sprinkle people near the machine Level indicator Placed on the right side of t...

Page 72: ...or and remove the clip that con nects the two parts of the hitch separating them Note that the hose end or spray gun is a male part similar to the part discon nected from the quick fitting connection...

Page 73: ...impacts Procedures to assemble the deflector and the gas spring Set the washers between the plastic parts 1 and 2 Set the joint pins in the points 1 and 2 Af ter that fit the smaller washers and lock...

Page 74: ...assemble it 1 Locate left and right deflectors on the rear of the machine A 2 Loosen mounting bolts B and remove both right and left deflectors ATTENTION With sprayer hitched to the tractor park on a...

Page 75: ...Optional 3 Pull the clip and remove the quick fit ting clamp C Then disconnect the hose from left and right branches 4 Loosen nozzle branch mounting bolts D and remove both right and left branches 5...

Page 76: ...acer bushing F and remove the deflector upper faste ner G Next tighten the mounting bolt F for the spacer bushing 8 Remove spacer bushings I and guard screens from both left and right sides NOTE The s...

Page 77: ...4 77 4 O P E R AT ION A ND A D JUS T ME N T S ARBUS 1000 Kit Tower para Arbus 1000 Opcional 9 Equipment without spacer bushings and guard screen ready for Tower Kit installation...

Page 78: ...ower kit for Arbus 1000 Optional Tower Kit assembly 1 Connect the branch hose to the Tower Kit J and tighten the clamp with a screwdriver L 2 Tower Kit with branch hose connected 3 The items shown are...

Page 79: ...ft and right branches 5 Install the nozzle holders with seal 1 on the Tower Kit nozzle branch 2 and 3 By placing the nozzle holder seal 1 in the hole of the Tower Kit nozzle branch and install the noz...

Page 80: ...N T S ARBUS 1000 Tower kit for Arbus 1000 Optional 7 Install the Tower Kit to the fan housing Align the spacer bushings with the holes on the fan housing 8 With Tower Kit installed insert mounting bol...

Page 81: ...wer kit for Arbus 1000 Optional 9 With both sides of Tower Kit installed lo cate the two mounting holes N and O Insert mounting bolts and tighten 10 Connect the branch hose to the quick fit ting right...

Page 82: ...wrench to loosen the fastening bolts on the support body detail B and remove them A B B The Tower kit is available for Arbus 1000 air blast sprayers line Follow the instructions below to assemble the...

Page 83: ...Tower kit for Arbus 1000 Optional C D D D 3 Use an appropriate wrench to loosen the fastening bolt on the adjustable vanes detail C 4 4 Remove the fastening bolt from the adjustable vanes 5 5 Locate t...

Page 84: ...ve them 7 Pull the ring and remove the quick rele ase clamp detail F Then disconnect the hose from the left and right branches G 8 Remove the left and right branches NOTE The spacer bushings detail E...

Page 85: ...us 1000 Optional H H I 9 Loosen the fastening bolts on the guard screens detail H 10 Remove the guard screens left and right sides NOTE After removing the guard screens I store them in an appropriate...

Page 86: ...wer kit for Arbus 1000 Optional 1 Remove the hose that comes with the Tower kit 2 Attach the branch hose to the Tower kit detail I Use a screwdriver to tighten the fastening clamp detail J 3 Tower kit...

Page 87: ...4 The items beside come with Tower kit and they will be used in the assembly process 5 Use the spacer bushings included in the kit and install them in the Tower kit according to the illustration besi...

Page 88: ...ptional L M N 7 After installing the Tower kit insert the fastening bolts in the spacer bushings de tail L and tighten them 8 When the two sides of the Tower kit are installed locate the two holes to...

Page 89: ...JUS T ME N T S ARBUS 1000 Tower kit for Arbus 1000 Optional O P 9 Attach the branch hose O to the quick coupling left and right side Next insert the quick coupling clamp detail P 10 View of the machin...

Page 90: ...iseases or weeds Stage of infection of the disease Stage of development of weeds Weather conditions Safety during application The maintenance of safe conditions for people animals and the environment...

Page 91: ...f solvent water oil etc per unit area only functions to dissolve transport and faci litate the distribution of the active ingre dient over the target surface whether it is plants soil etc This means t...

Page 92: ...the areas of the body that have been exposed to chemicals During handling of the equipment Check the working conditions of the equi pment Do not unplug nozzles valves or tubing with your mouth Do not...

Page 93: ...lowing Example Noozles flow rate 14 gpm at 200 psi 14 x J4 2 and 12 x JA 3 nozzles 26 nozzles Row spacing 16 40 x 22 96 ft Working speed 2 5 mph Plants per acre 115 plants Spray calibration Spray volu...

Page 94: ...clean Once all items have been checked sprayer calibration can begin 1 Mark 50 meters on the terrain to be treated 2 Fill up the sprayer with clean water 3 Position the machine at least 5 meters befo...

Page 95: ...ume in Li ter hectares using the formula Q Vol x 43560 A Where GPA spraying volume in gallons acre Vol volume used on sprayed area in galons A sprayed area 165 feet x determined spray swath s ft2 Exam...

Page 96: ...personal protection equipment such as Waterproof hat with large flaps Glasses Mask Long sleeved apron Waterproof gloves Waterproof boots ATTENTION Working with the sprayer with less than 50 liters of...

Page 97: ...er Shake the mix Add the amount of water that is needed to fill out the recipient Shake until a homogenous mix is achieved Add the mix prepared to the working re cipient Mount the lid of the working r...

Page 98: ...It is very important that before discar ding empty packages that the leftover product be removed and next the pa ckage should b punctured several times to avoid reuse The packages made from metal plas...

Page 99: ...lly clean the container Fill up the sprayer reservoir with water NOTE Lever 1 of the flow regulating valve should be positioned to allow the return of the mix to the reservoir closed ATTENTION Use the...

Page 100: ...water from this tank is not fit for drinking or even washing hands face tools etc It must be used only to fill the chemical containers for the final rinse Clean water tank To assist in the operation o...

Page 101: ...ackage lid and carefully place water for washing in the sprayer tank Maintain the package over the opening of the sprayer tank until its contents are empty Next punch hole into the package to avoid it...

Page 102: ...r approximately 30 seconds to re move the product residues that got stuck on the internal walls of the package Remove the package lid and carefully place water for washing inside the package washer Re...

Page 103: ...Complete the shaking by alternatively lif ting the package extremities while sup porting the opposite side on the ground This operation should last approximately 30 seconds Remove the water for washi...

Page 104: ......

Page 105: ...5 10 8 Nozzle holder 5 10 9 Chemical pump 5 110 Mechanical agitator 5 110 Whell hub 5 110 Belts tension 5 111 Lubrication points 5 113 Operation chart 5 114 Recommended lubricants 5 116 PTO shaft conv...

Page 106: ......

Page 107: ...and wash them Wash the work clothing separately from all other clothing of your family Take a shower with plenty of soap and water and change clothing These procedures will prevent problems in the su...

Page 108: ...ical used for that purpose Clean the filters as necessary or every time you supply the sprayer with chemical Valve A filters elements B and ring C Main filter Pressure regulator VAR Disassemble the pr...

Page 109: ...S 1000 Nozzle holder Clean the nozzle holders daily or when necessary Cap G nozzle H ring I swirlcore J seat K and nozzle holder L Nozzle holder with valve G H J L I K Double nozzle holder optional G...

Page 110: ...ing hours according to specifications in the lubrication table Whell hub Check the pump oil level A daily and fill it if necessary Chemical pump NOTE In case of need for a more de tailed maintenance r...

Page 111: ...knob 3 until obtaining the ten sion recommended Retighten the screws 1 Retighten the nut 2 Pump belt Agitator belt Loosen the nut 1 fixing the tension pul ley of the agitator belt Use a lever to slide...

Page 112: ...ension Loosen the four nuts 1 enough to allow the frame to be moved Loosen the two nuts 2 Hand tighten equally the two knobs 3 until obtaining the tension recommend ed tension Retighten the two nuts 2...

Page 113: ...haft cross and tubes Refer to the section MAINTENANCE PTO SHAFT 2 Jack 3 Trailer s hitch 4 Front and rear bearings ATTENTION Before operating the equipment for the first time clean and lubri cate all...

Page 114: ...ts are original parts Make sure about the PTO shaft clearances Check whether the coupling pins are properly provided with cotter pins Remove the tractor s drawbar Adjust commands to prevent the same f...

Page 115: ...correct leak Keep the equipment at a dry sheltered and ventilated place Calibrate the tires Retighten the bolts on the tank axle and wheels Dismantle the drive shaft covers clean and wash parts Change...

Page 116: ...Type Specification Indication Amount Pump JP 75 lubricat ing oil all oils for internal combustion engines within this specification URSA LA 3 SAE 15W 40 API CG 4 0 39 gallons Pump JP 100 0 66 gallons...

Page 117: ...a fety chain In too tight maneuvers switch off the power take off ATTENTION Only operate with the PTO shaft provided with safety guard Every kind of mainte nance to the PTO shaft shall be performed wh...

Page 118: ...e up to the indicated position 3 Loosen the safety protection 4 Remove the slide ring Assembly 1 Clean and lubricate the PTO shaft bars 2 Install the sliding ring into the recess with the grooves faci...

Page 119: ...iate and low Thereafter install the components again on their due places Repeat this operation at the end of every work day during the wintertime period and you will certainly prevent troubles in the...

Page 120: ...5 120 5 M A IN T E N A NC E ARBUS 1000 Trouble shooting 1 Tank 2 Main filter 3 Pump 4 Return 5 Nozzles branch 6 Chemical control 7 Pressure hose 1 5 7 2 3 4 6...

Page 121: ...he pres sure regulator b Insufficiency of pressure partial lack of pressure The liquid is not sprayed at the proper pressure A The spraying angle is smaller than the specified angle B The gauge shows...

Page 122: ...e fluid flow Clean the filter at the time of every refill or more frequently de pending on the water quality and type of chemical 5 Obstruction in intake hoses Check the hose connecting the filter to...

Page 123: ...ck fittings and reservoir outlet sealing rings 6 Pressure regulator Check valve seating and seat 7 Excess flow nozzle flow in excess of the recommended limit Check whether the nozzle flow rate is with...

Page 124: ...ity over 2000 kg in each point through the points A These operations must be done with the sprayer tank empty Changing tires Always deflate the tire before removing the object that punctured it The ti...

Page 125: ...he equip ment would not give rise to risks of conta mination of rivers lakes creeks dams etc ATTENTION Avoid leaving chemical rem nants in the storehouse or even storing the same for a long time For t...

Page 126: ...e on the outside with clean water and perform such cleaning at places where no risk exists of contamina tion to the environment Keep the machine in a sheltered dry and ventilated place Do not keep the...

Page 127: ...ARBUS 1000 6 127 6 WA R R A N T Y Warranty 6 129 Techinical inspections registration 6 131 Product registration card 6 133 Table of contents...

Page 128: ......

Page 129: ...pumps commands engines transmissions hy draulic piston and the like will only be provided in the event that the defect cannot be remedied by replacing parts and portions of the component Loss of Warra...

Page 130: ...l purchaser indicating that he has read and understood all safety and ope rational instructions in the manual Fur ther the retailing dealer has explained to the original retail purchaser all safety in...

Page 131: ...ARBUS 1000 6 131 6 WA R R A N T Y Techinical inspections registration Date Hours No Description Techinical Dealer...

Page 132: ......

Page 133: ...gnature ______________________________________________________ Copy M quinas Agr colas Jacto S A Urgent respond with in 30 days first class postage required Invoice number ____________________________...

Page 134: ......

Reviews: