


16
INSTALLATION & OPERATION
OPERATING INSTRUCTIONS
STEAM FLOW:
Secure steam flow to the machine in accordance with applicable codes and procedures. Steam flow must
be secured prior to cleaning the inside of the machine.
SHUTDOWN AND CLEANING:
At the end of the workday, close the doors. When the unit completes the cycle, turn the
power switch to the OFF position and open the door. Remove and clean the pan strainer. Remove the drain stopper from
the tub and allow the tub to drain (NOTE: The wash tank water will be hot so caution is advised). Once the wash tub is
drained, remove the pump suction strainer. Dispose of any soil and debris found in the strainer. Unscrew the wash and
rinse arms from their manifolds. Remove the endcaps and flush the arms with water. Use a brush to clean out the inside
of the arms. If the nozzles appear to be clogged, use a toothpick to remove the obstruction. Wipe the inside of the unit,
removing all soil and scraps. Reassemble the wash and rinse arms and replace them in the unit. The arms only need to
be hand tight, do not use tools to tighten them down. Reinstall the drain stopper and strainers and close the door.
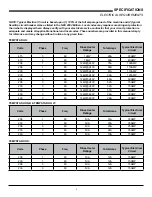
WATER CONSUMPTION ISSUES AND EFFICIENCY:
The models covered in this manual provide the customer with the ability
to control the hourly rack capacity of the machine. Extending the wash cycle to wash severely soiled ware, such as mixing
bowls, does not increase the machine’s water consumption. However, selecting a longer time cycle does lower the amount of
dishes the machine will be able to wash per hour. It is important for operators to select the correct wash cycle depending on the
amount of washing required. Not every rack of dishes requires the machine to be set on the longest wash cycle.
Summary of Contents for TempStar Series
Page 2: ......
Page 28: ...PARTS 22 TOP MOUNTED CONTROL BOX ASSEMBLY 30 28 29 25 22 21 26 33 34 36 1...
Page 36: ...PARTS HOOD ASSEMBLY 30 1 5 4 2 3 6 7 10 8 9...
Page 60: ...PARTS 460 VOLT MACHINE TRANSFORMER MOUNTING BOX 54...
Page 61: ...PARTS PARTS 55 EXHAUST FAN CONTROL OPTION...
Page 66: ...ELECTRICAL SCHEMATICS SOLID STATE TEMPSTAR HH TOP MOUNT CONTROLS 208 230V 60HZ 1 3 PHASE 60...
Page 67: ...ELECTRICAL SCHEMATICS 61 TEMPSTAR HH UNIVERSAL TIMER 208 230V 60HZ 1 3 PHASE...
Page 68: ...ELECTRICAL SCHEMATICS 62 SOLID STATE TEMPSTAR HH TOP MOUNT W CYCLE SWITCHES 460V 60HZ 3 PHASE...
Page 69: ...ELECTRICAL SCHEMATICS TEMPSTAR HH UNIVERSAL TIMER 460V 60HZ 3 PHASE 63...
Page 70: ...ELECTRICAL SCHEMATICS TEMPSTAR HH S UNIVERSAL TIMER 208 230V 60HZ 1 3 PHASE 64...
Page 71: ...ELECTRICAL SCHEMATICS TEMPSTAR HH 208 230V 60HZ 1 3 PHASE 65...
Page 72: ...ELECTRICAL SCHEMATICS TEMPSTAR HH 460V 60HZ 3 PHASE 66...
Page 73: ...ELECTRICAL SCHEMATICS TEMPSTAR HH S 208 230V 60HZ 1 3 PHASE 67...
Page 74: ...ELECTRICAL SCHEMATICS TEMPSTAR HH NB 208V 230V 50 60HZ 1 PHASE 68...
Page 75: ...ELECTRICAL SCHEMATICS TEMPSTAR HH NB LT 208V 230V 50 60HZ 1 PHASE 69...
Page 76: ...70 ELECTRICAL SCHEMATICS OPTIONS SDI OPTION...
Page 77: ...ELECTRICAL SCHEMATICS OPTIONS EXHAUST FAN HOOKUP DRAIN QUENCH OPTIONS 71...
Page 78: ...Tempstar HH Series Installation Operation Technical Manual 07610 002 23 32 Issued 09 14 07...