Mobi 3
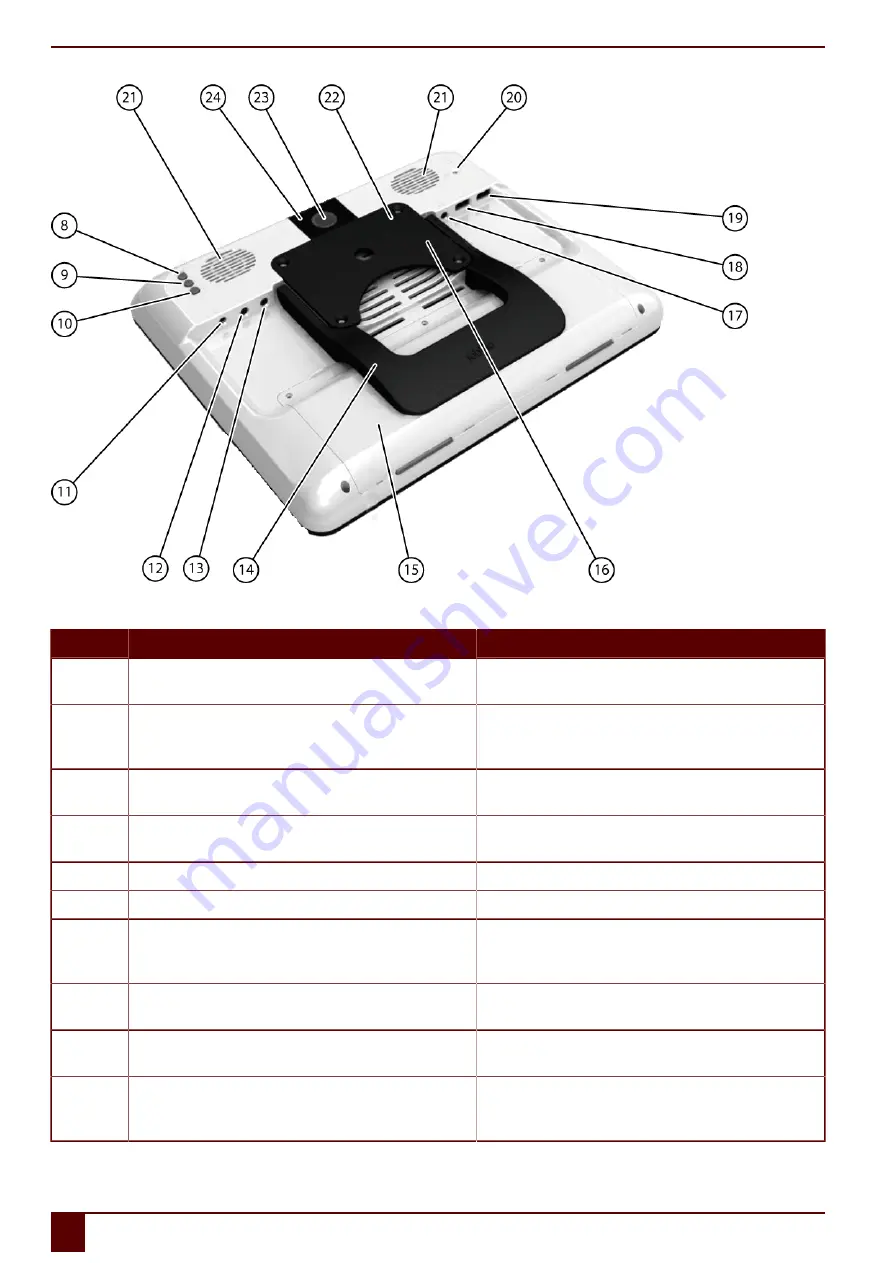
Figure 2: Mobi rear view
No
Identification
Explanation
8
Top button or button A
This button is programmable. As standard, the Windows function
Master Volume Up
is programmed.
9
Middle button or ESC button
This button is NOT programmable, but can be disabled. Press this
button briefly to simulate a rightclick at the next touch off the screen.
Press and hold this button for 1.5 seconds to simulate an ESCAPE.
10
Bottom button or button B
This button is programmable. As standard, the Windows function
Master Volume Down
is programmed.
11
Connection to power supply
This connection is to charge the device using the power adapter
included.
12
Connection switch 1
This input is for connecting switch 1.
13
Connection switch 2
This input is for connecting switch 2.
14
Tray stand
The Mobi has a folding stand. The stand is designed so that the device
can be ergonomically supported on a tray. In its folded configuration,
the stand is securely held in place by a magnet.
15
Battery cover
The battery cover protects the battery and can be removed by
unscrewing 3 screws.
16
Fan vent
This opening is for additional cooling to the Mobi. Be sure to keep this
opening unobstructed!
17
Jack for headphones
This output is for connecting headphones to the Mobi. The speakers
are not automatically disabled when you connect the headphones.
Headphones and speakers are controlled through the software.
B
Description and operation
8
1
Getting to know the Mobi (resistive)
Summary of Contents for Mobi 3
Page 1: ...Mobi 3 ...
Page 5: ...Mobi 3 A Introduction 3 ...
Page 8: ...Mobi 3 B Description and operation 6 ...
Page 15: ...Mobi 3 C Safety 13 ...
Page 17: ...Mobi 3 D Getting started 15 ...
Page 20: ...Mobi 3 E Control 18 ...
Page 35: ...Mobi 3 F Settings 33 ...
Page 44: ...Mobi 3 G Maintenance and troubleshooting 42 ...
Page 49: ...Mobi 3 H Decommissioning and disposal 47 ...
Page 54: ...Mobi 3 52 ...


