background image

23

6. Practical Use

The operating procedure for the Programat CS4 will be explained 
with the help of two examples: one standard and one  
individual program.

6.1 Switching on the furnace

Put On/Off switch (9) on position “I“. Subsequently, the furnace  
conducts an automatic self-test which will be indicated in the  
beginning. Subsequently, a status bar shows the progress of the self-
test. Make sure that the furnace is not manipulated during this time.

6.1.1 Stand-by screen

If the self-test has been successful, 
the stand-by screen will appear in 
the display and the desired pro-
gram can be selected using the 
program selection keys.

Once the furnace head has been opened and the loaded sinter tray 
placed, the program can be started using the START key. For that 
purpose, the START key is shown in the recommendation area. 


Note:

 For safety reasons, the furnace head can only be 
opened once the temperature has dropped below 
1200 °C/2192 °F

6.1.2 Program progress indicator

Once the program is started by pressing START, the program pro-
gress screen appears. 


The following information is provided:
a) Program status
b) Remaining time (hh:mm)
c) Current temperature
d) Program number
e) Program name
f) Progress bar 

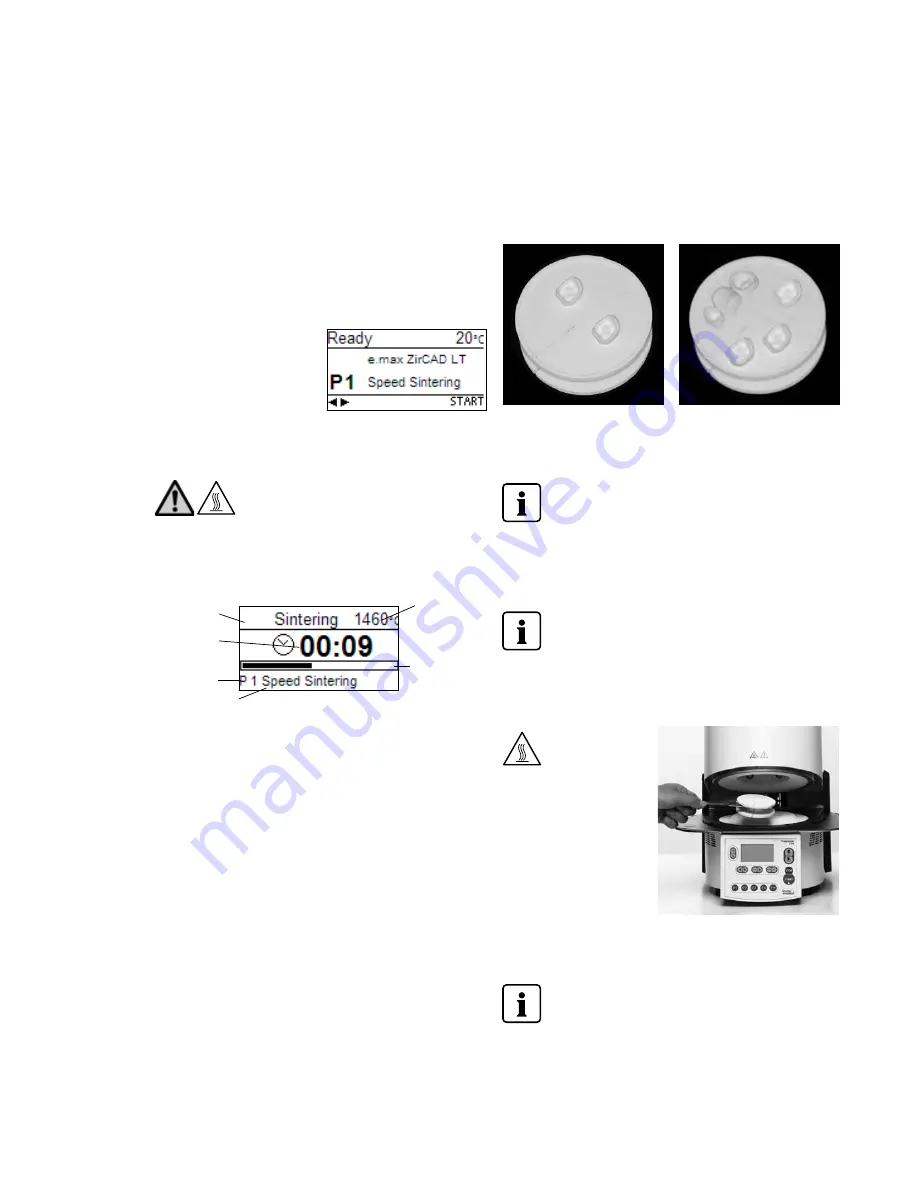
6.2  Loading for sintering procedure 

The sinter tray (100) holds up to approximately 6 units, depending 
on the program. Make sure that the objects do not touch in order to 
prevent them from sintering together. For more detailed information, 
please refer to the instructions for use of the corresponding material.   

In order to achieve optimum sintering results, the objects should be 
placed on their occlusal or labial surface (not on the cervical margin). 
Furthermore, no objects should be placed on the groove in the sinter 
tray, if possible.

   For the wet processing of IPS e.max ZirCAD restorations, 

sinter programs with an integrated predrying process are 
programmed. Additional predrying is not required.

6.3.  Sintering procedure with a standard program

Step 1:

Select the desired program using the program keys.

   You must not position a restoration in the furnace before 

the display indicates a temperature below 700 °C/1292 °F. 

Step 2:

Open the furnace head using the open furnace head key (87).  
Use a sinter tray fork to place the loaded sinter tray in the centre of 
the furnace.

  For safety reasons, 

always use the sinter 
tray fork when  
placing the sinter 
tray in or removing  
it from the furnace.

Step 3:

Press the START key (73) to start the program. You can observe the 
cycle on the program progress indicator. 

   To skip the pre-drying process, press close furnace head 

(88) and then press the START key (73). 

f)

a)

b)

d)

c)

e)

Summary of Contents for Programat CS4

Page 1: ...Programat CS4 Operating Instructions...

Page 2: ......

Page 3: ...5 5 Settable parameters and possible value ranges 5 6 Settings test programs and information 5 7 Explanation of the display symbols 5 8 Explanation of the acoustic signals 5 9 OSD 6 Practical Use 23 6...

Page 4: ...nics plug 24 Leave spring 25 Air vents base 26 Cooling tray 27 Cooling tray fastening screw 28 Silicone washer 29 Hood 30 Attachment screw for hood 31 Air vents furnace head 32 Air vents rear panel 33...

Page 5: ...5 44 16 26 4 8 27 28 15 25 1 3 6 5 37 7...

Page 6: ...6 39 17 22 18 23 21 20 9 38 46 47 19 24 35 9 10 11 10 11 14 31 30 29 42 45 13 12 32 42...

Page 7: ...key 81 Information key 82 Program 1 key 83 Program 2 key 84 Program 3 key 85 Program 4 key 86 Next program key 87 Open furnace head 88 Close furnace head 100 Sinter tray 102 Cleaning brush 103 IPS e m...

Page 8: ...crushing The Operating Instructions must be read 1 3 Notes regarding the Operating Instructions Apparatus Programat CS4 Target group Dentists dental professionals These Operating Instructions facilit...

Page 9: ...ust be operated under the indicated environmental and operating conditions see chapter 9 The Programat CS4 must be properly maintained Do not use colouring liquids containing chlorine or hydro chloric...

Page 10: ...ace 2 1 10 Contraindication Do not insert any foreign objects into the air vents There is a risk of electric shock 2 1 11 Burn hazard Never place objects in the hot firing chamber by hand since there...

Page 11: ...ks and dangers may perform these procedures After maintenance the required safety tests high voltage resistance protective conductor etc have to be carried out Ensure that only fuses of the indicated...

Page 12: ...uctor Protection from electric shock Electric fuses Protection from electric shock Furnace housing and end caps Protection from electric shock burning and crushing 3 3 Description of functions The sin...

Page 13: ...2 4 5 2 3 4 5 3 1 5 2 3 4 5 3 4 2 Selecting the location Place the furnace on a fire proof flat table using the rubber feet Make sure that the furnace is not placed in the immediate vicinity of heater...

Page 14: ...strongly against the rear of the furnace For safety reasons the spacer must always be mounted Secure the cooling tray 26 with the two screws 27 including the silicone washers 28 Place the cooling tra...

Page 15: ...er on the furnace head and carefully position it on the furnace head mounting 35 Ensure that the furnace head mounting mark 33 is aligned with the furnace base mounting mark 34 Make sure that the sint...

Page 16: ...tablishing additional connections Power connection Please make sure that the voltage indicated on the rating plate complies with the local power supply Connect the power cord 12 with the power socket...

Page 17: ...1 Connect the power cord 12 with the wall socket 2 Put the On Off switch 9 at the rear of the furnace on position I Subsequently the furnace conducts an automatic self test The performance of all furn...

Page 18: ...tarts the selected program Start LED 74 Lights up once a program has started It flashes when the program is paused Stop key 75 Pressing 1 x pause program Pressing 2 x program is aborted The STOP key a...

Page 19: ...ive error number is indicated Value range C Value range F Symbol Parameters min max Unit min max Unit v1 Predrying stage 1 Predrying temperature 0 100 300 C 0 212 572 F V1 Predrying time 00 00 00 20 h...

Page 20: ...red volume can be set using the keys Melody The desired melody may be set using the keys Programming Enables the programming of the parameters for the currently selected program Settings Display Short...

Page 21: ...C or F Calibration value MHT Calibration value at 1500 C 2732 F The value is displayed in accordance with the selected temperature mode in C or F Information Display Short Description Mains voltage Sh...

Page 22: ...ith the error tune endless beep The beeper may be switched off with the STOP key while the error message still remains visible If the error message is acknowledged with ESC the beeper also stops At th...

Page 23: ...2 Loading for sintering procedure The sinter tray 100 holds up to approximately 6 units depending on the program Make sure that the objects do not touch in order to prevent them from sintering togeth...

Page 24: ...icates a temperature below 400 C 752 F Step 2 Open the furnace head using the open furnace head key 87 Use a sinter tray fork to place the loaded sinter tray into the furnace Step 3 Press the Start ke...

Page 25: ...a Settings Renaming the keyboard can be selected provided the currently selected program is not write protected The desired letters can be selected using the cursor keys circular The letter is selecte...

Page 26: ...rticles see image a Fine glass dust The insulation of the lower part of the furnace and the cooling tray show residue of fine glass dust This type of contamination is more difficult to discern 7 1 2 C...

Page 27: ...be cleaned from time to time What When Cleaning material Furnace housing 7 and furnace head if required soft dry cloth Membrane sealed keypad 8 weekly soft dry cloth Cooling tray 26 daily cleaning bru...

Page 28: ...UTH 1 Press the Settings key 78 to access the Settings screen Select Temperature Calibration UTH using the cursor keys 79 80 The following display appears The UTH calibration program is selected with...

Page 29: ...correction value can be transferred to the furnace with the help of the keys Each keystroke changes the furnace temperature by 1 C The correction value must be added to the current temperature of the...

Page 30: ...oltage The furnace is operated with the incorrect supply voltage Make sure that the furnace is operated with the supply voltage indicated on the rating plate 1310 Calibration reminder Some time has pa...

Page 31: ...ement bent or fractured Switch off the furnace and contact the Ivoclar Vivadent After Sales Service Damage of the thermocouple Is the thermocouple damaged or fractured Contact the Ivoclar Vivadent Aft...

Page 32: ...kg Furnace head 17 kg Safety notes The sinter furnace complies with the following standards IEC 61010 1 2010 EN 61010 1 2010 UL 61010 1 2012 2015 CSA 61010 1 2012 2015 IEC 61010 2 010 2014 EN 61010 2...

Page 33: ...contact the Ivoclar Vivadent Service Center Important information The current program tables are also available at www ivoclarvivadent com The program tables can be downloaded from the Internet as PDF...

Page 34: ......

Page 35: ......

Page 36: ...ivadent S A de C V Calzada de Tlalpan 564 Col Moderna Del Benito Ju rez 03810 M xico D F M xico Tel 52 55 50 62 10 00 Fax 52 55 50 62 10 29 www ivoclarvivadent com mx Ivoclar Vivadent BV De Fruittuine...

Reviews: