background image

10

FEATURES AND OPTIONS  

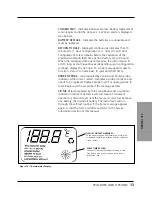
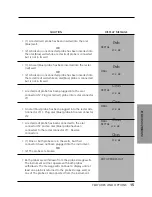
3. While the patient's temperature is being determined, the

tissue contact pinwheel will appear in the top right corner of
the display and the 26.7°C (80.0°F) will be replaced by an
advancing temperature. Three audible tones indicates that
the measurement is complete, and the patient's temperature
(in degrees and tenths of a degree) will appear on the display
panel. The display will clear as the probe is returned to the
storage well.

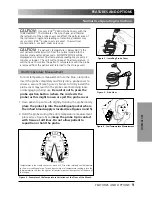
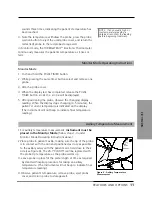
4. Observe the displayed temperature and remove the probe

from the patient's mouth. Hold the probe as you would a
syringe and press the probe ejection button at the base of
the probe to eject the used probe cover into a waste
container (see Figure 7).

5. Return the oral (blue) probe to the blue probe storage well.

This will automatically turn off and reset the thermometer for
the next temperature.

6. To recall the last available temperature reading, press the

PULSE TIMER button. DO NOT withdraw the probe from the
storage well as this will cause memory to be erased.

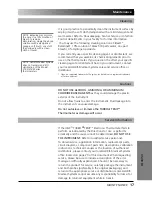
For rectal temperature measurement use the red rectal probe
from the red (rectal) well. Insert the probe completely and firmly
into a cover. Failure to firmly install the probe cover may result in
the probe cover becoming loose or disengaged during use. Be
careful not to press the probe ejection button where the cord
exits the probe as this might loosen or eject the probe cover.

1. Touch the tissue about 1.3 cm (0.5 inch) above the sphincter

muscle and carefully insert the probe, using current hospital
technique for penetration. (The use of a lubricant is optional.)

2. To ensure continuous tissue contact and maximize patient

comfort, hold the probe in position until the audible tone 

NORMAL USE

Rectal Temperature Measurement

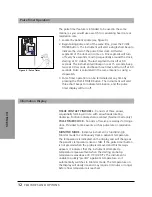
NOTE:  If the probe tip

temperature is higher than

33.3°C (92°F) when taken

out of the probe well, the

thermometer will not be

able to quickly predict the

patient's temperature.

Instead, the thermometer

will automatically go into

Monitor mode.

M ONITO R

M O D E

will then be

displayed. A correct final

temperature reading may

require 3 minutes or

longer. The instrument will

not beep at final

temperature. It will

continue to monitor the

patient's temperature until

the probe is removed from

the patient and returned

to the storage well.

NOTE:  If an unusually high or low temperature reading is

obtained, reconfirm the reading before beginning treatment.

NOTE:  If there is a long delay from the time the probe is removed

from the probe storage well until it is inserted into the patient's

mouth, it is possible that the instrument will not display a final

temperature. If this occurs, insert the probe into the probe

storage well, remove it again and start a new measurement.

Figure 7 - Probe Ejection

Summary of Contents for 218X

Page 1: ...TURBO TEMP ELECTRONIC THERMOMETER MODELS 218X DIRECTIONS FOR USE ...

Page 2: ......

Page 3: ...or Mode Operating Instructions 11 Axillary Temperature Measurement 11 Pulse Timer Operation 12 Information Display 12 Problems Solutions 14 Accessories 16 MAINTENANCE Cleaning 17 Cautions 17 Service Information 17 Inspection Requirements 18 Limited Warranty 19 Sales and Service Offices 20 List of Illustrations Figure 1 1a Features 1 2 Figure 2 Instrument Start Up 7 Figure 3 Installing Probe Cover ...

Page 4: ......

Page 5: ...nd is located at the tip of the probe In Monitor mode the display is continually updated in response to changes in temperature In Normal mode a final temperature is displayed with an audible beep To obtain this temperature the probe tip measures the rate of change in temperature when the thermistor comes into contact with surrounding tissue A final temperature is calculated based on this rate of c...

Page 6: ...s Recalls last available predictive temperature reading Audible tone signals final temperature reading Normal mode only Internal timer to deter theft Broken probe indicator Large display panel with automatic backlight Sixty second clock display divided into five second increments for timing pulse and respiration rates Audible tones at fifteen thirty and sixty seconds Tissue contact pinwheel displa...

Page 7: ...ORAGE TEMPERATURE 31 C to 48 9 C 23 8 F to 120 F TRANSPORT STORAGE HUMIDITY 5 95 Relative Humidity Non Condensing Meets the range specified in the ASTM Specifications E1112 Table 1 which is 98 0 F 102 0 F p P Pu ul ls se e T Ti im me er r B Bu ut tt to on n Starts pulse clock recalls last available predictive reading activates backlight and used to initiate Monitor mode A Au ud di ib bl le e T To ...

Page 8: ......

Page 9: ...re the oral blue probe plug is connected to the 2 socket and the rectal red probe is connected to socket 1 Remove batteries if thermometer is not likely to be used for some time INSTALLATION Installation NOTE Batteries must be installed exactly as shown on the battery compartment or the instrument will not function Install negative end of battery first to prevent damage to the battery contacts To ...

Page 10: ...me base before using it for the first time or the instrument will not operate The instrument must also be returned to the home base whenever the batteries are replaced 2 The anti theft timer and alarm are reset by returning the thermometer to the home base When the anti theft timer is configured for 8 hour operation FACTORY DEFAULT the RETURN TO BASE message will be displayed approximately one hou...

Page 11: ...ws 188 8 E and all messages The self check takes place during this time Verify that the test display is replaced by 26 7 C 80 0 F In Monitor mode the message MONITOR MODE will display and the Pulse Timer button should be released If the message FIX ME CAL appears the thermometer is out of calibration and requires service To place the thermometer into Monitor mode push and hold the PULSE TIMER butt...

Page 12: ......

Page 13: ...upply is located see Figures 4 and 5 2 Hold the probe during the entire temperature measurement process see Figure 6 and keep the probe tip in contact with tissue at all times Do not allow patient to reposition or hold the probe Temperatures in the mouth can vary as much as 3 F from the relatively cool hard palate to the warm sublingual area To take an accurate oral temperature reading place the t...

Page 14: ...ng use Be careful not to press the probe ejection button where the cord exits the probe as this might loosen or eject the probe cover 1 Touch the tissue about 1 3 cm 0 5 inch above the sphincter muscle and carefully insert the probe using current hospital technique for penetration The use of a lubricant is optional 2 To ensure continuous tissue contact and maximize patient comfort hold the probe i...

Page 15: ...ot beep to indicate final temperature reading 1 For axillary temperature measurement instrument must be placed in the Monitor Mode follow steps 1 3 under Monitor Mode Operating Instructions above 2 Place probe in patient s axilla making sure the tip of the probe is in contact with the skin and positioned as close as possible to the axillary artery with the patient s arm held close to their side se...

Page 16: ...hree short beeps to indicate termination and the pulse timer display will turn off TISSUE CONTACT PINWHEEL Consists of three arrows sequentially forming a circle with arrowheads rotating clockwise Motion indicates tissue contact Normal mode only PULSE TIMER CLOCK Consists of twelve pie wedges forming a clock Provided to time events such as pulse rate or respiration rate MONITOR MODE Indicates inst...

Page 17: ... accompanied by FIX M E and broken probe indicator either oral or rectal Indicates a probe is broken and needs to be replaced Replace probe in well or unplug probe to reset Replace with new probe if the message persists FIX ME accompanied by three long beeps and a number Indicates instrument detects a self test failure Instrument operation is discontinued until the failure is corrected Remove one ...

Page 18: ...do not match expected values tolerances Requires Service Heater Interlock fault detected Heater interlock has failed to disable the probe heater circuitry Requires Service The instrument has detected an internal malfunction Requires service A D calibration phase timed out CAL is displayed in LCD panel Requires Service The instrument has detected a broken oral blue probe Requires Service The instru...

Page 19: ...d to the rectal connector 1 Reverse connectors 1 One or both probes are in the wells but their connectors have not been plugged into the instrument OR 2 The probes are broken Both probes are withdrawn from the probe storage wells The instrument will not operate with both probes withdrawn The message will continue to display until at least one probe is returned to the probe storage well or one of t...

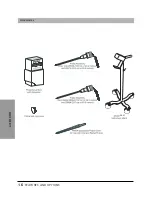
Page 20: ...16 FEATURES AND OPTIONS ACCESSORIES Accessories 2031 ...

Page 21: ...red trademark of Purdue Frederick DO NOT USE ALCOHOL AMMONIA OR AMMONIUM CHLORIDE BASED AGENTS as they could damage the plastic exterior of the instrument Do not allow fluids to enter the instrument Fluid leakage into the instrument can cause damage Do not autoclave or immerse the TURBO TEMP Thermometer as damage will occur If the IVAC TURBO TEMP Electronic Thermometer fails to perform as indicate...

Page 22: ...Each Usage Display Each Usage Probe s Each Usage Battery Condition Each Usage Periodic Inspections Inspection Frequency Visual Inspection 12 months Start Up 12 months Pulse Timer Operation 12 months Calibration Verification 12 months Anti Theft Check 12 months Electrical Safety Tests Not required for a battery powered instrument INSPECTION REQUIREMENTS ...

Page 23: ...sk In no event shall ALARIS Medical Systems be liable for any incidental indirect or consequential damages in connection with the purchase or use of any ALARIS Medical Systems product This warranty shall not apply to and ALARIS Medical Systems shall not be responsible for any loss arising in connection with the purchase or use of any ALARIS Medical Systems product which has been repaired by anyone...

Page 24: ... 4BS UK Telephone 01256 47 44 55 Facsimile 01256 33 08 60 ALARIS Medical France S A 95 Rue Pereire BP 8217 78108 Saint Germain en Laye Cedex FRANCE Telephone 01 39 10 50 00 Facsimile 01 30 61 22 23 ALARIS Medical Systems Deutschland GmbH Schuetzenstrasse 62 D 35398 Giessen DEUTSCHLAND Telephone 0641 982 44 0 Facsimile 0641 982 44 21 ALARIS Medical Systems Inc International Headquarters The Crescen...

Page 25: ... and pending 145835 Copyright 2000 ALARIS Medical Systems All rights reserved Printed in USA on recycled paper ALARIS Medical Systems Inc 10221 Wateridge Circle San Diego California 92121 2733 USA Mail P O Box 85335 San Diego California 92186 5335 USA ALARIS Medical UK Ltd The Crescent Jays Close Basingstoke Hants RG22 4BS UK ...

Reviews: