Function
and Features
Copyright ©ITECH Electronic Co., Ltd.
29
Operation method:
1. Press
[On/Off]
key to cut off load input status. Connect the battery to be
tested. Under CC mode, press
[Shift]
+ 5 keys to enter battery discharge
function menu and select one of the three methods for test based on actual
requirements.
2. Set discharge stopping conditions:
⚫
Type I: Press
[Shift]
+ 5 keys and select Capability. Press
[Enter]
key and
the VFD displays Stop Capability =Ah. Set battery stop capacity. Press
[Enter]
key. When set battery capacity is reached, the load input status will
automatically be OFF.
⚫
Type II: Press
[Shift]
+ 5 keys and select Voltage. Press
[Enter]
key and
the VFD displays Stop Voltage=V. Set stop voltage and press
[Enter]
key
to start discharge test. When the battery voltage drops to stop voltage, the
load input status will automatically be OFF.
⚫
Type III: Press
[Shift]
+ 5 key and select Timer. Press
[Enter]
key and the
VFD displays Stop Timer=S (Max. 99999S). Set discharge time. When the
set stop time is reached, the load input status will automatically be OFF.
3. Press
[Shift]
+
key to start test. The board will display discharge
voltage, current discharge time and discharged capacity (AH).
4. Press
[ESC]
key to exit battery capacity test mode in any three methods.
3.15 CR-LED test function
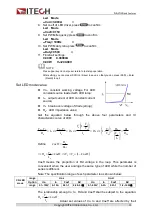
IT8912E electronic load adds diode break-over voltage setting under traditional
CR mode. Only when the voltage across the electronic load is higher than the
diode break-over voltage, the electronic load will work. This is the completely
true simulation of the working principle of the diode. So IT8912E electronic load
can simulate the real LED test ripple current.
PWM dimming is to use the pluse width modulation technology to control the
LED driver luminance.
IT8900 LED mode is used for LED lamp dimming.User can control
PWM(PWM+,PWM-) terminal output via adjusting the frequency and duty ratio
setup in menu.
Operating steps:
1.
Press
key.
0.000V 0.00000A
0.00W V
o
=200.00V
2. Press
(
Shift)+
to enter CR-LED setup.
3. Select voltage range,press
to confirm.
Led Mode
High-Volt Low- Volt
▼
4. Set the upper current limit,press
to confirm
Led Mode
▲
High=15.500A
▼
5. Set the lower current limit,press
to confirm
Led Mode
▲
Low=0.1000A
▼
6. Set LED driver working voltage,press
to confirm
Led Mode
▲
Volt=200V
▼
7.
Set LED driver working current,press
to confirm

