background image

Iris Innovations

Configuring the Camera over the 
LAN 

WARNING: Stay Secure!

When  connecting  any  device  to  a  network  with  access 
over  the  internet  brings  risks  to  the  security  of  your 
network and your data. Your IRIS460 features built in User 
Name  and  Password  authentication  but  it  is  also  your 
responsibility  to  strengthen  your  network  security  where 
ever  possible.  Please  contact  your  IT  expert  for  further 
advise. Iris cannot provide support with any aspect of your 
network  security,  other  than  the  cameras  built  in  security 
settings. 

Basic Setup: Single Camera / Computer 

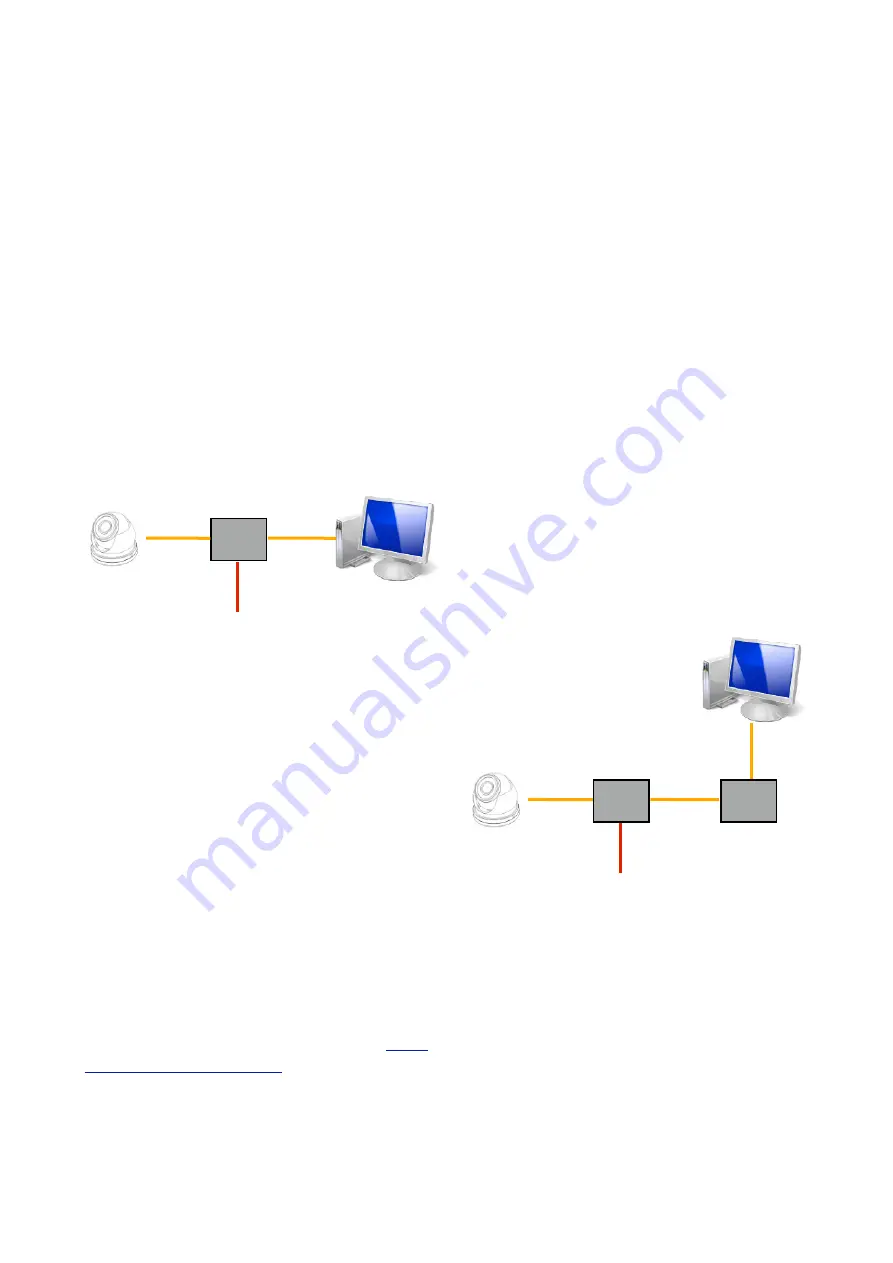
The diagram below shows a very basic setup, with a single 
camera being viewed on a PC (or laptop).  

Use  a  standard  568B  ethernet  CAT5  cable  to  hook  your 
computer  up  to  the  PoE  injector,  and  then  another  568B 
cable to hook the camera up to the injector.  

With  this  type  of  installation,  you  must  ensure  the  IP 
address of the camera is in the same range as the network 
adapter  in  your  computer  used  to  communicate  with  the 
camera.  Consult  documentation  for  your  computer  for 
information on how to view (and edit) your network adapter 
IP address.  

The camera is set as default to DHCP, which means it has 
no IP address set, and awaits for a router on your network 
to assign the address.  

To  find  your  camera  on  the  network,  use  an  IP  camera 
discovery tool, or an ONVIF Device Manager.  

A  great  Onvif  Device  Manager  can  be  found  here:

https://

sourceforge.net/projects/onvifdm/

Once  you’ve  downloaded  and  installed  the  Device 
Manager  software,  open  the  program  and  then  click  the 
REFRESH button at the bottom of the device list on the left 
hand side. If everything is hooked up correctly, the details 
of your camera, including its IP address, will be displayed 
in the list. 

If the cameras IP address falls outside the range of the IP 
address of your computers network adapter, you’ll have to 
change  the  address  on  your  adapter  so  it  corresponds 
with  the  address  of  the  camera.  Once  this  is  done  (and 
you’ll  usually  need  to  reboot  your  computer)  you  should 
simply  be  able  to  open  your  web  browser,  type  the  IP 
address of the camera into the address bar and access the 
camera.  From  here,  if  required,  you  can  change  the  IP 
address  of  the  camera  as  desired  -  back  to  the  original 
address  range  of  your  computer  for  example.  If  you  do 
this, then you will also have to change the address of your 
network adapter back to its previous range. 

Basic  Setup:  Single  Camera  /  Computer  via  Router 
using DHCP (default) 

The  diagram  below  shows  a  simple  one  camera  /  one 
computer device, but this time a router is used to manage 
your network devices and address allocation. 

As  mentioned  previously,  the  camera  as  default  is  set  to 
obtain  its  IP  address  automatically  via  DHCP.  This  means  
that once connected, your router will detect the device and 
assign it an IP address within its designated range (refer to 
the  documentation  for  your  router  for  further  details).  You 
must also ensure the network adapter for your computer is 
set to obtain its address via DHCP.

IRISx460 User Guide v2.3 April 2021

9

PoE 

Injector

Network  

Cable

Network  

Cable

IRISPoE1 
6~36VDC

PoE 

Injector

Network  

Cable

Network  

Cable

IRISPoE1 
6~36VDC

Router

Network  

Cable

Summary of Contents for IRISx460

Page 1: ...Iris Innovations IRISx460 User Guide v2 3 April 2021 1 IRISx460 QUICK START GUIDE ...

Page 2: ...t 15 of the FCC rules These limits are designed to provide reasonable protection against harmful interference in a residential installation This equipment generates uses and can radiate radio frequency energy and if not installed and used in accordance with the instructions may cause harmful interference to radio or television reception However there is no guarantee that interference will not occu...

Page 3: ...HIRD PARTY IN NO EVENT WILL IRIS ITS DIRECTORS OFFICERS EMPLOYEES OR AGENTS BE LIABLE TO YOU FOR ANY SPECIAL CONSEQUENTIAL INCIDENTAL OR INDIRECT DAMAGES INCLUDING AMONG OTHERS DAMAGES FOR LOSS OF BUSINESS PROFITS BUSINESS INTERRUPTION OR LOSS OF DATA OR DOCUMENTATION IN CONNECTION WITH THE USE OF THIS PRODUCT EVEN IF IRIS HAS BEEN ADVISED OF THE POSSIBILITY OF SUCH DAMAGES REGARDING TO THE PRODUC...

Page 4: ...ised work to the product may affect the warranty CAUTION Care and Cleaning This product is a sensitive piece of electronic imaging equipment and must be handled and treated accordingly Do not drop or shake the unit during installation Avoid exposure of the imager to direct sunlight where possible as this may degrade the cameras performance over time When cleaning the device ensure power is switche...

Page 5: ...ch as Raymarine s Axiom Navico devices such as Simrad NSS range and other network plotters For compatibility information please contact your Iris dealer or visit www boat cameras com Overview of Key Features Here s a brief list of some of the IRIS460 s key features Up to 3MP Resolution 2304 x 1296 High Performance LED s 10 Meter Range Mechanical IR Cutout filter for True Day Night Operation Low Po...

Page 6: ...oes not cover desired field of view 1 Fit Base 2 Slide camera cable through base 3 Set desired camera field of view 4 Slide Cowling over inner dome onto base 5 Tighten Grub Screws IRISx460 User Guide v2 3 April 2021 6 Inner Dome Lens Photo Diode Light Sensor Infra Red LEDs Cowling Lock Screw in 2 positions Base TO AVOID DAMAGE TO THE CAMERAS PAINTWORK WHICH COULD RESULT IN EROSION TO THE HOUSING E...

Page 7: ...on of the camera this will just be a single CAT5 cable If you have a non PoE version you will need a CAT5 cable and 2 cores 18AWG for the DC power Ensure terminations are sufficiently protected from any moisture ingress Details on how to fit the waterproof plug are on the next page Step 4 Fit the field installable water resistant RJ45 back shell over the CAT5 cable and terminate the RJ45 connector...

Page 8: ...nd are not crossed Step 3 Place the O Seal 2 onto the end of the cameras network interface socket 1 Step 4 Insert the network plug 3 into the cameras network interface socket 1 Step 5 Insert the waterproof rubber gasket 5 into the waterproof end cap 4 and secure lock nut 6 with the waterproof end cap 4 Step 6 Align the snap on waterproof end cap 4 with the notch on the cameras network interface so...

Page 9: ...Manager software open the program and then click the REFRESH button at the bottom of the device list on the left hand side If everything is hooked up correctly the details of your camera including its IP address will be displayed in the list If the cameras IP address falls outside the range of the IP address of your computers network adapter you ll have to change the address on your adapter so it ...

Page 10: ...to log onto the camera and assign an address to fit in with your network address range This sounds obvious and like it should be a basic step but can actually be a major challenge as you can only log into the camera if its address is in the same range as your network If you do not have experience in this field we recommend you consult your IT specialist as making undesirable changes to your settin...

Page 11: ...e cameras interface Video Definition Toggle between Standard Definition 1280x720 or High Definition 1920 x 1080 Volume Not Enabled on IRIS460 Full Screen Scales Live Video Panel to Full Screen Microphone Not Enabled on IRIS460 Snapshot Stores snap shot to path defined in Local Settings Video Stores video to path defined in Local Settings Camera Title Can be toggled ON OFF or re labelled in Setting...

Page 12: ...set your desired start time STime and end time ETime and hit QUERY The list of available events will be displayed in the playback table To view and event double click on the desired entry in the playback table Local Settings Window Defines paths for storing Snap Shots and Videos as detailed above IRISx460 User Guide v2 3 April 2021 12 Playback Controls Playback Time Line Playback Window Playback T...

Page 13: ...twork Config tab contains the following sub menus Network Config Set IP address details including DHCP Static shown above Port Config Define network port settings shown below PPPoE Config Enable Disable PPPoE default disabled Email Config Define email address snap shots are sent to when an alarm motion is triggered This requires an email account and the SMTP server details to configure FTP Config ...

Page 14: ...rate bit rate control etc are set Both streams can be configured independently Alarm Config The IRIS460 supports motion recording and scheduled recording For Motion Detection you define the areas of the screen you wish to become alarmed by drawing boxes as desired in the Alarm Motion window Subsequently when motion is detected within these boxes the camera enters alarm state and begins recording t...

Page 15: ...serial number software versions etc LOG QUERY Query camera error and activity log by time and date AUTO REBOOT Specify a time you wish the camera to automatically reset PTZ SETTINGS Not Applicable System Maintenance The System Maintenance menu has two sub menus FIRMWARE UPDATE Define the path new firmware is located lo perform a firmware upgrade RESTORE DEFAULT Restores the camera to its default s...

Page 16: ...Please check the up to date specifications on our website www boat cameras com to check compatible browsers Please also ensure your PC s firewalls and Active X settings are configured correctly For Active X settings navigate to the appropriate point in your browser security settings and allow all Active X connections Failure to do so may result in the camera video not displaying correctly even tho...

Page 17: ...Iris Innovations IRISx460 User Guide v2 3 April 2021 17 ...

Page 18: ...Iris Innovations IRISx460 User Guide v2 3 April 2021 18 ...

Page 19: ...Iris Innovations IRISx460 User Guide v2 3 April 2021 19 ...

Page 20: ...ISx460 User Guide v2 3 April 2021 20 Iris Innovations Limited Unit 240 Ordnance Business Park Aerodrome Road Gosport Hampshire PO13 0FG United Kingdom Tel 44 0 2392 556509 email info boat cameras com www boat cameras com ...

Reviews: