CM-IW2000 Instruction Manual
2
Introduction
The iPort
®
Control Mount is an in-wall mounting platform system
that allows an iPad
®
to become an integral part of your home
control system through wireless applications. Before installing
and using the CM-IW2000, please read and follow all of the
instructions in this manual carefully.
System Capabilities:
• Rigidly supports the iPad and provides a modern elegant
appearance
• Charges the iPad while it is mounted.
iPort Control Mount Box Contents:
(1) iPort in-wall mounting system
(1) Power wall plate
(1) Regulated power supply
(1) Installation cut-out template
(1) Instruction manual
(1) Suction cup removal tool
(1) Circuit board assembly
(10) Machine screws with integral washers
Required Tools
The following tools are required to install the iPort:
• #1 Phillips screwdriver
• #2 Phillips screwdriver
• Wire cutters and wire strippers
• RJ-45 cable crimp tool and modular connectors
• Sheet rock saw (for retrofitting into an existing wall)
Selecting an Installation Location
The iPort Control Mount is designed for use in normal interior
environments. When selecting location for the Control Mount,
please consider the following:
• Do not use the Control Mount outside or in a humid or wet
environment. It is not waterproof or water-resistant.
• The Control Mount cut-out must have enough depth within
the wall cavity for the Control Mount and its connections.
• Check for a strong Wi-Fi signal at the mounting location using
the iPad that is to be installed in the Control Mount.
Control Mount Rear Connection
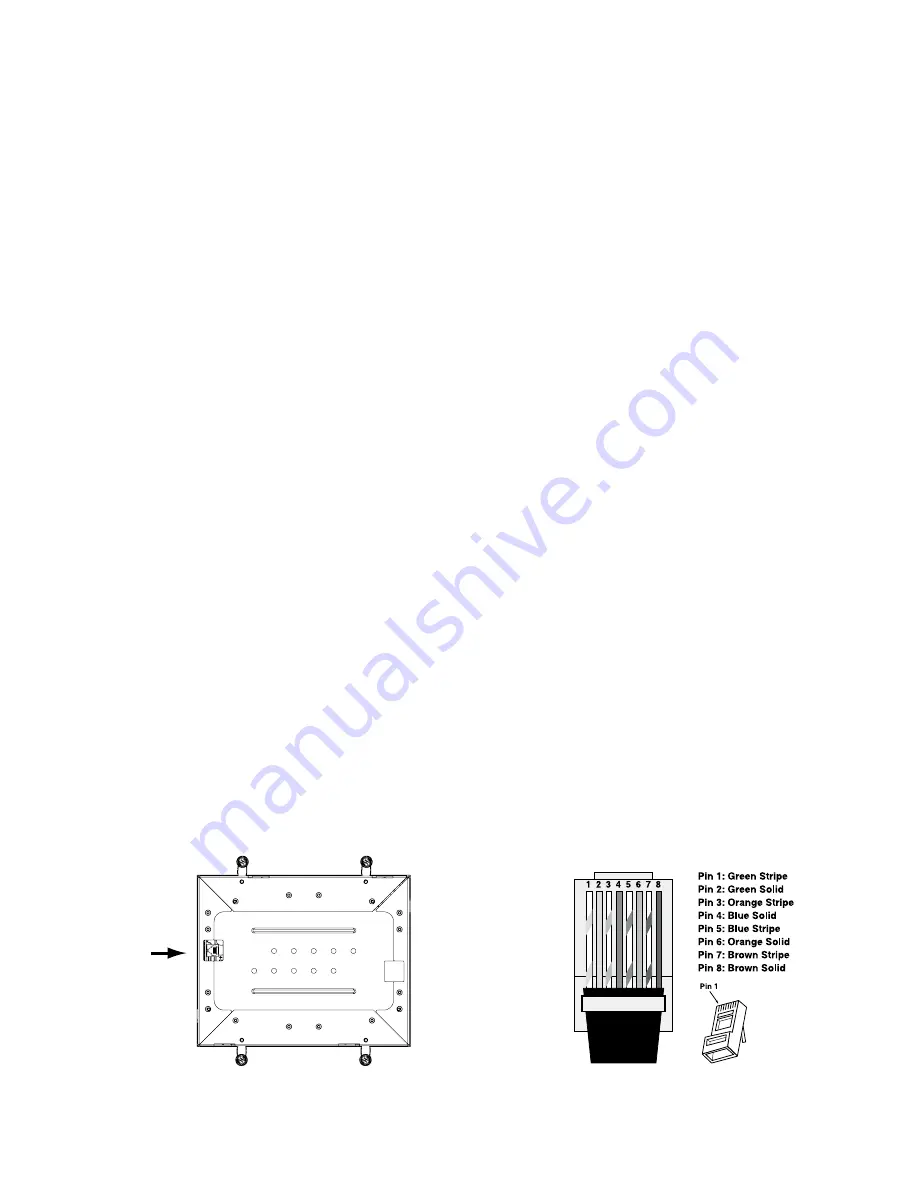
The CM-IW2000 features an RJ-45 jack to connect to the
powered wall plate via Cat5 cable. The power connection receives
DC power through the RJ45 connector as shown in figure 1.
Wiring Cat5/RJ-45 Cable
The Cat5 cable and RJ-45 connector used in iPort installations
must be wired according to the T568A (“Straight-Through”)
Standard with cables wired identically at both ends.
To prepare the Cat5 cable and RJ-45 connector for iPort
installation:
1. Pull the Cat5 wire through the wall between the desired
locations.
2. Use a stripper or knife to strip about 1” of the cable jacket off
each end of the wire.
• Be careful not to nick any of the individual wires.
3. Untwist the wire pairs and spread them flat. Arrange them as
shown in Figure 2.
4. Trim the ends of the individual wires to ½” in length, making
sure they are even with each other. Flatten the wires against
each other, leaving no space between them.
5. Hold the RJ-45 connector clip-side down and insert the Cat5
wire ends firmly into the connector. Make sure that all the wires
are flat all the way to the very front of the connector.
6. Re-confirm the color orientation matches the diagram and
cable jacket fits against the connector stop.
7. Firmly crimp the RJ-45 connector with the crimp tool. Confirm
the connector is crimped firmly and all the wires are flat right up
against the front of the connector. If even one of these wires is
incorrect, cut the connector off the cable and repeat steps 2 – 7
with a new RJ-45 connector.
Figure 2: RJ-45 Power Connector
Figure 1: iPort Rear Connection
RJ-45 Jack
2
1
3
4
POWER
INTERNET
WIRELESS
ETHERNET PORT
To Audio
Wall Plate
CM-IW100T
®
U.S. Patent No. 7,493,142
Additional Patents Pending
Designed and Engineered in the USA
33-5203 4-09


