


4
3
1
2
4
5
1
2
3
4
1
2
3
4
5
6
7
MENU AND FUNCTION BUTTONS
1.
[MENU]:
This button enters the menu options for the current Mode of
operation. CD Player Mode menu options include Switch Mode, Copy
Track, Copy All, Repeat, System Info. Internal Flash Player Mode menu
options include Switch Mode, Move Track, Repeat, System Info.
2.
[DISPLAY]:
Press this button to cycle through different time display settings on the LP 2 CD: Elapsed
(default), Track Remain, Total Remain. This button also functions as a [SELECT] button while
selecting Menu options.
3.
[ERASE]:
This button allows you to erase tracks from the Internal Flash Player. This button also
functions as a [NO] button while selecting Menu options.
4.
[SPLIT TRK]:
The LP 2 CD features Auto Split, which automatically detects silence between songs
and splits the recording into individual tracks. By default, Auto Split is enabled. If you choose to
disable this feature and manually split your tracks, then you can use the [SPLIT TRK] button in between
songs to create a new track. You can also perform this operation after you’ve recorded your music
(see “Splitting Tracks In Internal Flash Player” section). This button also functions as a [YES] button
while selecting Menu options.
5.
CD CONTROL BUTTONS
1.
[REW]:
Press this button to skip to the
previous track. Hold down this button
while playing a track to quickly scan
backward.
2.
[FF]:
Press this button to skip to the next track. Hold down this button while playing a track to quickly
scan forward.
3.
[STOP]:
Press this button to stop playback and go back to the first track. This button also stops
recording when ripping your music to the Internal Flash Player.
4.
[PLAY / PAUSE]:
Press this button to play the currently selected track; the green LED below the button
will light. Press again while the track is playing to pause; the green LED will blink while paused. Press
again to resume playback. This button also initiates recording while in Record Ready Mode.
5.
[RECORD]:
Press this button to enter Record Ready Mode. This mode allows you to record audio
from the turntable platter or from external audio sources connected to the Line In inputs to the Internal
Flash Player (see “Recording Music to the Internal Flash Player” section for more details). When you
press [RECORD], a red LED below the button will begin to blink to let you know that you are ready to
record.
6.
[BURN CD]:
Once you have recorded your music to the Internal Flash Player, press this button to burn
the player contents directly to a compatible, blank CD-R (see “Burning Internal Flash Player Contents
to CD” section for more details).
7.
[OPEN/CLOSE]:
This button opens and closes the CD tray.
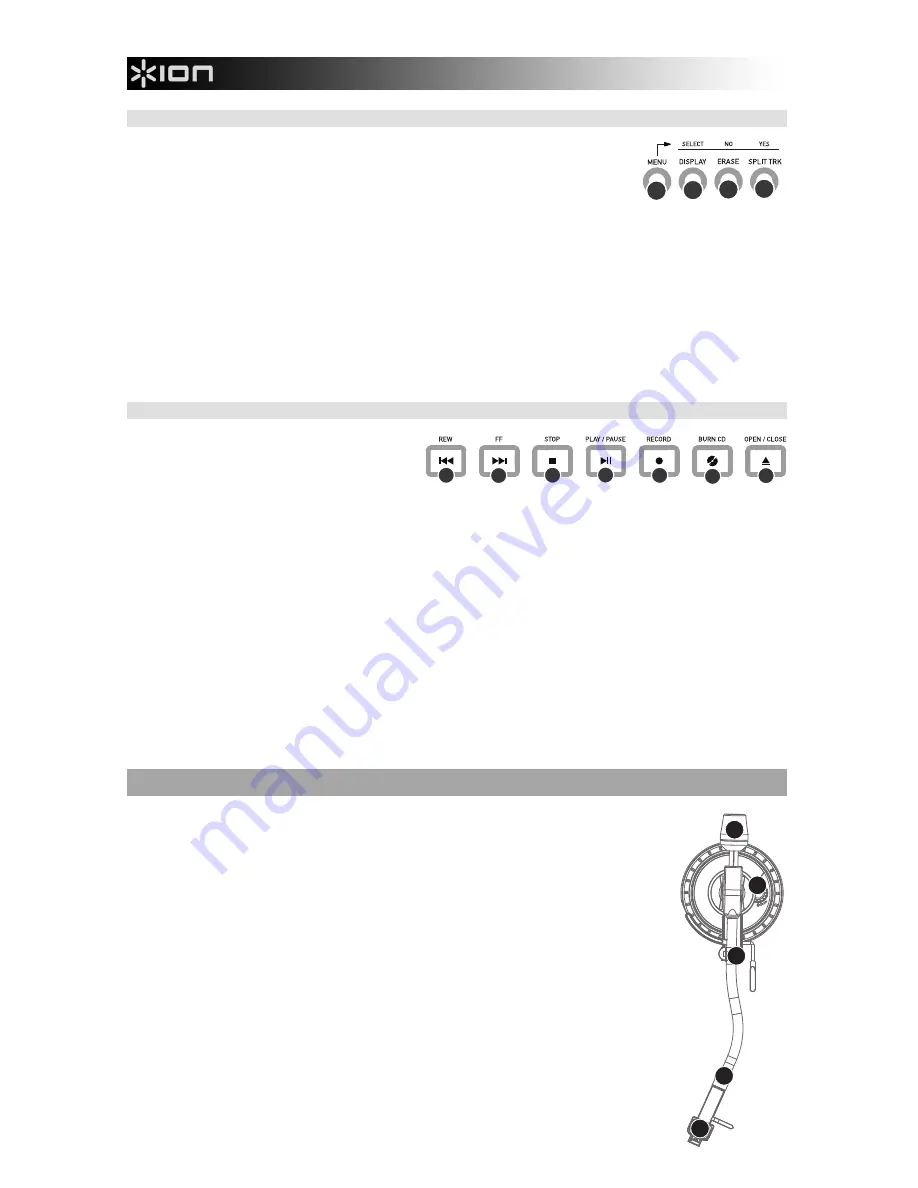
TONEARM OVERVIEW
1.
Counter Weight and Scale Ring:
The Counterweight is used to balance the head
shell and cartridge assembly so that the proper amount of stylus pressure is
applied to the record.
2.
Anti-Skate Adjustment:
This knob is used to compensate for inward tracking
forces. See “Tonearm Setup” section for more details.
3.
Arm Clip:
This specially designed arm clip secures the tone arm while at rest or
when not in use. The arm clip has been designed to remain in the up position while
unlocked.
NOTE:
When transporting the turntable, it is always recommended that the
headshell be removed and the arm clip secured to prevent tonearm or turntable
damage.
4.
Tone Arm Lock Nut:
This Aluminum nut is used to secure the head shell and
cartridge assembly to the tone arm tube. See Cartridge Setup for more details.
5.
Cartridge and Headshell:
The cartridge is pre-mounted on a standard headshell.
The cartridge is user replaceable and compatible with a variety of standard
cartridges. Be sure to remove the clear plastic cover before operating the turntable
from the cartridge.


