background image

12

12

OSD colour 

You can change the colour of the user interface with this option.  

EPG font size

This option allows you to change the size of the text in the EPG, to allow you to see more or less data at once.  

Power Up Mode

This option allows you to set the unit to automatically change to a specific mode during power-up.   If you select 
“Stand-by mode”, the receiver will go into stand-by immediately after power-up.  If you select “Last mode”, the 
receiver will change to the same mode it was in, prior to switching it off.  

Note:

 The receiver is able to switch on some TV sets that use the “Slow Blanking” signal on the SCART 

connector.  If “Last Mode” is selected, the receiver and TV will power-up at the same time.

Auto Upgrades

By choosing “Notify”, you will see a 

 symbol in the upper part of the OSD when a new update is available.  

By choosing “Auto” your receiver will be automatically updated while in stand by.
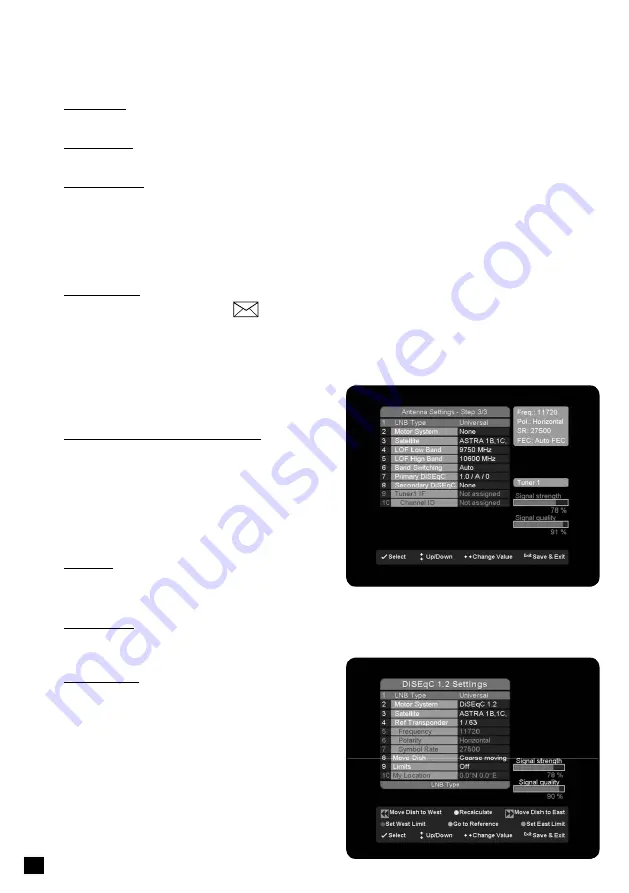
ANTENNA SETTINGS

To set up the receiver for the type of antenna connected, 
follow the instructions below.

Signal strength and signal quality bars

In two level bar meters, on the right side of the screen, 
the user can see the strength and quality of the signal 
coming from the antenna dish to the tuners. These 
two meters can be used while doing a fine-tuning of 
the antenna position. The antenna has to be adjusted 
to have maximum possible signal strength and signal 
quality.

LNB Type

Select Universal for most standard LNBs, or Unicable if 
you have a Unicable LNB.

Motor System

If a motorized dish is connected to the digital receiver, use this option to set the system used for sending 
commands to the motor.

Motorized dish

If you select one of the options for motorized dish and 
press the “Yellow” function key, a new menu bar will be 
open. Here, you are able to adjust and set the position 
of this satellite. The two level bar meters can be used 
during adjustment. Use the color keys on the remote 
control, as shown at the bottom of the screen, to move 
the dish and set the limits.

The “Yellow” “Recalculate” key is used to recalculate all 
satellite positions, if the base position of the dish has 
been moved.  if you move the dish, simply enter the 
menu, adjust the position for only one satellite and press 

Summary of Contents for Scena 5 IDL 5550S CI

Page 1: ...Language English German 1 36...

Page 2: ......

Page 3: ...En 1 1 Satellite High Definition PVR ready Set Top Box User Manual Model IDL 5550S CI Scena 5...

Page 4: ...ram Navigation Volume Control Resolution Program Information info banner Messages Videotext Teletext Audio and Subtitles language Standby mode USB Recoding and Playback THE MAIN MENU SETTINGS Audio Vi...

Page 5: ...lities in the disposition of this product and otherwise observe all applicable requirements For further information on how to properly dispose of your product and for information specific to your coun...

Page 6: ...ible to this About this manual Instructions in this manual describe the operation using the controls on the remote You can also use the corresponding controls on the front panel with the same markings...

Page 7: ...tems such as newspapers table cloth curtains etc Ventilation Do not expose the product to high temperatures such as placing it on top of other product that produce heat or in places exposed to direct...

Page 8: ...peration and standby modes 2 VFD Display 3 Channel up and down navigation keys Moves the TV radio channel up or down 4 USB A Host connector Allows to connect USB mass storage devices 5 Common Interfac...

Page 9: ...DIF Coax upper and Optical Outputs the digital audio signals S PDIF for home cinema connection 7 RS 232C Connects to the PC to update the software programme of the product 8 LNB IN and Loopthrough OUT...

Page 10: ...7 Volume up 8 Volume down 9 Channel up 10 Channel down 11 Help 12 Sleep timer brings up the Sleep Timer dialog 13 Color keys used for selection in On Screen Display menus 14 Guide displays the TV prog...

Page 11: ...or bright fluorescent lighting as this may interfere with the receiver and cause it not to respond to the remote Setup This short instruction explains the most important functions to ensure that you...

Page 12: ...a hi fi audio system To do this use a RCA cinch stereo cable to connect the sockets marked Audio L R on the receiver to one of the inputs of your hi fi system marked either Line Aux or Extra If your h...

Page 13: ...o which the TV image is visible through the overlay of the on screen menu Pop up Timeout When switching between programmes for instance a message is briefly displayed with programme information Now Ne...

Page 14: ...s below Signal strength and signal quality bars In two level bar meters on the right side of the screen the user can see the strength and quality of the signal coming from the antenna dish to the tune...

Page 15: ...w and High Band The LOF Local Oscillator Frequency of the LNB is usually printed on the LNB itself or in its documentation You can set the High and Low LOF frequencies to match the LNB here Band switc...

Page 16: ...o called blind search 2 Channels Select All to search for all Free to Air and Pay TV channels Select Free to air to search only for Free to air channels 3 Satellite Select which satellites you want to...

Page 17: ...If you choose manual you can set the individual Audio and Video PIDs and the PCR Video PID Use this option to manually set the Video PID Audio PID Use this option to manually set the Audio PID PCR Use...

Page 18: ...nnel number and name 3 Program schedule and title 4 press OK on the remote control to set a reminder for this program 5 Use Left Right to scroll through the programs in this channel Use Up Down to cha...

Page 19: ...he upper part of the screen to indicate when you have received a message This usually is used to notify you when a software update is available Videotext Teletext If videotext or teletext information...

Page 20: ...iver using the power switch on the rear panel USB Your digital receiver is equipped with 2 USB connections one at the front panel behind the flap and one at the back panel however only one port is act...

Page 21: ...coding file for playback The Library also lists JPEG and MP3 files so you can playback slide shows and play lists too During playback the Stop Pause Play Fast Forward Fast Backward Slow motion and Nex...

Page 22: ...sic audio and video parameters of your digital receiver related to connections on rear panel TV Resolution Use this option to set the resolution of the display TV SCART Use this option to specify the...

Page 23: ...ormation Default settings Use this option to reset the receiver to default settings This may be necessary when a large number of settings have accidentally been made incorrectly for example As you can...

Page 24: ...age with the information that your receiver got a successful update During the OTA software update the unit will first search for the update signal During the search a message box Software update will...

Page 25: ...p c From the Settings Menu select System Information d Insert the USB mass storage device into the USB slot on the front panel of the receiver e The message USB Mounting will appear at the top of the...

Page 26: ...of the family for instance can create his or her own list of personal favourites sorted according to their individual preferences The favourite lists manager is divided into two parts In the first par...

Page 27: ...tion the start and end times as well as the title of the next programme are displayed A few symbols are used to provide more information about the technical details of a programme Stream contains more...

Page 28: ...he Green function key on the remote control to move 24 hours forward or the Red function key to move 24 hours back You can use the directional keys Up and Down to select specific channels and the dire...

Page 29: ...th the event In a last column of the Personal planner you can see the mode The combinations available are in the table below Single tune it will be deleted after processing Single record it will be de...

Page 30: ...the desired value use the directional keys Up and Down Confirm your entries with the OK key Mode The Event Mode can be Automatic or Notification If Automatic mode is selected the event will be execute...

Page 31: ...nnels by means of a four digit security PIN code Personal Identification Number It also makes sense to block menu settings if you want to prevent the receiver from being incorrectly programmed by unau...

Page 32: ...on available at this time to manually switch the receiver to the standby mode Note When switching to standby mode the receiver is also able to switch off some TV sets with Slow Blanking on the SCART c...

Page 33: ...ported resolutions 576i on the CVBS Video and SCART connectors 1080i 720p 576p 576i 480p 480i on the HDMI and Component Video connectors Standard PAL Aspect ratio 4 3 and 16 9 Automatic adjustment for...

Page 34: ...el down keys 10 digit VFD display 1 Standby LED Indicator 1 IR Sensor 2 CI Slots USB host socket Type A Power requirements Mains input voltage 90 to 260 V Mains input frequency 50 60 Hz Power consumpt...

Page 35: ...The CI module or CA card is not correctly inserted Re insert the Card and or module Scrambled programs are not received The CI module or CA card belong to a different decoding system Use a CA module...

Page 36: ...horized Company representative service provider or dealer have been advised of the possibility of such damages or of any claim by any third party Any liability of the Company or its supplier which is...

Page 37: ...Warranty will become the property of the Company 7 To get the Limited Warranty service In the event that a warranty service is required you should contact your specialist dealer or the point of sale...

Reviews: