background image

truVision DVR 31 Quick Start Guide 

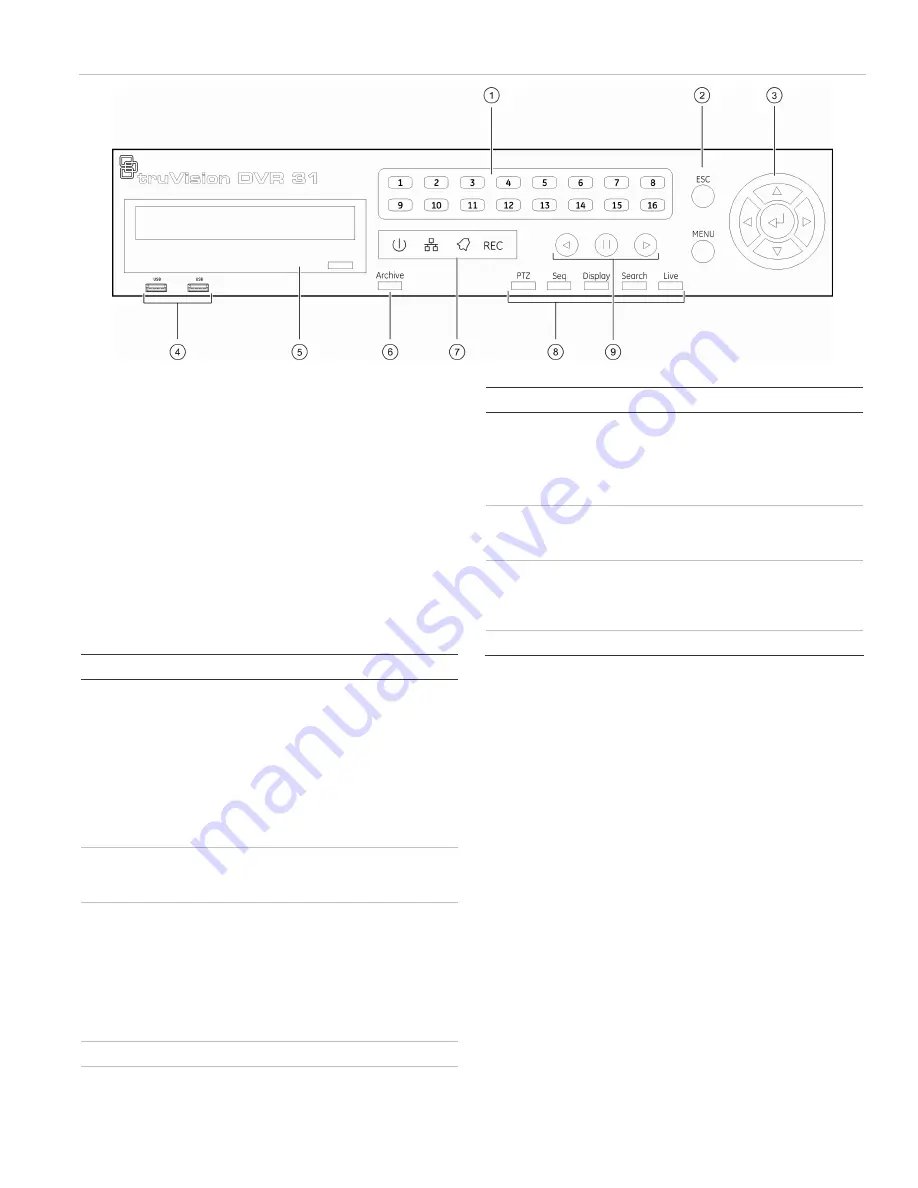
Figure 2: Front panel 


Control options 

There are several ways to control the DVR 31: 

• 

Front panel control 

• IR 

remote 

control 

• 

Mouse toolbar control 

• 

Web browser control 

Front panel control 

The buttons on the front panel control most functions. 
See Figure 2 above for the locations of the controls. 

Table 2: Front panel control descriptions 

Item Name 

Description 

Numeric buttons 

Display the corresponding video in full 
screen while in both live and playback 
mode. The number of the button 
corresponds to the camera number. 
Press and hold a numeric button for 
two seconds to display the 
corresponding video on the spot 
monitor. 

While in PTZ mode, press the 1 button 
to access the Set/Go Preset menu. 

Menu and Esc 
controls 

Press Esc to exit a screen or cancel a 
selection. Press Menu to display the 
main menu. 

3 Directional 

controls and Enter 
button 

Use the arrow buttons as directional 
keys in zoom mode. 

While in a setup menu, use the Left or 
Right Arrow keys to navigate through 
fields. Use the Up or Down Arrow keys 
to change the value of a selected field. 
Press Enter to confirm the selection or 
display additional screens. 

USB ports 

Connect USB devices. 

CD/DVD drive 

Insert media for archiving. 

Item Name 

Description 

Archive button 

Begin archiving or display the Archive 
screen. 

Press once to begin copying a video 
segment for export while in playback 
mode. Press again to stop copying. 

Status LEDs 

Display device status and conditions. 
See Table 1 on page 2 for more 
information. 

Function buttons 

Change the DVR 31 operating mode. 
For example, press PTZ to go into PTZ 
mode. See the DVR 31 User Manual 
for more information. 

Playback controls 

Control video playback speed. 

IR remote control 

The IR remote control buttons are similar to those on the 
DVR 31 front panel. You can use the remote control to 
perform any DVR 31 function. 

To place batteries into the IR remote control: 

1.  Remove the battery cover. 

2.  Insert the batteries (AAA). Make sure that the 

positive and negative poles are correctly placed. 

3.  Replace the battery cover. 

To connect the remote control to the DVR 31: 

1.  Turn on the DVR 31 and wait for live video to 

appear. 

2.  On the remote control, press the DVR ID button, and 

then press the 1 button. 

3.  The remote control is now operational. 

Summary of Contents for truVision DVR 31

Page 1: ... truVision DVR 31 User Manual truVision DVR 31 Quick Start Guide truVision DVR 31 Quick Chart Video player application Record duration calculator Installation environment Refer to the user manual for detailed information but observe these important requirements Place the DVR 31 in a secure location Do not expose the unit to rain or moisture Setting up the DVR 31 To quickly put the DVR 31 into oper...

Page 2: ...es it after completing the setup Connecting the devices Use Figure 1 above as a visual guide to connect the various peripherals to the DVR 31 Resolution options 800 x 600 1024 x 768 1280 x 1024 720P and 1080P See Appendix A in the truVision DVR 31 User Manual for a list of compatible HDMI monitors Turning on the DVR 31 Turn on the DVR 31 using the power switch on the back panel When you turn on th...

Page 3: ...ow keys to change the value of a selected field Press Enter to confirm the selection or display additional screens 4 USB ports Connect USB devices 5 CD DVD drive Insert media for archiving Item Name Description 6 Archive button Begin archiving or display the Archive screen Press once to begin copying a video segment for export while in playback mode Press again to stop copying 7 Status LEDs Displa...

Page 4: ...install ActiveX controls to connect and view video using Internet Explorer However you cannot download data such as video images and the DVR player due to the increased security measure To have complete functionality of the Web browser interface and the DVR player with Windows Vista and Windows 7 do the following Run the Browser interface and the DVR player application as an administrator in your ...

Page 5: ...rol To archive recorded video using Quick Archive 1 Insert the backup device If using a USB memory drive insert the device into the USB port on the front panel If using a digital video disc DVD insert the disc into the DVD drive If both media are found in the DVR 31 the USB device takes precedence over the DVD 2 Press the Archive button on the front panel or the remote control The Quick Archive hi...

Page 6: ...ator log on uses admin as the account name with a default password of 1234 The seven predefined standard users are labeled User1 to User7 with a default password of 4321 and level 4 access Only the system administrator can manage users The administrator can customize the standard users and allocate their access rights You can modify the admin password but not the admin user name We recommend that ...

Page 7: ...ut for each camera with alarms 3 On the Alarms screen enable the buzzer if desired 4 On the Alarms screen ensure that Video Loss Protection is disabled for unused camera input channels 5 On the Display screen enable the event indicator to display an on screen indicator when an event occurs To set up motion alarms 1 On the Cameras screen use the Motion Detection command and functions to define moti...

Page 8: ...8 truVision DVR 31 Quick Start Guide DVR 31 screen map ...

Reviews: