background image

truVision DVR 31 Quick Start Guide 

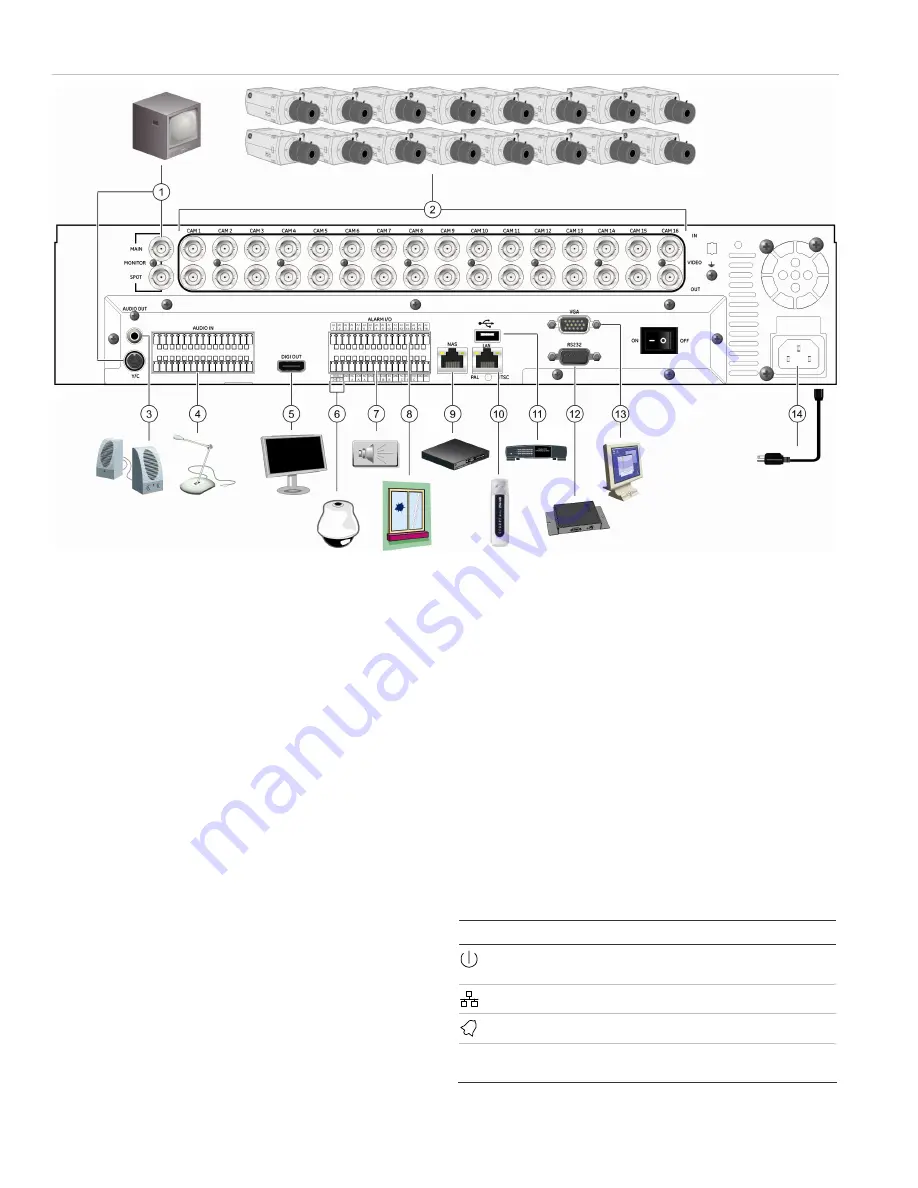
Figure 1: DVR 31 back panel connection diagram 


1. 

Connect up to two CCTV monitors (main and spot) 

2. 

Connect up to 16 cameras 

3. 

Connect to speakers for audio output 

4. 

Connect to audio input (available for each camera) 

5. 

Connect to a monitor that displays digital video (HDMI) 

6. 

Connect to a PTZ control 

7. Alarm 

output 


8. 

Connect to alarm input cables 

9. 

Connect to a network attached storage (NAS) device (This device 
is currently not supported.) 

10.  Connect to a network  
11.  Connect to a USB device 
12.  Connect to a point-of-sale (POS) device 
13.  Connect to a VGA monitor 
14.  Connect to the power cord 


Note: 

During setup you can disable the password to 

save time (Menus > Users > Enable Password). Be sure 
to enable the password (if the installation requires it) 
after completing the setup. 

Connecting the devices 

Use Figure 1 above as a visual guide to connect the 
various peripherals to the DVR 31. 

Resolution options: 800 x 600, 1024 x 768, 1280 x 1024, 
720P, and 1080P*. 

* See Appendix A in the truVision DVR 31 User Manual 
for a list of compatible HDMI monitors. 

Turning on the DVR 31 

Turn on the DVR 31 using the power switch on the back 
panel. When you turn on the device, the DVR 31 

automatically displays all live views from the connected 
cameras. It also automatically begins recording. 

Operating the DVR 31 

Status LEDs 

The LEDs on the front panel light up or flash to alert you 
to various conditions. 

Table 1: Status LED descriptions 

LED Name 

Description 


Power 

Steady indicates that the correct power is 
connected to the unit. 


Network 

Blinking indicates that data is being transferred.


Alarm 

Steady indicates that an alarm is triggered. 

REC  Record 

Blinking indicates that the DVR 31 is recording. 
Steady indicates hard drive failure. 


Summary of Contents for truVision DVR 31

Page 1: ... truVision DVR 31 User Manual truVision DVR 31 Quick Start Guide truVision DVR 31 Quick Chart Video player application Record duration calculator Installation environment Refer to the user manual for detailed information but observe these important requirements Place the DVR 31 in a secure location Do not expose the unit to rain or moisture Setting up the DVR 31 To quickly put the DVR 31 into oper...

Page 2: ...es it after completing the setup Connecting the devices Use Figure 1 above as a visual guide to connect the various peripherals to the DVR 31 Resolution options 800 x 600 1024 x 768 1280 x 1024 720P and 1080P See Appendix A in the truVision DVR 31 User Manual for a list of compatible HDMI monitors Turning on the DVR 31 Turn on the DVR 31 using the power switch on the back panel When you turn on th...

Page 3: ...ow keys to change the value of a selected field Press Enter to confirm the selection or display additional screens 4 USB ports Connect USB devices 5 CD DVD drive Insert media for archiving Item Name Description 6 Archive button Begin archiving or display the Archive screen Press once to begin copying a video segment for export while in playback mode Press again to stop copying 7 Status LEDs Displa...

Page 4: ...install ActiveX controls to connect and view video using Internet Explorer However you cannot download data such as video images and the DVR player due to the increased security measure To have complete functionality of the Web browser interface and the DVR player with Windows Vista and Windows 7 do the following Run the Browser interface and the DVR player application as an administrator in your ...

Page 5: ...rol To archive recorded video using Quick Archive 1 Insert the backup device If using a USB memory drive insert the device into the USB port on the front panel If using a digital video disc DVD insert the disc into the DVD drive If both media are found in the DVR 31 the USB device takes precedence over the DVD 2 Press the Archive button on the front panel or the remote control The Quick Archive hi...

Page 6: ...ator log on uses admin as the account name with a default password of 1234 The seven predefined standard users are labeled User1 to User7 with a default password of 4321 and level 4 access Only the system administrator can manage users The administrator can customize the standard users and allocate their access rights You can modify the admin password but not the admin user name We recommend that ...

Page 7: ...ut for each camera with alarms 3 On the Alarms screen enable the buzzer if desired 4 On the Alarms screen ensure that Video Loss Protection is disabled for unused camera input channels 5 On the Display screen enable the event indicator to display an on screen indicator when an event occurs To set up motion alarms 1 On the Cameras screen use the Motion Detection command and functions to define moti...

Page 8: ...8 truVision DVR 31 Quick Start Guide DVR 31 screen map ...

Reviews: