background image

8

Programming Your System

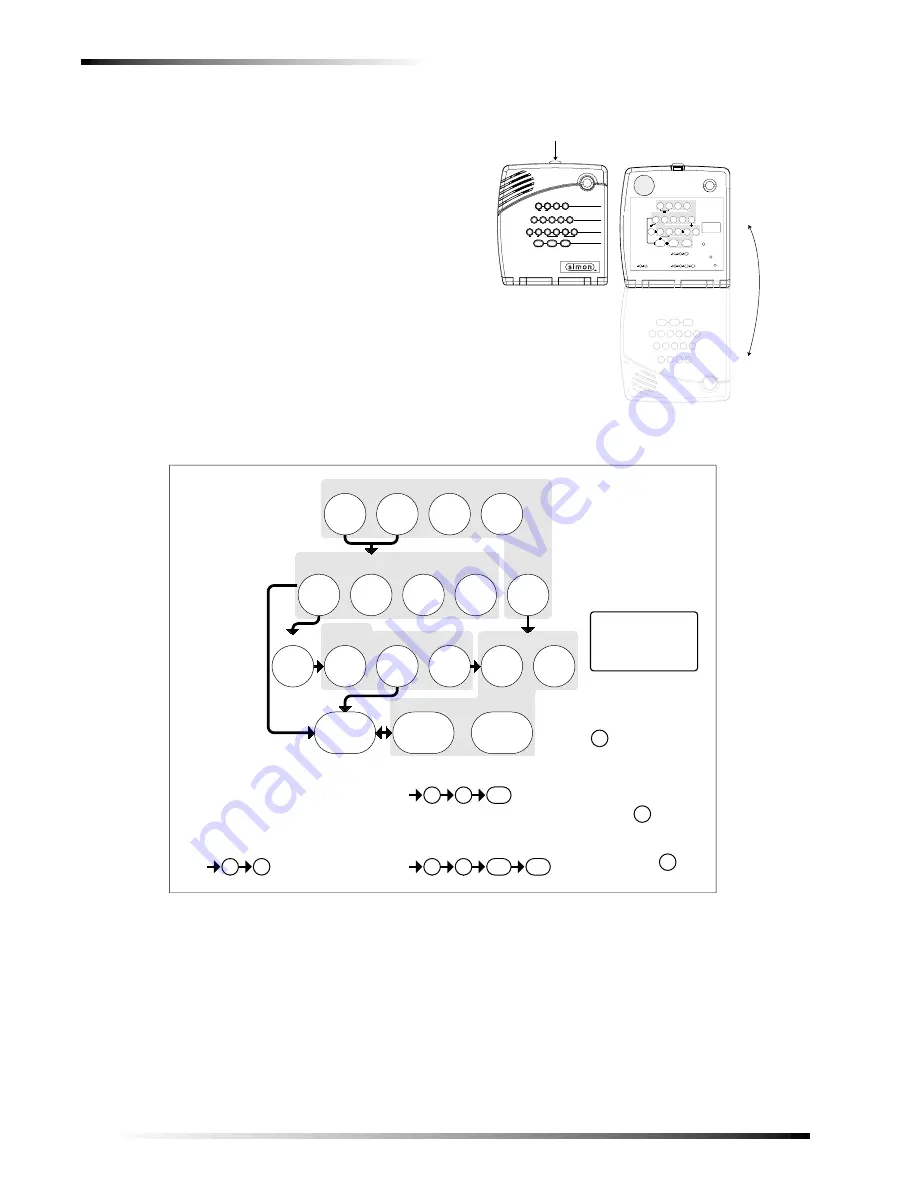
The programming decals are visible when you open the 
panel cover (see Figure 1.). These decals are designed to 
make system programming easier for you. Always begin 
by entering your access code. Then, choose an operation 
from the START MENU. Follow the voice prompts and 
flow arrows to complete the desired task. Notice the button 
flow diagrams following the Instruction Summary.

Programming Instructions

Use the following instructions to access the programming 
buttons and programming decals.

1.

System must be disarmed. Open the Panel Cover by 
pressing the plastic latch on the top of the panel.

When you open the cover you will immediately be 
prompted by the panel voice to use the numbered keys 
to enter your ID. 

Figure 1. Opening the panel cover

2.

Enter the Master Access Code.

Note
The Master access code is 1-2-3-4 when the panel is 
shipped. You should change your Master Access 
Code after your system is installed (see “Access 
Code”). 

3.

The system voice will prompt you to begin with the 
START MENU

The START MENU includes the following buttons: 

Add

Delete

Cancel

Test

Clock Set

Press the appropriate button.

Test Weekly

C O D E

Status

System

9 / 0

Windows

Doors &

Sensors

Motion

Disarm

5 / 6

Arm

3 / 4

7 / 8

On

Off

AUX

Sensor

Motion

Time

FIRE

POLICE

Lights

Special

H O M E   C O N T R O L

E M E R G E N C Y

H O M E   S E C U R I T Y

Doors

Chime

3

2

9

7

8

1

0

6

4

5

Test

System should be checked

422-2806 Rev A

Set

Code

Access

Clock

+

Delete

Delete

press

-

+

Hours

at least every three years.

To delete an option or access code

Hold key or press

and follow the voice

repeatedly until you
hear the desired item.

Note:

Cancel

and

Test

Cancel

DONE

Minutes

, then

DONE

See Note

If you make a mistake or want to

Sensor or Phone Test

follow the voice prompting.

To select a test, press

start over press

prompting.

by a qualified technician

Delete

START MENU

Add

Version 3

MAIN MENU

*

Remote

Sensor/

*

*

Control

Light

Option #

*

*

Sensors

-

*

Entry/Exit

Delay

CONTROL MENU

*

Press for program
information.

Instruction

Add Option

Summary

Unit #

Add

Press

Clock Set

Press

Set Clock

DONE

Chime Voice

Latchkey Time

Panel Voice

Add

Option #

Press

Option #42:
Option #43:
Option #55:

Option #41:

Option #2:
Option #3:
Option #36:
Option #37:

See Note

Sensor Activated Light Lockout Start Time
Sensor Activated Light Lockout Stop Time

and follow voice prompts.

Pager Phone Number

Speaker Volume

Status Beep Volume

Option #1: Panel Beeps

use red numbers to enter 4-digit code.

Add Access Code

Hours

Access Code

See Note

Minutes

Time

Cancel

1 / 2

1.

Press Down

2.

Open

Cover

3

2

9

7

8

1

0

6

4

5

Test

System should be checked

422-2806 Rev A

Set

Code

Access

Clock

+

Delete

Delete

press

-

+

Hours

at least every three years.

To delete an option or access code

Hold key or press

and follow the voice

repeatedly until you
hear the desired item.

Note:

Cancel

and

Test

Cancel

DONE

Minutes

, then

DONE

See Note

If you make a mistake or want to

Sensor or Phone Test

follow the voice prompting.

To select a test, press

start over press

prompting.

by a qualified technician

Delete

START MENU

Add

Version 3

MAIN MENU

*

Remote

Sensor/

*

*

Control

Light

Option #

*

*

Sensors

-

*

Entry/Exit

Delay

CONTROL MENU

*

Press for program
information.

Instruction

Add Option

Summary

Unit #

Add

Press

Clock Set

Press

Set Clock

DONE

Chime Voice

Latchkey Time

Panel Voice

Add

Option #

Press

Option #42:
Option #43:
Option #55:

Option #41:

Option #2:
Option #3:
Option #36:
Option #37:

See Note

Sensor Activated Light Lockout Start Time
Sensor Activated Light Lockout Stop Time

and follow voice prompts.

Pager Phone Number

Speaker Volume

Status Beep Volume

Option #1: Panel Beeps

use red numbers to enter 4-digit code.

Add Access Code

Hours

Access Code

See Note

Minutes

Time

Cancel

Summary of Contents for Simon 3

Page 1: ...trol Panel 6 Phone Commands 7 How to Use Your Touchpads 7 Remote Handheld Touchpad 7 Keychain Touchpad 7 Programming Your System 8 Programming Instructions 8 Access Codes 9 Light Control 9 Programming Options 10 Option 01 Panel Beeps 10 Option 02 Panel Voice 10 Option 03 Latchkey Time 11 Option 36 and 37 Sensor Activated Light Lockout Start and Stop Times 11 Option 41 Voice Chime 12 Option 42 Spea...

Page 2: ... affected equipment and the panel receiver to separate outlets on different branch circuits Consult the dealer or an experienced radio TV technician for help FCC Part 68 This equipment complies with Part 68 of the FCC Rules Located on this equipment is a label that contains among other information the FCC registration number and the ringer equivalence number REN for this equipment If requested thi...

Page 3: ...rity system primarily from within the home Keychain Touchpads are used to control the security sys tem from within or near the outside of your home Sensors Indoor Motion Sensors detect motion in a protected indoor area When motion is detected the panel may respond by sounding chimes or an alarm Outdoor Motion Sensors detect motion in a protected outdoor area When motion is detected the system may ...

Page 4: ... this manual to determine the mean ing of panel system beeps Your Exit Delay is set for ___ seconds Entry Delay Entry Delay is the amount of time the system gives you to disarm the system after entering the home This is pro grammed by the installer When you enter your home you will hear beeps during the entry delay see the table Sta tus Beeps of this manual to determine the meaning of panel system...

Page 5: ...med and the Disarm light will be lit WARNING If you enter your home and you hear alarm sirens or if controlled lights that should be off are on an intruder may be inside or another emergency may have occurred Leave immediately and call for help Subdisarm Your System 1 Enter your Master Access Code while the system is disarmed Panel announces System disarmed Disarm button light blinks and the syste...

Page 6: ... Lights Turn on designated lights with Lamp Modules at a spe cific time You can program what time the lights go on and off see Programming Light Control Turn Time Activated Lights on 1 Press Time Lights button Panel will announce time activated light on Time Lights button will be lit Turn Time Activated Lights off 1 Press Time Lights button Panel will announce time activated light off Time Lights ...

Page 7: ...n sounds used by the security system Temporal 3 refers to a contin uous pattern of 3 siren pulses then off for 2 seconds 3 siren pulses then off for 2 second Panel Indicator Lights Use the following table to understand the panel indicator lights Status Beeps Activity Beep Response ARM Doors Windows Exit delay and Entry delay beeps sound 2 times every 5 seconds and 2 times per second during the las...

Page 8: ...ur motion detectors Check the location of your smoke detectors Smoke detectors near bathrooms and kitchens can be tripped by steam and smoke from cooking Take note of system beeps voice announcements and indicator lights which indicate the current system sta tus How to Use an Off Site Phone You may use an off site phone to arm disarm your panel turn lights on and off check system status or conduct...

Page 9: ...dical emergency Keychain Touchpad If your installer programmed the Key chain Touchpad with no entry delay and you armed the system with the Keychain Touchpad you must disarm your system before entering the home to avoid caus ing an alarm If your installer programmed your system for Remote Touchpad Arming you must enter your home to start the entry delay before you can use your Keychain Touchpad to...

Page 10: ... Test follow the voice prompting To select a test press start over press prompting by a qualified technician Delete START MENU Add Version 3 MAIN MENU Remote Sensor Control Light Option Sensors Entry Exit Delay CONTROL MENU Press for program information Instruction Add Option Summary Unit Add Press Clock Set Press Set Clock DONE Chime Voice Latchkey Time Panel Voice Add Option Press Option 42 Opti...

Page 11: ...el voice prompts you to Please select from START MENU Press the Add button on the START MENU 4 The panel voice prompts you to Select from MAIN MENU Press the Access Code button on the MAIN MENU 5 The panel voice responds with Master Code press again for next access code or DONE to select or CANCEL to quit Press the access code button again to hear the next access code When you hear the access code...

Page 12: ...ss Option Panel announces Option 1 press again for next option or done to select 5 Press DONE Panel announces Option 1 is on Delete turns off panel piezo beeps 1 Open panel cover Panel announces Use numbered keys to enter ID 2 Enter Access Code using the numbered keys Panel announces Please select from Start Menu 3 Press Delete from the Start menu Panel announces Select from main menu 4 Press Opti...

Page 13: ...ou don t want sensor activated lights to be active during daylight hours set the lockout start time to begin at dawn and set the stop time option 37 to coin cide with sunset Option 36 Sensor Activated Light Lockout Start Time Add enables sensor activated light lockout start time mid night to 11 59 P M 1 Open panel cover Panel announces Use numbered keys to enter ID 2 Enter Access Code using the nu...

Page 14: ...nter Access Code using the numbered keys Panel announces Please select from Start Menu 3 Press Add from the Start menu Panel announces Select from main menu 4 Press Option Panel announces Option 1 press again for next option or done to select 5 Press 42 Panel announces Option 42 press again for next option or use numbered keys to enter option 6 Enter the voice level 1 8 with the numbered keys 7 Pa...

Page 15: ...ows you to set the volume for status sounds such as arming beeps trouble beeps and status beeps The low est volume setting is 1 the highest is 10 1 Open panel cover Panel announces Use numbered keys to enter ID 2 Enter Access Code using the numbered keys Panel announces Please select from Start Menu 3 Press Add from the Start menu Panel announces Select from main menu 4 Press Option Panel announce...

Page 16: ...or Tampered This condition occurs when a sensor is physically tam pered with If the system is armed an alarm will occur For example the cover is taken off of one of the sensors Your system will indicate this condition to you by causing the System Status button to light When you press this button the system responds with Sensor Name tampered Cor rect the problem by resetting the sensor If this cond...

Page 17: ...ronmental prob lems All alarm systems are subject to possible compromise or failure to warn for a variety of reasons If sirens are not placed within hearing range of per sons sleeping in remote parts of the premises or if they are placed behind doors or other obstacles If intruders gain access through unprotected points of entry or areas where sensors have been bypassed If intruders have the techn...

Page 18: ...ne should enter the premises if they hear sirens in the house If you arrive at the premises and hear sirens do not enter Call for emergency assistance from a neighbor s phone Your Floor Plan Use the following guidelines when drawing your floor plan use the next page to draw your floor plan Show all building levels Show exits from each room two exits per room are recommended Show the location of al...

Page 19: ...17 ...

Page 20: ...ccess Code while system is disarmed Disarm ARM Motion Sensors Press once ARM Doors Windows Press once ARM Doors Windows Press each button once ARM Doors Windows Press twice Press once Press once Press twice Press once if programmed Access Code Press twice Press twice Press Master Code 3 3 Press both Emergency buttons and hold for 3 seconds Press twice Press 3 times Press both hold for 3 seconds Qu...

Reviews: