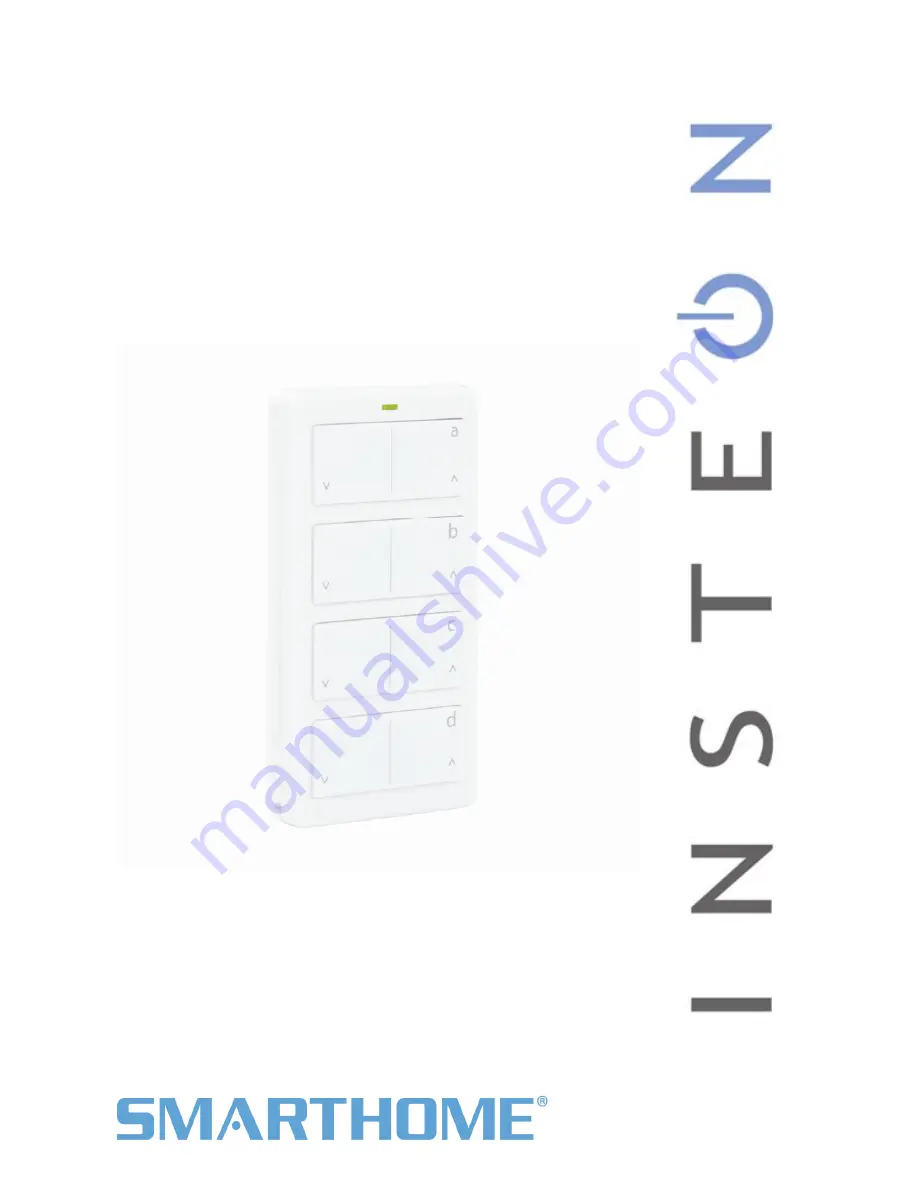
RemoteLinc
2
INSTEON
®
Remote Control Keypad, 4 Scene (#
2444A2xx4
)
Owners Manual
Page 1 of 15 2444A2xx4 Rev: 10/24/2011 10:50 AM
Page 1: ...RemoteLinc 2 INSTEON Remote Control Keypad 4 Scene 2444A2xx4 Owners Manual Page 1 of 15 2444A2xx4 Rev 10 24 2011 10 50 AM...
Page 2: ...uck Button 8 Advanced Features 8 Add Multiple Responders to a Scene Multi Link 8 Remove Multiple Responders from a Scene Multi Unlink 8 Change Button Scene Configuration e g Change to 8 Button Mode 9...
Page 3: ...nted on wall with no trim plate wireless keypad Mounted on wall in a single gang Decorator trim plate wireless keypad built in look Mounted on wall in a multi gang Decorator trim plate add to the numb...
Page 4: ...e Stuck Button Mode saves battery life by going to sleep if button stuck down Beeper for setup ease Recharges with standard USB charger with via Micro USB Plug 5VDC 9 12 month battery life based on av...
Page 5: ...nt your RemoteLinc 2 anywhere Gang two or more together for more control Can be installed adjacent to existing wired in switches RemoteLinc 2 can easily be removed for portability or recharging Use wi...
Page 6: ...ast Off Add RemoteLinc 2 Button to a Scene as a Controller Follow the steps below to control a scene one or more INSTEON devices 1 Tap the RemoteLinc 2 scene button of choice on or off buttons will bo...
Page 7: ...on Tap Press hold Double tap On Right Turn scene on Brighten scene members until released Turn scene members full bright instantly Off Left v Turn scene off Dim scene members until released Turn scene...
Page 8: ...s the RemoteLinc will automatically stop transmitting to preserve battery life The RemoteLinc 2 will automatically turn back on when the button that was depressed is no longer being pressed Advanced F...
Page 9: ...2nd time for 3 seconds until you hear a beep RemoteLinc 2 s LED will blink RED 3 Press Hold Set Button a 3rd time for 3 seconds until you hear a beep RemoteLinc 2 s LED will blink GREEN 4 Press Hold...
Page 10: ...its LED turns off returns to Ready Mode Turn Beeper On During Usage or Back Off 1 Press Hold Set Button for 3 seconds until you hear a beep RemoteLinc 2 s LED will blink GREEN 2 Press Hold Set Button...
Page 11: ...formation LED State Meaning Add Responder Setup Mode or Blinking Green slowly LED on off Setup Mode Blinking Red slowly Remove Responder Setup Mode Multi Add Responder Setup Mode or Double Blinking Gr...
Page 12: ...nding Warranty 1 Year Limited INSTEON Scenes 4 default configurable to 8 Scene Configurations 4 On Off default 8 Toggle or 8 Always On Maximum scene Links 400 On Off Begin Brightening Begin Dimming En...
Page 13: ...ing Problem Possible Cause Solution RemoteLinc 2 may be out of range of nearest dual band INSTEON device hopper Try moving an access point or other dual band plug in module closer to RemoteLinc 2 The...
Page 14: ...fonctionnement The digital circuitry of this device has been tested and found to comply with the limits for a Class B digital device pursuant to Part 15 of the FCC Rules These limits are designed to...
Page 15: ...rms of the above warranty and disclaimer Home automation devices have the risk of failure to operate incorrect operation or electrical or mechanical tampering For optimal use manually verify the devic...