


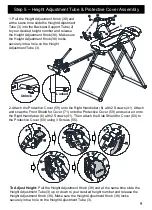


Step 1
– Base Frame Assembly
5
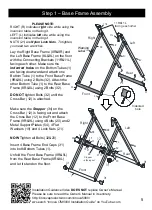
PLEASE NOTE:
RIGHT (R)
Indicates right side while using the
inversion table, not facing it.
LEFT (L)
Indicates left side while using the
inversion table, not facing it.
NUTS (21)
are Nylon Lock Nuts. To tighten,
you need two wrenches.
Lay the Right Base Frame (8R&9R) and
the Left Base Frame (8L&9L) on the floor
with the Connecting Brackets (11R&11L)
facing each other. Make sure the
indented holes
on the Bottom Tubes (1)
are facing downward and attach one
Bottom Tube (1) to the Front Base Frame
(9R&9L) using 2 Bolts (32). Attach the
other Bottom Tube (1) to the Rear Base
Frame (8R&8L) using 2 Bolts (32).
DO NOT
tighten Bolts (32) until the
Cross Bar (12) is attached.
Make sure the
Stopper
(34) on the
Cross Bar (12) is facing out and attach
the Cross Bar (12) to the Front Base
Frame (9R&9L) using 4 Bolts (20) and 2
Metal Support Plates (54), 4 Flat
Washers (19) and 4 Lock Nuts (21).
NOW
Tighten all Bolts (32&20).
Insert 4 Base Frame End Caps (31)
into both Bottom Tubes (1).
Unfold the Front Base Frame (9R&9L)
from the Rear Base Frame (8R&8L)
and let it stand on the floor.
Installation Guidance Video
DOES NOT
replace Owner’s Manual.
Please be sure to read the Owner’s Manual in its entirety.
http://innovaproductsinc.com/innova5900/
or
search “
Innova ITM5900 Installation Guide
” on YouTube.com
Indented
hole
32
32
32
32
Right
Left
1
! W
a
rn
in
g
Rear
8L
8R
9R
9L
11R
11L
Front
1
11R&11L
facing each other
31
20
19
21
19
21 19
19
20
Right
Left
1
!
W
a
rn
in
g
Front
Rear
8L
8R
9R
9L
31
31
31
12
54
54
34
Stopper
is facing out
20
21
21
Warning
Label