ALTERNATE LUBRICANTS.
You may use a petroleum-based
lubricant that is premium quality, does not contain detergents,
contains only anti-rust, anti-oxidation, and anti-foam agents as
additives, has a flashpoint of 440°F (227°C) or higher, and has
an auto-ignition point of 650°F (343°C) or higher.
See the petroleum lubricant viscosity table below. The table is
intended as a general guide only. Heavy duty operating
conditions require heavier viscosities. Refer specific operating
conditions to your dealer for recommendations.
Temperature Around Unit
Viscosity @ 100°F
(37.8°C)
Viscosity Grade
°F
°C
SUS
Centistoke
s
ISO
SAE
40 & below
4.4 & below
150
32
32
10
40 - 80
4.4 - 26.7
500
110
100
30
80 - 125
26.7 - 51.0
750
165
150
40
If you use a petroleum-based compressor lubricant at start-up
and decide to convert to All Season Select synthetic compressor
lubricant later on, the compressor valves must be thoroughly
decarbonized and the crankcase must be flushed before
conversion.
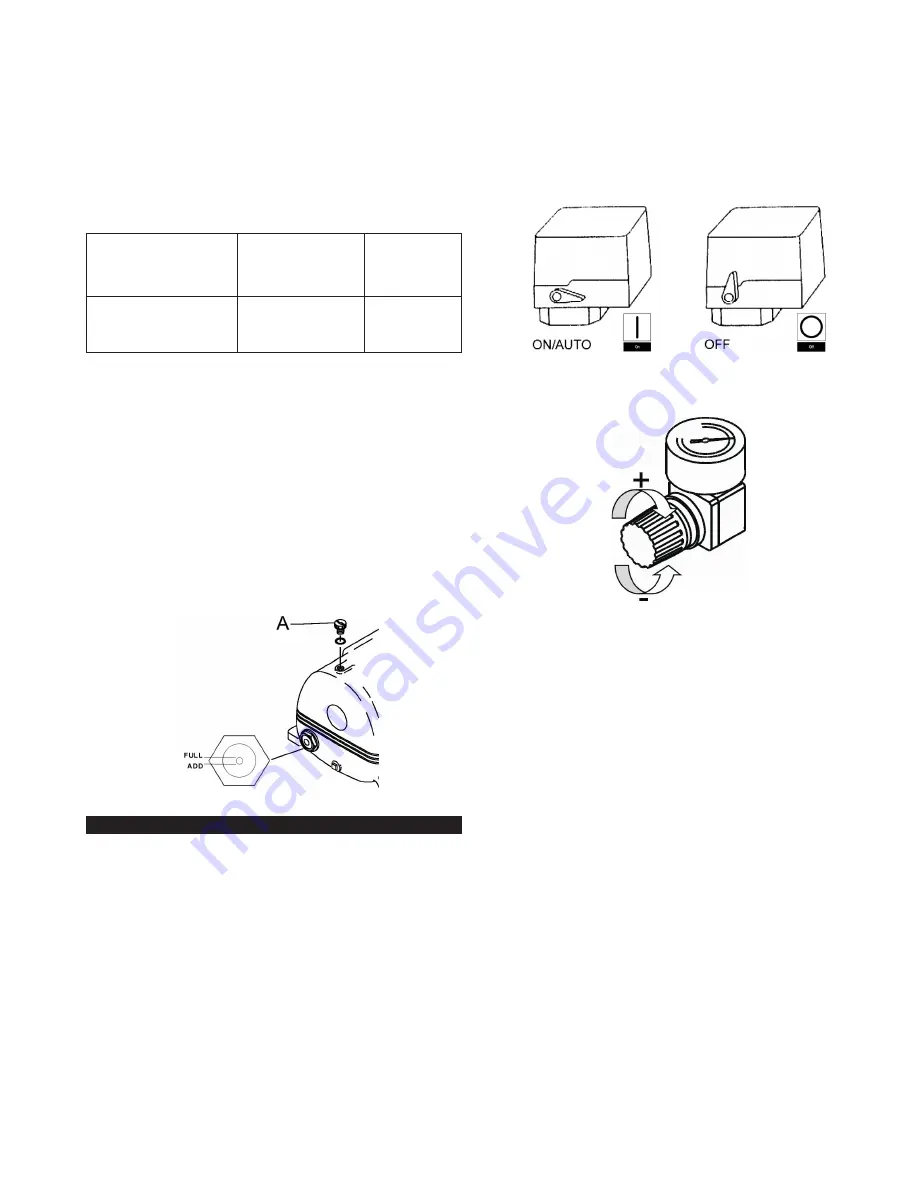
COMPRESSOR PUMP FILLING PROCEDURES:
•
WARNING
HAZARDOUS VOLTAGE. Can cause serious
injury or death. Disconnect power and
Lockout/Tagout machine.
1.
Unscrew and remove the oil fill plug (A).
2.
Slowly fill the crankcase with lubricant until the lubricant reaches
the “full” level of the sight glass as shown. Crankcase capacity is
one (1) pint (0.5 liters).
3.
Replace the oil fill plug HAND TIGHT ONLY.
OPERATION
GENERAL ________________________________________
Your air compressor was designed for 100% continuous duty
operation with the use of All Season Select synthetic compressor
lubricant and 60% continuous duty operation with the use of
petroleum lubricant. In other words, synthetic lubricant allows the
compressor to pump continuously without cycling. Petroleum
lubricant limits the compressor to a maximum of 36 minutes of
pumping time per hour. The compressor should not cycle more
than 10 times per hour.
NORMAL START-UP _______________________________
1.
Set the pressure switch lever to “OFF”.
2.
Close the regulator by turning it fully counterclockwise (-).
3.
Attach hose and accessory.
4.
Move the pressure switch lever to “ON/AUTO”. The unit will start.
5.
Allow tank pressure to build. The motor will stop when tank
pressure reaches cut-out pressure.
6.
Adjust the regulator to the desired secondary pressure by turning
it clockwise (+) to increase the pressure or counterclockwise (-)
to decrease the pressure.
NOTE:
When the receiver tank pressure drops below the
factory pre-set minimum, the pressure switch
resets and restarts the unit.
SHUTDOWN ______________________________________
1.
Set the pressure switch lever to “OFF”.
2.
Close the service valve fully.
3.
Remove the air tool or accessory.
4.
Slowly open the service valve to bleed air pressure down to 20
psig.
5.
Slowly open the manual drain valve at the bottom of the tank to
drain all condensate (water).
6.
Close the drain valve and the service valve for the next use.
7.
Wrap the power cord firmly around the handle.
8.
Store the unit indoors.
Filling Procedures
Pressure Switch Lever
Regulator
3
http://air.irco.com
P1.5IU-A9


