iNFinuvo QQ2 LT Series User Manual Download Page 5

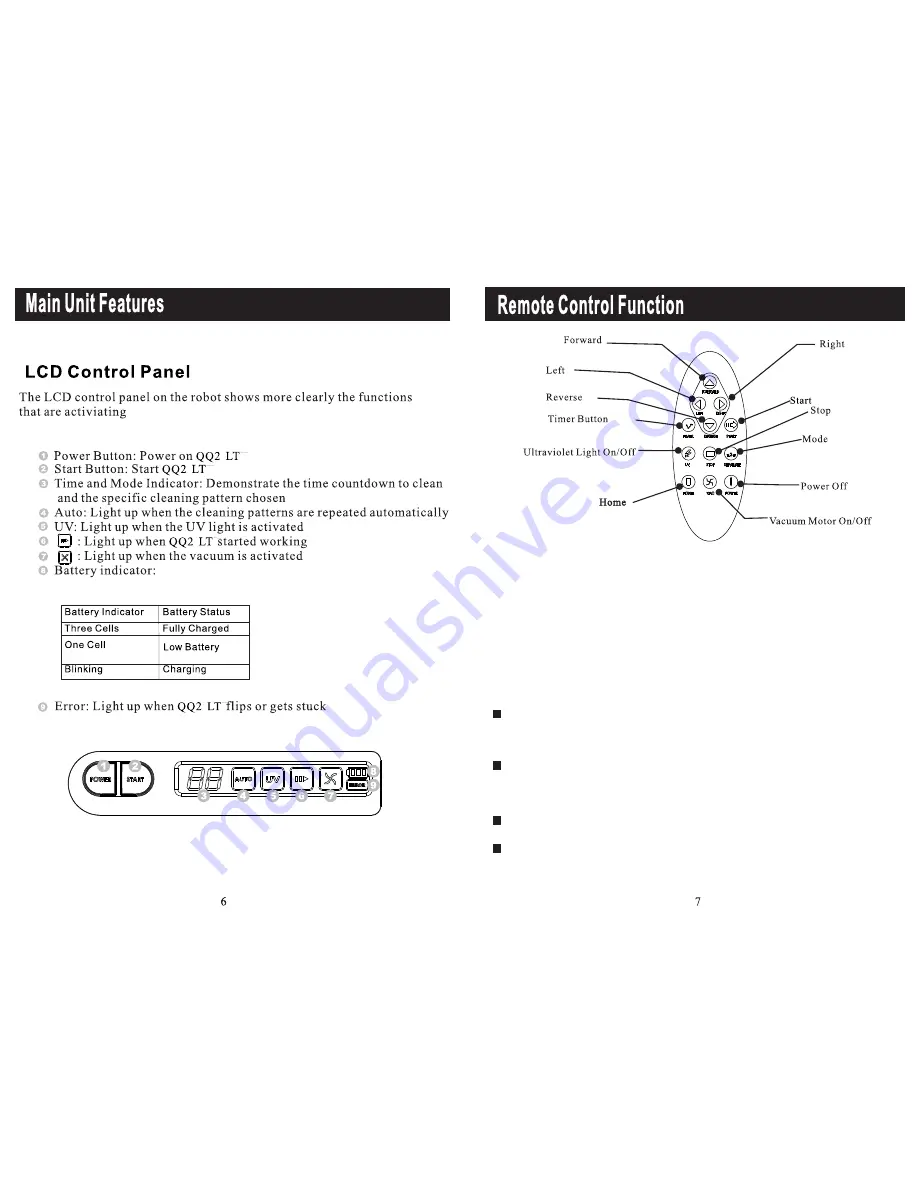
Function of each Button:

1.Start Button: Press the Start Button to begin the automatic cleaning of the 
    room. 
2.Stop Button: Press the Stop Button to stop the activity of the unit, and it will 
   emit a long sound.
3.Timer button: Use this button to set the cleaning time of the QQ2 LT.
4.Directional Buttons: Forward: when press forward QQ2 LT will moving
    until user press forward button again or stop by obstacle.
    Right, left and backward button: use these buttons to manually drive the 
    unit to the right, left and backward. 
5.Mode Button: Press this button to pick a specific cleaning pattern for the 
   QQ2 LT. By default the unit cleans in "Automatic" Mode (All 5 cleaning 
   movements).
      Press the "Mode" button once to make the unit clean in"Spiral" mode only. 
      The timer will display "1" for one minute and then will show the cleaning 
      time. When  the QQ2 LT comes in contact with any object while 

running in this mode, it will automatically stop its movement.
Press the "Mode" button again (Twice)to make the QQ2 LT clean in 
"Special Bounce" mode only. The Timer will display "2" for one minute.
 Press the"Mode" button again (Three times) to make the unit run in "Along
 Wall" mode only. The Timer will display "3" for one minute.

Press the "Mode" button again (Four times) to make the unit run in "S 
Shape" mode only. The timer will display "4" for one minute.
Press the "Mode" button again (5 times) to make the unit run in 
"Polygonal Spiral" mode only. The Timer display will show "5" 
for one minute.

QQ2 LT Series

QQ2 LT Series

or "LO" on Timer

Summary of Contents for QQ2 LT Series

Page 1: ...botic Vacuum Cleaner USER MANUAL QQ2 LT Series Robotic Vacuum Cleaner REV A 011613 If you have question or issue on the product do not return it to store Please contact technical support first with li...

Page 2: ...ore using this product please remove 2 white protection pads inside front bumper Please follow all normal saety precautions to avoid the occurrence of situations such as fire short circuit and injury...

Page 3: ...d vinyl and most carpets As long as you have the QQ2 LT Robotic Vacuum Cleaner you have the most helpful house cleaning mate 2 The compact shape enables this unit to clean under beds tables and other...

Page 4: ...Main Unit 1 2 Remote control 1 3 Filter 2 4 Rechargeable battery 1 5 Charger 1 6 User manual 1 7 Hand brush 1 8 Self charging base 1 9 Fragrance not included 10 Sonic Wall included for QQ2 LT II model...

Page 5: ...All 5 cleaning movements Press the Mode button once to make the unit clean in Spiral mode only The timer will display 1 for one minute and then will show the cleaning time When the QQ2 LT comes in con...

Page 6: ...iolet light as needed 7 Vacuum Motor Off Button Press this button to control the On Off of the vacuum motor 8 Home Button Use this Button to make QQ2 LT go back to the charging base 9 Power Off Button...

Page 7: ...scheduler LCD panel is located on the top of the QQ2 LT self charging base unit User needs to plug the AC adapter into QQ2 LT self charging base and power up the scheduler before setting up the clock...

Page 8: ...will be set and display will become steady SET and CLK disappear if there is no key input for one minute idling or no action User can schedule the QQ2 LT unit to clean on any day of the week up to 7 d...

Page 9: ...RT button on the remote control on page 7 When the QQ2 LT is being charging on the self charging base you can direct the QQ2 LT to begin cleaning when you press START button on your remote control QQ2...

Page 10: ...he unit Cleaning Dust Bin and Air Filter 1 Make sure the power of the unit is Off 2 Press the Dust Bin Open Button See Illustration 1 3 Remove the Dust Bin Cover See Illustration 2 4 Remove the Dust B...

Page 11: ...any dust that has accumulated inside the vacuum entry as shown below Shake the dust out into a trash can QQ2 LT Series QQ2 LT Series 9 While the Dust Bin is removed from its compartment turn the unit...

Page 12: ...tment with a brush then dump the dirt into a trash can 7 Re install the roller brush following the steps outlined in Roller Brush Installation and Removal Section Useful Tips Clear the area where the...

Page 13: ...ray Capacity of dust bin Moving speed of machine Remote control Types of movement Dimension Weight 23 22 Useful Tips Fixing jams Objects can get caught in the Roller Brush and prevent it from working...

Page 14: ...e and documentation QQ2 LT Series QQ2 LT Series This trouble shooting guides cover some CleanMate problems that you might have If problem persists please contact your local warranty provider or www in...

Reviews: