Infinova V1700N series Operation Manual Download Page 11


5


Note: 

The following descriptions are used for the super 

user. 


3.2 System Information 

The initial interface of System Settings displays related system 
information. You can get to know all system information from this 
interface such as: basic information of system, network configure, 
OSD/PTZ/NTP setting, video parameter setting, alarm parameter 
information, NTP setting and etc. 
 

3.3 Account Settings 

After logging on as a super user, click the 


button. 

When the button turns to be high light, the following account 
information will display: 


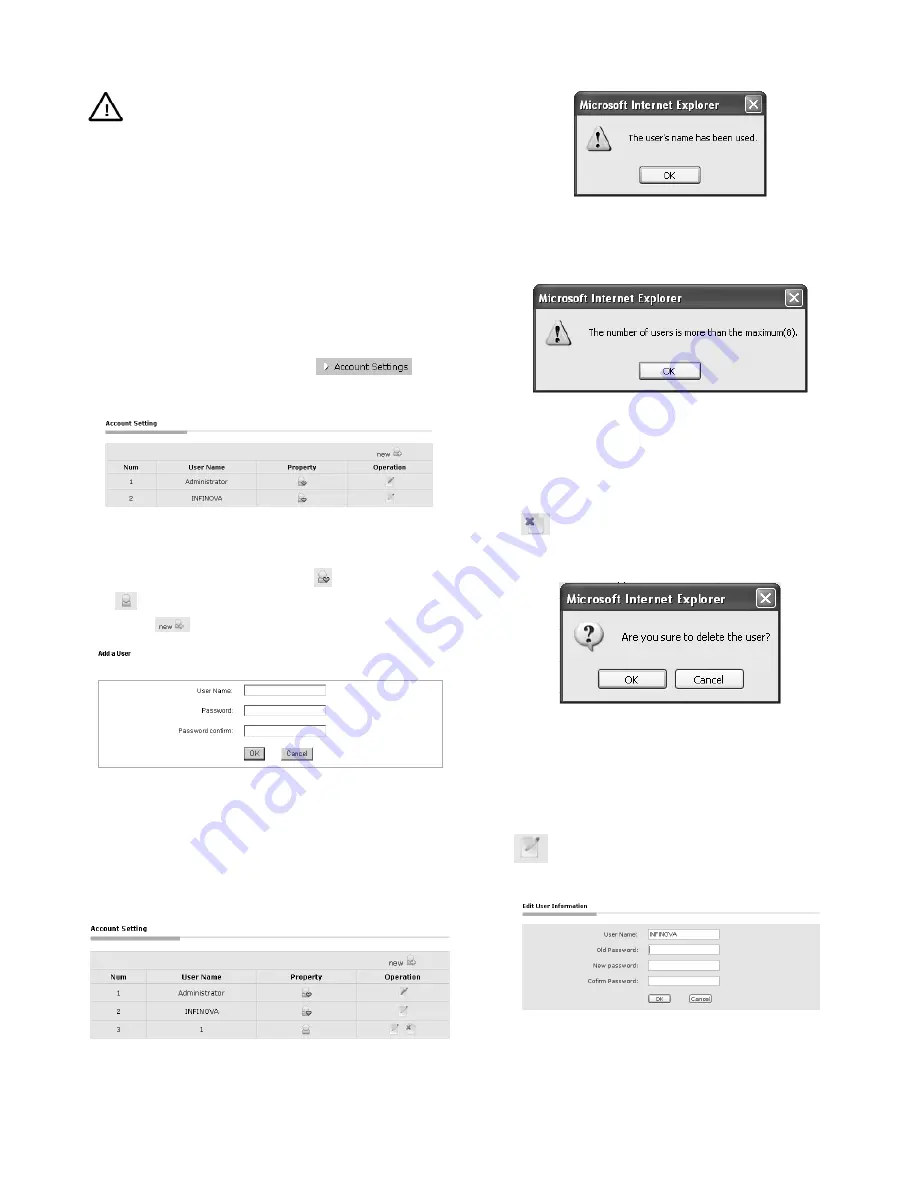
Figure 3-6. Account Setting 


1. Add Users 

Note: support a maximum of 8 accounts. 

  stands for super user, 

while

  stands for common user. 

(1) Click 

”, enter the interface of “Add a User”.   


Figure 3-7. Add User 


(2)  Enter the desired User Name and Password(Special characters 

are not allow to appear in User Name or Password, and 
number of password characters can be from 8-20.)   

(3) 

Click “OK” button. If the setting is successful, the new user 
name will appear in the following account list. Take adding 
“1” as the new user for example.


Figure 3-8 Add User 

 
(4)  If the user exists, the following interface will display: 


Figure 3-9 


Click “OK” button, the image will be back to Figure 3-7.   
If the 9

th

 user is to be added, the following box will pop up:


Figure 3-10 


2. Delete Users


Note: 

Only super user can delete common user, plus super user 

cannot delete other super user.   

Click 

button


behind the common user you want to delete in 

the account list, then the following figure will display: 


Figure 3-11 


Click “OK” button,


the selected user would be deleted and the 

account list would be automatically updated.   
 

3. User Password Change 

Click

button


in the account list, the dialog box of Edit User 

Information will pop up:


Figure 3-12 


Input the old password, enter your desired new password for twice 
and then click “OK” button, the following picture will appear: 

Summary of Contents for V1700N series

Page 1: ...ng of Infinova V1700N series IP domes Based on network technology V1700N series IP domes could easily realize network digital video transmission and network control function and provide professional remote video services They provide high reliable cost effective solutions to various applications ...

Page 2: ......

Page 3: ...trademarks that may appear belong to their respective proprietors FCC Warning The V1700N series IP Domes comply with the FCC rules Operation is subject to the following two conditions This device will not cause harmful interference This device must accept any interference received including interference that may cause undesired operations The V1700N series IP Domes have been tested and found to co...

Page 4: ...ommended by manufacturer Position power source and related wires to assure to be kept away from ground and entrance Refer to qualified personnel for all service matters Save product packaging to ensure availability of proper shipping containers for future transportation Indicates that the un insulated components within the product may carry a voltage harmful to humans Indicates operations that sho...

Page 5: ...eo and Alarm Settings 8 4 1 Display Status Settings 8 4 2 Motion Detection 8 4 3 Alarm Settings 8 4 4 Snapshot 9 4 5 Time Setting 9 4 6 OSD Settings 9 4 7 I P Rate 9 4 8 Frame Rate 10 4 9 Color Saturation Setting 10 4 10 QP Settings 10 4 11 Resolution Settings 10 4 12 Network Qos Setting 10 Chapter V Menu Settings 11 Chapter VI Camera Control 12 6 1 Lens Direction Control 12 6 2 Lens Function Sett...

Page 6: ......

Page 7: ...ient and continuously scan and provide high quality full motion full color and real time active images This system can record detect the moving objects and also select different alarm methods to send out the alarms The system has fulfilled the alarm functions such as Recording Preset Relay Output and etc in the upper level software which dramatically saves the cost on alarm function for the users ...

Page 8: ...dress otherwise the images can not be viewed 7 No need to restart the system after performing network settings Chapter II IE Browser Setting Support IE browser version Internet Explorer 5 0 or greater Must Install IMMP4Control ocx and DirectX9 0 2 1 Software Installation 1 Equipment Connection Connection order Firstly connect the network cables then connect the video only used for servers Note Che...

Page 9: ...t in sequence Please try step 1 and 2 first and if it fails you can proceed with step 3 or 4 The preparation of IE image browsing comes to and end 2 2 Set IE Browser You can watch the images and relative interfaces that caught by camera over IE browser or a kind of special software V2216 based on the applicable network to browse and control the video image If the installation of OCX is done the us...

Page 10: ...new username and password 1 If login as the super user the following interface will display Figure 3 2 Super User Interface after Login 2 If login as the common user the following interface will display Figure 3 3 Common User Interface after Login User can enter system setting interface by click the button Settings above the video image While Live Page button helps you switch to real time video in...

Page 11: ... Name or Password and number of password characters can be from 8 20 3 Click OK button If the setting is successful the new user name will appear in the following account list Take adding 1 as the new user for example Figure 3 8 Add User 4 If the user exists the following interface will display Figure 3 9 Click OK button the image will be back to Figure 3 7 If the 9th user is to be added the follo...

Page 12: ...00 IP dome Subnet mask used to set subnet mask of V1700 IP dome Gateway IP address used to set the gateway address of V1700 IP dome When all settings are finished click Set button The following interface will appear Figure 3 16 Click OK button the system will skip to login interface automatically 3 6 Time Zone Settings Click button in the navigation bar to display the following TimeZone Settings i...

Page 13: ... 3 21 Click Set button the following hint would display Figure 3 22 Click OK system starts to reset to the factory default It takes about 90 seconds to undertake this process when finishing the figure below would appear Figure 3 23 Click OK button to close the webpage Note When factory setting is finished IP address resumes to 192 168 1 100 while subnet code resumes to 255 255 255 0 3 9 Online Reb...

Page 14: ...n Detection box is configured by digital video monitor management software Only the motion detection area can be shown on the webpage users cannot make changes as shown above Motion detection area Two coordinates determine an area The line between those two points is the diagonal of detection area Each point extends along 2 lines perpendicular to the X axis and Y axis and the rectangle formed by t...

Page 15: ...ge or not Option On display system s time information Off do not display system s time information Synchronize with PC used to check whether the time of system is the same as that of local PC Click Set to adjust Synchronize with NTP whether to select NTP server or not Select NTP Server to enable NTP server or otherwise disable NTP server If NTP server is selected you can input NTP server address i...

Page 16: ... comes out the color saturation option Figure 4 9 The higher the color saturation the darker the image color the lower the color saturation and the image color will approach to Black White more Default Setting average Note Only the super user can set this option 4 10 QP Settings Click QP Rate button in the navigation bar to display the QP parameters setting interface Figure 4 10 QP Ratio shows the...

Page 17: ...ote Available only for super user Plus the revision come into valid only after reboot Chapter V Menu Settings Note The common users have no such settings Click the Enter menu button on the bottom of Figure 4 1 to enter the menu and display the following interface Figure 5 1 The menu control should be used together with the direction keys and please refer the Lens Direction Control for details on h...

Page 18: ...enu When a super user logs in the Up down left right key could be adjusted to change the menu option When entered the menu only the Up down left right key works 6 2 Lens Function Setting When the mouse moves on or the button will turn light when clicking it with the mouse it returns to former status which means it works Shown in the following Figure Figure 6 3 Indicates iris operation 1 means Iris...

Page 19: ...1 Enter the pattern number in 2 Click in the Pattern Area to start setting a pattern 3 Use the joystick to perform a series of pan tilt and zoom operation to finish a navigation course 4 Click in the Pattern Area to save the navigation course as the pattern 5 Repeat Step 1 4 to set pattern 2 Calling up a Pattern 1 Enter the pattern number in 2 Click in the Pattern Area to call up pattern The domes...

Page 20: ... t be controlled After successful initiation Protocol or Baud rate of PTZ Settings are incorrectly chosen Proper set the Protocol and Baud rate Don t correctly install the inserter to view the images Refer to the inserter Installation to reinstall it Don t correctly set the security level of the browser Refer to the browser setting to reset it Dome s IP address conflict with other user s IP addres...

Page 21: ......

Page 22: ...Infinova 51 Stouts Lane Monmouth Junction NJ 08852 U S A Tel 1 888 685 2002 USA only 1 732 355 9100 Fax 1 732 355 9101 sales infinova com V3 3 0903 ...

Reviews: