background image

Index Braille

Page 19

Manual Index Everest

January 2000

Verson 8.20/9.20

6.3.4.1

Word wrap

Select between split words or wrap it to the next line.

6.3.4.2

Auto line-feed

Select an automatic line-feed together with a carriage return according to your computer software.

6.3.4.3

Form Feed

Select ON to get an empty page between each copy of a document.

6.3.4.4

Volume

Select the volume of the speech feedback.

6.3.4.5

Impact level

Select the impact level on the hammers according to different paper qualities.

6.3.4.6

Delay time

Select the delay time for the printer to wait for more information after a file.

Note! Using a computer with a slow disc-drive requires a longer delay time in the printer.

6.3.4.7

Print quality

Select normal or high print quality.

High quality prints every line twice. This improves the Braille quality when printing very heavy
paper or plastic sheets.

6.3.4.8

Graphic dot distance

Select between 1.6, 2.0 or 2.5 mm resolution in graphic mode.

6.3.4.9

Text dot distance

Selects resolution in text mode.
Select between 2.2 mm Japanese standard, 2.5 mm Normal or 3.2 mm Jumbo Braille.

Note! 2.2 mm sets automatically Line type Japanese. Maximum number of characters per line in
Japanese mode is 48.

6.3.4.10

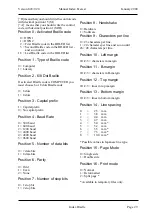
Set up

Select access to setup. NOT OPEN gives access only by the command “power on + Setup key”.
OPEN gives access by pressing the Setup key when printer is on stand by.
Changing of access to Set up (Open/Not open) will effect all three setups, A/B/C.

Summary of Contents for EVEREST Series

Page 1: ...t panel 12 5 1 Standard commands 12 5 1 1 On off line 12 5 1 2 Form Feed 12 5 1 3 Help 12 5 2 Print mode 13 5 2 1 Double sided 13 5 2 2 Single sided 13 5 2 3 Normal 13 5 2 4 Reformatted 13 5 2 5 Split page 14 5 3 Copy 14 5 3 1 Multiple 14 5 3 2 Repeat 14 5 3 3 Load buffer 14 6 Setup commands 15 6 1 Default setup A B C 15 6 2 Setup 15 6 2 1 Change Setup 15 6 2 2 Setup keys 15 6 2 2 1 Group 15 6 2 2...

Page 2: ... emulation 26 8 2 Defined codes 27 8 3 ESC Sequences Index commands 27 8 4 VersaPoint graphic 27 8 5 Multiple copies selection by ESC sequences 27 8 6 Changes in setup from computer 28 8 6 1 Change setup by ESC sequences 28 8 7 Page numbering selection by ESC sequences 31 8 8 Remaining copies to print 31 8 9 Transparent mode 31 8 10 Power on commands 32 8 10 1 Self test 32 8 10 2 Factory setting 3...

Page 3: ...sport locking red coloured plastics placed inside the sheet feeder Save the transportation material Note When shipping the printer it is important to replace the printing head lockers and use the original packing Before installing the printer make sure that there is no visible damage to the printer and that the delivery is complete If you encounter any problems contact your dealer PLEASE DO NOT DI...

Page 4: ...Index Everest Braille Embosser Cables Paper Supports and Sound cover Everest user manual ink print Installation CD Braille paper 1 3 Safety instructions Before power on make sure that the voltage selection switch is set for the correct value The switch is located under the left leg of the printer ...

Page 5: ...IBM 437 standard table 3 Operating the printer 3 1 How to start up 3 1 1 Loading paper 1 Release the pick up rollers by moving the control on the button on the side of the sheet feeder upwards and fill it with paper 2 Adjust the paper margins guides in the sheet feeder to the correct paper width and lock them with the lever on the top of each margin guide 3 Set the Sheet card selectors located on ...

Page 6: ...store the new value in the memory The new length will be stored until the next time the Form Feed key is pressed Everest accepts all paper lengths between 100 350 mm 4 14 Inch 3 1 5 Paper sensor calibration If the type of paper is changed e g from a thick to a thin paper or from a dark to a light coloured paper the paper sensor has to be re calibrated Please refer to chapter 7 1 5 item A B and C t...

Page 7: ...ille editor working in Windows controlling the embosser with a text based driver e g Duxbury 3 2 1 Start embossing Connect the printer to your computer load the paper and turn it on Everest is ready for use with the default factory settings 3 3 Default setup To change the active default setup press the DEFAULT SETUP KEY A B or C Each setup can be individually set for different user preferences 3 4...

Page 8: ...Index Braille Manual Index Everest Page 8 January 2000 Verson8 20 9 20 3 5 Flow schematic for Setup ...

Page 9: ...aper is properly cut There should be a smooth and even surface when you feel with your finger along the cutting edge of the paper b Never use separated fan fold paper The edges of this paper are very bad and can result in double feeding or not feeding at all c The paper must be a clean with no holes or perforations on the sheet Holes and perforation are normally made with a punch and as a result s...

Page 10: ...ure below c When loading the sheet feeder with paper make sure it is not overfilled For the best possible function it is necessary to leave 1 2 mm free space between the pick up rollers and the paper stack before closing the sheet feeder d Set the two paper supports close to the margins of the paper e Adjust the two green DOCUMENT GUIDES at the lower part of the front panel so that they touch abou...

Page 11: ...correctly installed c To ensure good paper out control look at the following The document guides green plastic should be in the correct position especially if light paper is used The correct position is about 5 mm from the side edge of the paper If heavy Braille paper is used we recommend not using the document guides Simply slide them out from the paper area d Avoid low humidity locations If the ...

Page 12: ...f Line Form Feed Help 2 PRINT MODE Normal Reform Split Page Double Single 3 COPY Repeat Multiple 1 10 4 DEFAULT SETUP A Default setup A B Default setup B C Default setup C 5 SETUP Setup Group Item Value 5 1 Standard commands 5 1 1 On off line Connect disconnect line to computer Pressing Off line during printing also pauses printout 5 1 2 Form Feed Form Feed measures the paper length by feeding one...

Page 13: ...ess the key marked SINGLE to set the printer to single sided printout 5 2 3 Normal In normal mode the Everest will print the Braille as it is formatted in the text file The text has to be formatted with the correct characters per line according to the setup of the printer 5 2 4 Reformatted In reformatted print mode the Everest formats the text to erase space in the text file like multiple space FF...

Page 14: ...d MULTIPLE you can choose between the different copy functions and with 1 and 10 you can select the number of copies and or what part of a document to print 5 3 1 Multiple MULTIPLE is used to select number of copies Example Make 54 copies MULTIPLE 5 x 10 4 x 1 MULTIPLE and send the file to Everest 5 3 2 Repeat REPEAT is used to copy the last printed document or a part of it Press REPEAT twice to p...

Page 15: ...EM and VALUE are organised in a tree structure where GROUP is the selection of four major groups ITEM is the different items to change in each group and VALUE is the value for each item See description chapter 3 5 6 2 2 Setup keys 6 2 2 1 Group GROUP includes four different groups of parameters BRAILLE CODE SERIAL COMMUNICATION PAGE LAYOUT and OPTION When pressing GROUP several times you will togg...

Page 16: ... with or without capital prefix in Literary Grade 1 Braille When a user defined Braille table is used it can be changed to all combinations between literary and computer Braille with no system limitations 6 3 2 Serial communication In this group all serial communication parameters can be changed Baud rate 300 600 1200 2400 4800 9600 Serial data 7 8 Parity Odd Even None Stop Bit 1 2 Handshake Hardw...

Page 17: ...o a file or as a book This moves the text blocks on both sides simultaneously 6 3 3 4 Top margin Top margin gives blank lines at the top of each page Select number of lines 6 3 3 5 Bottom margin Bottom margin gives blank lines at the bottom of each page 6 3 3 6 Line distance Line distance sets the distance between the lines in mm 6 3 3 7 Page mode With page mode you can select between single or do...

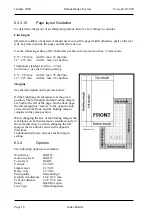
Page 18: ...the description on the picture beside On the front page all margins are at the given position The left margin and the binding margin are both to the left of the page On the back page the left margin has moved to the opposite side viewed form the front and the binding margin remains on the same position When changing the size of the binding margin the text blocks on both sides moves simultaneously ...

Page 19: ...h a slow disc drive requires a longer delay time in the printer 6 3 4 7 Print quality Select normal or high print quality High quality prints every line twice This improves the Braille quality when printing very heavy paper or plastic sheets 6 3 4 8 Graphic dot distance Select between 1 6 2 0 or 2 5 mm resolution in graphic mode 6 3 4 9 Text dot distance Selects resolution in text mode Select betw...

Page 20: ...irst page of the CD From here you can find links to the entire contents of the CD This browser has a special feature it can execute commands directly from a html page why we strongly recommend not to use any other browsers 7 3 WinBraille system The CD includes the WinBraille system compatible to Windows 95 98 NT WinBraille will be used as the software platform for Index Embossers Beside the editin...

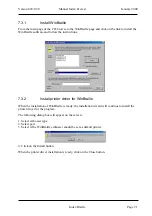
Page 21: ...tions 7 3 2 Install printer driver for WinBraille When the installation of WinBraille is ready the installation wizard will continue to install the printer driver for the program The following dialog box will appear on the screen 1 Select embosser type 2 Select port 3 Select if the WinBraille embosser should be set as default printer 4 Click on the Install button When the printer driver installati...

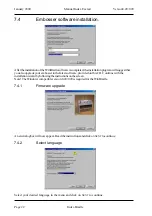
Page 22: ...tthat youalsoupgradeyourembossertothelatestsoftware providedonthisCD Continuewiththe installationwizardbyfollowingtheinstructionsonthescreen Note TheWindowscompatibleversion8 20 9 20isrequiredfortheWinBraille 7 4 1 Firmware upgrade Anewdialogboxwillnowappear ReadtheinstructionsandclickonNEXTtocontinue 7 4 2 Select language Select your desired language in the menu and click on NEXT to continue ...

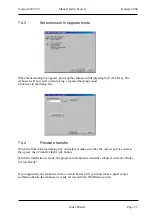
Page 23: ...lick next in the dialog box 7 4 4 Firmware transfer When the final download dialog box is displayed make sure that the correct port is selected then press the UPGRADE FIRMWARE button When the installation is ready the program will shut down and the embosser will echo Index Everest Ready If you upgraded your embosser form a version below 8 09 you must make a paper sensor calibration before the embo...

Page 24: ...ticated feature to calibrate the paper measurement system Read this chapter carefully before you install the software to your computer In case of doubt contact your local distributor After the installation process is completed the calibration process should take place immediately Load the sheet feeder in landscape format The longest edge of the paper down in the sheet feeder Note As default value ...

Page 25: ...help menu 7 5 2 Register WinBraille By the end of the tutorial wizard a registration form will be displayed Make sure that you fill the form and mail it to Index By registering as a WinBraille user you will be notified on future program changes and upgrades The registration form is also accessible in the help menu 7 5 3 Upgrade WinBraille Upgrades can be automatically upgraded from Index Web site ...

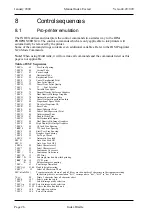
Page 26: ...t Tabs ESC S 83 Super Subscript Print ESC T 84 Cancel Sub Superscript Print ESC U 85 Unidirectional Print ESC W 87 Double Wide Print ESC X 88 Set Horizontal Margins ESC Y 89 Dual Density Bit Image Graphics ESC Z 90 High Density Bit Image Graphics ESC 0 48 1 8 Inch Line Spacing ESC 1 49 7 72 Inch Line Spacing ESC 2 50 Start Text Line Spacing ESC 3 51 Graphic Line Spacing ESC 4 52 Set Top of Form ES...

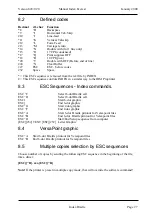
Page 27: ...nces Index commands ESC C Select 6 dot Braille cell ESC D Select 8 dot Braille cell ESC 1 Start 6 dot graphic ESC End 6 dot graphic ESC G Start 4 dot graphic ESC F End 4 dot graphic ESC A Start 6 dot Braille printout for Versapoint files ESC B End 6 dot Braille printout for Versapoint files ESC O Start End Setup sequence from computer ESC 252 TEXT ESC 252 Letter Graphic 8 4 VersaPoint graphic ESC ...

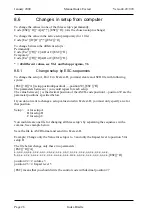
Page 28: ...p The value between is the decimal position of the ASCII code position 1 position 39 are the parameter positions specified below If you do not want to change a setup value stored in Everest D you must only specify an x for that position Setup A for setup A B for setup B C for setup C You could create one file for changing all three setup s by separating the sequences with a comma See example below...

Page 29: ...00 baud 2 1200 baud 3 2400 baud 4 4800 baud 5 9600 baud Position 5 Number of data bits 0 7 data bits 1 8 data bits Position 6 Parity 0 Odd 1 Even 2 None Position 7 Number of stop bits 0 1 stop bit 1 2 stop bits Position 8 Handshake 0 Hardware 1 Software Position 9 Characters per line 0 23 characters per line 1 24 characters per line and so on until 26 48 characters per line Position 10 Left margin...

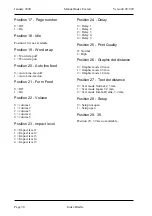
Page 30: ...me 3 3 volume 4 4 volume 5 Position 23 Impact level 0 Impact level 1 1 Impact level 2 2 Impact level 3 3 Impact level 4 4 Impact level 5 Position 24 Delay 0 Delay 1 1 Delay 2 2 Delay 3 3 Delay 4 4 Delay 5 Position 25 Print Quality 0 Normal 1 High Position 26 Graphic dot distance 0 Graphic mode 2 0 mm 1 Graphic mode 2 5 mm 2 Graphic mode 1 6 mm Position 27 Text dot distance 0 Text mode Normal 2 5 m...

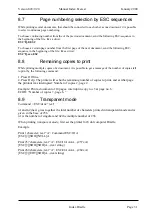
Page 31: ...e to get a message of the number of copies left to print by the following command 1 Press Off line 2 Press Help The printer will echo the remaining number of copies to print and at what page the printout was interrupted Number of copies page Example Print a document of 10 pages interrupt in copy no 3 at page no 6 ECHO Number of copies 7 page 6 8 9 Transparent mode Command ESC n1n2 text n1 and n2 h...

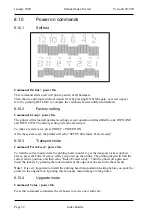
Page 32: ... POWER ON After the system reset the printer will echo SETUP 000 Index Everest ready 8 10 3 Transport mode Command Form Feed power On To find the correct position for the printing head in order to get the transport lockers on their places press the Form Feed key while you power up the printer The printing head will find the correct centre position and then echo Index Everest ready Turn the printer...

Page 33: ...uced speed with high torque to eject the paper slowly out of the printer If there should be a problem to get the paper out of the printer use the FF key to toggle FF OFF ON When the paper is ejected press ON LINE to cancel the FF operation The paper will be automatically re measured before the printing continues 8 11 4 Failure 140 invalid setup command Not valid command when selecting A B or C fro...

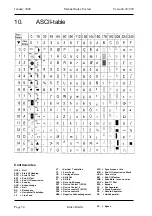
Page 34: ...ion LF Line Feed VT Vertical Tabulation FF Form Feed CR Carriage Return SO Shift Out SI Shift In DLE Data Link Escape DC1 Device Control 1 XON DC2 Device Control 2 DC3 Device control 3 XOFF DC4 Device control 4 NAK Negative Acknowledgement SYN Synchronous Idle ETB End Of Transmission Block CAN Cancel Line EM End Of Medium SUB Substitute even used as EOF End Of File ESC Escape FS File Separator GS ...

Page 35: ...ication 6 16 Serial communication cables 31 Set up 19 Setup commands 15 Sheet Card selector 5 Sheet feeder 9 Single sided 13 Split page 14 Standard commands 12 Support disk 20 T Text dot distance 19 Top margin 17 Transparent mode 29 Transport mode 30 U Unpacking 3 Upgrade mode 22 Upgrading the firmware 23 V Value 15 Volume 19 Word wrap 18 Index A ASCII table 32 Auto line feed 19 B Binding margin 1...

Reviews: