IMV EXAPad Instruction Manual Download Page 29

Instruction manual

www.imv-imaging.com  |  29
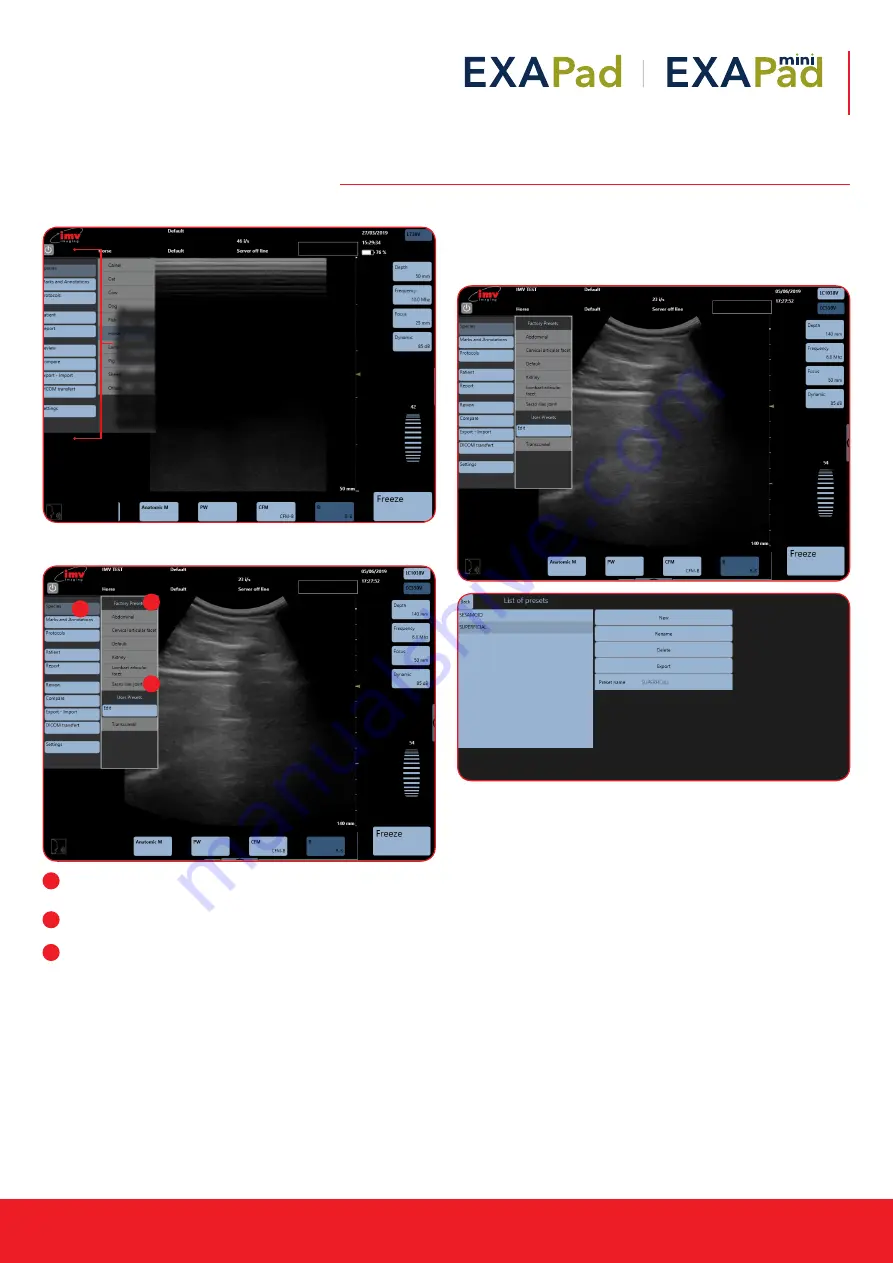
12.1 Species

Presets

Species: For each Specie, one or several predefined presets 
are stored in the device

Factory Presets: The number of factory presets depends on the 
application

Select preset to load. A preset includes all adjustable 
parameters and controls in all modes. When the preset has 
been loaded, the device returns to live imaging mode and the 
name of the selected species and preset is displayed on the 
screen. If preset is chosen when imaging is frozen, it will return 
to live imaging when a preset is selected. 

12.2 Create a new preset

Adjust your system settings such as depth, frequency and gain to 
your preference.

Then select the wanted species in the list and click on edit.

Press New. Enter the name of the preset in the field Preset Name 
and confirm by pressing Enter.

The new user preset is now created, and it is displayed in the list of 
presets in the User presets section.

Each user can create as many user presets as necessary. 

12.3 Rename a preset

Select the preset that should be renamed in the list of presets, and 
press the field Rename. Rename the preset in the field Preset Name 
and validate by pressing Enter.

The renamed preset is displayed in the list of user presets.

Only user presets can be renamed. It is impossible to rename a 
factory preset made by IMV imaging.

12. Applications and Presets 


Delete 

Press ‘Delete’ to delete the last measurement made. 
Press the button ‘Delete all’ to delete all measurements made. 


12. Applications and Presets  


Species 


**POINT TO THE BLUE LIST OF ICONS ON THE LEFT-HAND SIDE** 
Access to the general Setting menu by swiping from the left-hand side of the screen 
 
The list of available species is displayed in the general Setting menu when clicking on the field Species. 


Sorcha Stephens 5/6/2019 17:18

Comment [57]: 

Speed set  

Speed measurement 


Images side by side 

Access to the general 

Setting menu by tapping 

from the left-hand side of 

the screen.
The list of available species 

is displayed in the general 

Setting menu when clicking 

on the field Species.

1

2

3

1

2

3

Create a new preset 
 
Adjust your system settings such as depth, frequency and gain to your preference. 

Then select the wanted species in the list and click on edit. 


Press New. Enter the name of the preset in the field Preset Name and confirm by pressing Enter. 
The new user preset is now created, and it is displayed in the list of presets in the User presets section. 
Each user can create as many user presets as necessary.  
 

Rename a preset 

Select the preset that should be renamed in the list of presets, and press the field Rename. Rename the 
preset in the field Preset Name and validate by pressing Enter. 
The renamed preset is displayed in the list of user presets. 
 
Only user presets can be renamed. It is impossible to rename a factory preset made by IMV imaging. 


Delete a preset 

Access to the editing of presets as described above. Select the preset that should be deleted in the list 
of presets. Press the field Delete and confirm the deleting by pressing Enter. 


If the preset selected for delete is loaded and in use, the device will delete it and a default preset will 
be loaded instead. 
Only user presets can be deleted. Factory presets made by IMV imaging cannot be deleted. 

Sorcha Stephens 5/6/2019 17:25

Comment [59]: 

Same image as previous – 

presets 


Keep right-hand image 

Sorcha Stephens 5/6/2019 17:27

Comment [60]: 

Delete a preset 

Summary of Contents for EXAPad

Page 1: ...Your complete animal imaging solution Instruction manual...

Page 2: ...Mode imaging 8 M Mode Imaging 9 Freeze Mode and Cineloop 10 Storing of images and clips Review 11 Measurements 12 Applications and Presets 13 Patient file 14 Protocols 15 Report 16 EchoPad App 17 Per...

Page 3: ...rced shutdown should only be done when scanner is malfunctioning After 3 forced shutdown in a row a blue screen will appear If you are presented with the blue screen follow the on screen instructions...

Page 4: ...ce aPad scanner turns on in B imaging mode with a screen display as below ss to the controls of the scanner an access the available imaging modes by clicking on the corresponding mode Power M mic M PW...

Page 5: ...ENCE CORRESPONDS TO Enter the hospital or clinic name ce of language for the interface and keyboard of a user name new user who can have individual presets Go to the Field User and type the users by c...

Page 6: ...for better definition Close menu after Set time to close menu on left and right side of the screen 5 to 15 seconds 3 6 Image Clips Menu As default images and clips are saved as raw data 3 7 Voice rec...

Page 7: ...ps to the server during and at the end of an exam Connection parameters must be entered correctly otherwise images and clips will be stored locally When Dicom Print is activated images are printed thr...

Page 8: ...ide what measurements and tables should be used by creating a User Protocol First select the specie for which you are creating the Protocol then select an application from the list For each applicatio...

Page 9: ...utton Focus The position of the focal point on screen is adjusted by the Focus button The updated position of focus is displayed on the focus button Dynamic Increase and decrease dynamic range The upd...

Page 10: ...g System The following controls are available for voice control Deeper Increase of exploration depth Shallower Decrease of exploration depth Focus down Deeper Focus Focus up More superficial Focus Fre...

Page 11: ...ctivation increases resolution 5 CFM Mode imaging The colour scale which is also the PRF scale is graduated in two parts in order to distinguish the two directions of the flows towards and away from t...

Page 12: ...n for PW Different scale from general gain which is digital gain Audio Adjust audio level Power Adjust PW power Wall Filter Adjust wall filter This filter is filtering low frequencies linked to vascul...

Page 13: ...two different modes one in Power Doppler mode and one in B mode r Mode imaging OWER AT BOTTOM OF SCREEN wer image added to the B image HE BLUE ICONS ON LEFT HAND SIDE OF SCREEN s for adjusting Power M...

Page 14: ...Mode imaging on page 9 8 M Mode Imaging To activate M mode imaging by sliding along on the lower menu and pressing M The TM spectrum is added to the B image Position and size of the Anatomic M line P...

Page 15: ...ual www imv imaging com 15 8 3 Time scale in Anatomic TM mode The adjustment of the time scale in Anatomic TM mode is made in in the advanced adjustment menu accessed by tapping at the right hand side...

Page 16: ...red marker that will be surrounded by a blue line move the red curser until the last image in the sequence you want to store plays cineloop sequence pause cineloop sequence previous image in sequence...

Page 17: ...made by the advanced adjustment menu in PW mode 9 6 Post processing in Anatomic TM mode and TM mode Functions in white are not available for Post processing Post processing in PW mode In PW mode only...

Page 18: ...xt zone surrounded by a white rectangle in order to reposition it and or modify the entered text by clicking Edit again 9 9 Annotated arrow Click on the button Arrow A caliper is displayed this will b...

Page 19: ...can be used on live or frozen images A free text can also be entered as a mark Horse For each specie and application you can edit user annotations Some factory presets will already exist Reproduction...

Page 20: ...ption Keep annotation in freeze is activated in the settings see Settings Tools 9 Freeze Mode and Cineloop Long press on a frozen image to access list of predefined annotations Select annotation If an...

Page 21: ...ent file is open the sequence will be stored in the patient file in examination folder see Storing Image or miscellaneous folder If no patient file is open the sequence will be stored in the list of u...

Page 22: ...patient folder select the patient then press delete all Press ok to confirm delete 10 5 Loading of images or clips stored during an examination 10 Storing of images and clips Review 1 2 3 4 5 6 7 8 9...

Page 23: ...BLUE IN IMAGE 1 Step 3 POINT TO THE HIGHLIGHTED IMAGES IN IMAGE 1 Step 4 POINT TO THE AREA IN IMAGE 2 Step 5 POINT TO USB IN IMAGE 3 Step 6 POINT TO EXPORT IN IMAGE 4 Step 7 Sorcha Stephens 5 6 2019 1...

Page 24: ...o Compare and select the other image you need to compare from unattached files or even images from patients When image is selected press Compare to get the 2 images at the same time 10 Storing of imag...

Page 25: ...urements in B CFM Power M Anatomic modes 11 1 1 Distance Place the first grey caliper with the touchpad in the desired place to start to measure the distance D1 Press Set The second caliper is now dis...

Page 26: ...e all When pressing Delete all all measurements are deleted without unfreezing the image 11 1 6 Measurements in post processing and saving Measurements can be made in post processing on previously sto...

Page 27: ...ight side of the screen POINT TO BLUE MEASUREMENTS IN BOTTOM RIGHT OF SCREEN Automatic measurements Automatic measurements POINT TO ORANGE MEASUREMENTS AT BOTTOM RIGHT OF SCREEN Manual measurements Ma...

Page 28: ...cond time marker The measurement indicates the time as well as the cardiac rate corresponding to the measured period 11 2 2 Speed measurement Select the measurement Speed place the first caliper with...

Page 29: ...preset is displayed in the list of user presets Only user presets can be renamed It is impossible to rename a factory preset made by IMV imaging 12 Applications and Presets o delete the last measureme...

Page 30: ...ng by pressing Enter If the preset selected for delete is loaded and in use the device will delete it and a default preset will be loaded instead Only user presets can be deleted Factory presets made...

Page 31: ...n the database can be done manually by scrolling down the patient list using the arrows or by using a filter The patients are listed alphabetically by their surnames Arrows Search for patients using f...

Page 32: ...32 13 4 Stopping an examination There are two ways to stop an examination Go to Report and click Stop Examination Go to the patient file and click Stop Exam 13 Patient file...

Page 33: ...h to add the measurement into the report For multiple protocol measurements start by selecting the wanted measurement Then make each individual measurement by selecting them one by one as indicated ab...

Page 34: ...ns 15 Report A report is always linked to a patient start an examination before creating a report The report can be accessed when the examination is in progress or stopped ay to see format shown below...

Page 35: ...of your scanner PASSWORD Enter a password it must be 8 characters long Default is 12345678 ExaPad is now ready to be connected to an iPad 16 EchoPad App 16 EchoPad App Only available on iPad only the...

Page 36: ...If the connection is not working check that the network password for the ExaPad co entered for the Ipad Open EchoPad application on the iPad the application will search for the ExaPad POINT TO EXAPAD...

Page 37: ...the ability to connect to the internet with the ExaPad or ExaPad Mini if your connection requires going through an internet browser like in a hotel for example The ExaPad and ExaPad Mini are not inst...

Page 38: ...head is still fragile and care should be taken to protect it from any knocks 18 5 Specifications Screen Size 15inch ExaPad 12 inch ExaPad Mini Weight 7 4kg ExaPad 4kg ExaPad Mini Dimensions 39x30x7cm...

Page 39: ...e IMV imaging 126 Boulevard de la R publique 16000 Angoul me France 33 4 3702 1766 france imv imaging com www imv imaging fr North America IMV imaging 2900 43rd Street NW Suite 600 Rochester MN 55901...

Page 40: ...facebook com IMVimaging twitter IMVimaging www imv imaging com info imv imaging com 44 0 1506 460023 Contact us now IMV imaging V1_03 19 Instruction manual ExaPad Your complete animal imaging solution...

Reviews: