


10 |
4. B Mode Imaging
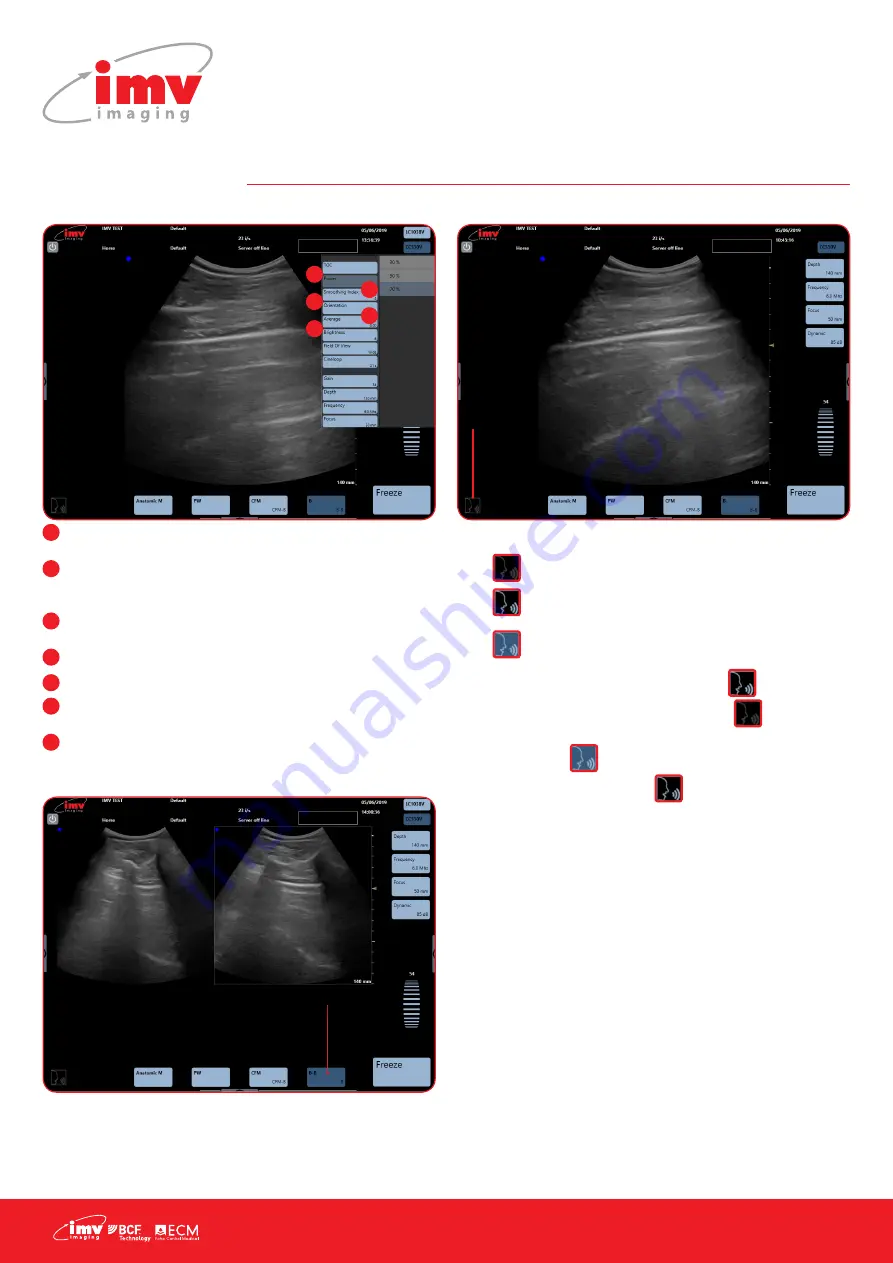
4.2 Other Advanced Adjustments
Power: Emission power adjustment choose between 30, 50, 70
and 100%.
Smooth: Activation or deactivation of Smooth index. The
smaller the index value, the smoother the image. A higher
index value will give a harder image.
Orientation: Turn the image up, down, left or right. Rotate 90°,
180° or 270°. Reset to return to standard parameters.
Average: Time average or temporal smoothing adjustment.
Brightness: Adjust brightness of screen.
Field of view: Adjust the width of the image to regain the fram
rate
Cineloop: Adjust cineloop length, the longer the cineloop the
lower the resolution (See page 16)
4.3 Dual Imaging
The image on the right of the screen is live. Touch the left image in
order to freeze the first image and activate the second.
When the two images are both frozen, the image that will be live
when touching pressing “Freeze” is the image with a blue edge.
A cineloop is available on the latest sequence of images.
4.4 Voice Command
The voice control has 3 different states:
•
: The voice control is not active
•
: The voice control is activated and ExaPad waits
for an order
•
: ExaPad listens to you
Activate the voice control, this pictogram
The voice control has
3
different states:
-
: The voice control is not active
-
: The voice control is activated and ExaPad waits for an order
-
: ExaPad listens to you
Activate the voice control, this pictogram
flashes a few times before it replaces the pictogram
. Start by pronouncing “System” to instruct the ExaPad to listen. Wait until the pictogram
is
displayed. Pronounce the desired voice control. When the pictogram
flashes and is displayed
again, a new request can be pronounced.
Start all voice controls by pronouncing “System”
The following controls are available for voice control:
- « Deeper »: Increase of exploration depth
- « Shallower »: Decrease of exploration depth
- « Focus down »: Deeper Focus
- « Focus up »: More superficial Focus
- « Frequency »: Passing from one frequency to another, circular
- « Higher »: Increase of general gain in B mode (steps of 10 units)
- « Lower »: Decrease of general gain in B mode (steps of 10 units)
- « Stop »: Freeze and unfreeze of image
- « Save » : Storing of current image
- « Cancel »: Cancelling of the last processed voice control
French and Spanish controls also available – see online for instructions.
flashes a
few times before it replaces the pictogram
The voice control has
3
different states:
-
: The voice control is not active
-
: The voice control is activated and ExaPad waits for an order
-
: ExaPad listens to you
Activate the voice control, this pictogram
flashes a few times before it replaces the pictogram
. Start by pronouncing “System” to instruct the ExaPad to listen. Wait until the pictogram
is
displayed. Pronounce the desired voice control. When the pictogram
flashes and is displayed
again, a new request can be pronounced.
Start all voice controls by pronouncing “System”
The following controls are available for voice control:
- « Deeper »: Increase of exploration depth
- « Shallower »: Decrease of exploration depth
- « Focus down »: Deeper Focus
- « Focus up »: More superficial Focus
- « Frequency »: Passing from one frequency to another, circular
- « Higher »: Increase of general gain in B mode (steps of 10 units)
- « Lower »: Decrease of general gain in B mode (steps of 10 units)
- « Stop »: Freeze and unfreeze of image
- « Save » : Storing of current image
- « Cancel »: Cancelling of the last processed voice control
French and Spanish controls also available – see online for instructions.
. Start by
pronouncing “System” to instruct the ExaPad to listen. Wait until
the pictogram
The voice control has
3
different states:
-
: The voice control is not active
-
: The voice control is activated and ExaPad waits for an order
-
: ExaPad listens to you
Activate the voice control, this pictogram
flashes a few times before it replaces the pictogram
. Start by pronouncing “System” to instruct the ExaPad to listen. Wait until the pictogram
is
displayed. Pronounce the desired voice control. When the pictogram
flashes and is displayed
again, a new request can be pronounced.
Start all voice controls by pronouncing “System”
The following controls are available for voice control:
- « Deeper »: Increase of exploration depth
- « Shallower »: Decrease of exploration depth
- « Focus down »: Deeper Focus
- « Focus up »: More superficial Focus
- « Frequency »: Passing from one frequency to another, circular
- « Higher »: Increase of general gain in B mode (steps of 10 units)
- « Lower »: Decrease of general gain in B mode (steps of 10 units)
- « Stop »: Freeze and unfreeze of image
- « Save » : Storing of current image
- « Cancel »: Cancelling of the last processed voice control
French and Spanish controls also available – see online for instructions.
is displayed. Pronounce the desired voice
control. When the pictogram
The voice control has
3
different states:
-
: The voice control is not active
-
: The voice control is activated and ExaPad waits for an order
-
: ExaPad listens to you
Activate the voice control, this pictogram
flashes a few times before it replaces the pictogram
. Start by pronouncing “System” to instruct the ExaPad to listen. Wait until the pictogram
is
displayed. Pronounce the desired voice control. When the pictogram
flashes and is displayed
again, a new request can be pronounced.
Start all voice controls by pronouncing “System”
The following controls are available for voice control:
- « Deeper »: Increase of exploration depth
- « Shallower »: Decrease of exploration depth
- « Focus down »: Deeper Focus
- « Focus up »: More superficial Focus
- « Frequency »: Passing from one frequency to another, circular
- « Higher »: Increase of general gain in B mode (steps of 10 units)
- « Lower »: Decrease of general gain in B mode (steps of 10 units)
- « Stop »: Freeze and unfreeze of image
- « Save » : Storing of current image
- « Cancel »: Cancelling of the last processed voice control
French and Spanish controls also available – see online for instructions.
flashes and is displayed
again, a new request can be pronounced.
Start all voice controls by pronouncing “System”
The following controls are available for voice control:
•
Deeper: Increase of exploration depth
•
Shallower: Decrease of exploration depth
•
Focus down: Deeper Focus
•
Focus up: More superficial Focus
•
Frequency: Passing from one frequency to another,
circular
•
Higher: Increase of general gain in B mode (steps of 10
units)
•
Lower: Decrease of general gain in B mode (steps of 10
units)
•
Stop: Freeze and unfreeze of image
•
Save: Storing of current image
•
Cancel: Cancelling of the last processed voice control
French and Spanish controls also available – see online for
instructions.
1
2
3
4
5
1
2
3
4
5
Activate and deactivate
Dual mode from B/B in
imaging modes menu.
Activate
voice
control
The voice control has
3
different states:
-
: The voice control is not active
-
: The voice control is activated and ExaPad waits for an order
-
: ExaPad listens to you
Activate the voice control, this pictogram
flashes a few times before it replaces the pictogram
. Start by pronouncing “System” to instruct the ExaPad to listen. Wait until the pictogram
is
displayed. Pronounce the desired voice control. When the pictogram
flashes and is displayed
again, a new request can be pronounced.
Start all voice controls by pronouncing “System”
The following controls are available for voice control:
- « Deeper »: Increase of exploration depth
- « Shallower »: Decrease of exploration depth
- « Focus down »: Deeper Focus
- « Focus up »: More superficial Focus
- « Frequency »: Passing from one frequency to another, circular
- « Higher »: Increase of general gain in B mode (steps of 10 units)
- « Lower »: Decrease of general gain in B mode (steps of 10 units)
- « Stop »: Freeze and unfreeze of image
- « Save » : Storing of current image
- « Cancel »: Cancelling of the last processed voice control
French and Spanish controls also available – see online for instructions.
6
7


