background image

This electronic product must not be disposed of in municipal 
waste. To pre-serve the environment, this product must be 
recycled after its useful life as required by law. 

RECYCLING INFORMATION

Please use recycling facilities that are authorized to collect this type of waste 
in your area. In doing so, you will help to conserve natural resources and 
improve European standards of environmental protection. If you require more 
information about safe and correct disposal methods, please contact your local 
city office or the establishment where you purchased this product.

CLEANING & MAINTENANCE

Inspect and tighten all parts of the exercise trainer regularly. Replace any worn parts 
immediately.

To clean the exercise trainer, use damp cloth and a small amount of mild soap. 

IMPORTANT: To avoid damage to the console, keep liquids away from the console and 
keep the console out of direct sunlight.

CONSOLE TROUBLESHOOTING

Read console troubleshooting section in the console manual for assistance.

20170901JY

26

Summary of Contents for IE480

Page 1: ......

Page 2: ... THE TRAINER CONSOLE DESCRIPTION OPERATION PROCEDURE USING THE MANUAL PROGRAM USING THE BEGINNER PROGRAM USING THE ADVANCE PROGRAM USING THE SPORTY PROGRAM USING THE CARDIO H R C PROGRAM USING THE WATT CONTROL PROGRAM USING THE RECOVERY PROGRAM USING THE BODY FAT CALCULATION PROGRAM TELEMETRIC HEART RATE CHEST STRAP EXPLODED VIEW PART LIST WARM UP COOL DOWN CLEANING MAINTENANCE RECYCLING INFORMATI...

Page 3: ...uipment has moving parts Keep others especially children at a safe distance while exercise g Make sure all devices are fully adjusted before use to avoid injury h Remove all jewelry including rings chains and pins before exercising i Always wear suitable clothing and footwear during exercise Do not wear loose fitting clothing that could become caught in the moving parts of your exercise machine j ...

Page 4: ...ly physician The safety level of the equipment can be maintained only if it is examined regularly for damaged and wear The appliances are not for children under age of 14 IMPORTANT Read all instructions carefully Assemble the unit in accordance with the steps in the manual Lay out all parts on the floor and check if you have all the parts included completely before beginning assembly In case of a ...

Page 5: ...tle holder 45 Post cover 90 91 Handlebar cover front rear 96 97 Disk bearing cover 72 Lower handlebar cover 99 100 Console 105 75 2pc Shaft Φ17 111mm 11 8pcs Screw M4 16mm 76 4pcs Washers M8 115 2pcs Washer M10 31 2pcs Locknut M10 77 4pcs Screw M8 20mm 101 2pcs Screw M8 40mm 18 2pcs Nut M8 82 4pcs Oil bushing Wrenches with screw driver 113 2pcs Lug washer M18 2pcs Washer M8 5 ...

Page 6: ...ING ARM ASSEMBLY 2A using 2 SCREW 11 2 Repeat the above steps on the other side 72 11 2A 3A STEP 2 1 Slide the GUIDE RAIL under the WHEELS as shown in Figure 1 A 2 Attach it to the MIDDLE STABILIZER as shown in Figure 1 B using 2 SCREWS 54 and do not tighten the screws for now 6 ...

Page 7: ...DE RAILS to the REAR STABILIZER E with 2 SCREWS 54 and do not tighten them for now 2 Adjust the GUIDE RAILS until the ALUMINUM RAILS on the GUIDE RAILS are facing up 3 Tighten all 4 SCREWS 54 when the adjustment is complete 7 ...

Page 8: ...ARM F to the PEDAL ARM BRACKET B using 1 SHAFT 75 1 LUG WASHER 2 PRE INSTALLED WASHERS 76 and 2 PRE INSTALLED SCREWS 77 2 Repeat the above step on the other side 113 Place the LUG WASHER onto the LOWER LINK ARM as the picture shown 8 ...

Page 9: ...STEP 5 1 Connect the UPPER CONSOLE CABLES 86 39 2 Slide the HANDLEBAR POST H onto the MAIN FRAME A using 2 PRE INSTALLED SCREWS 92 2 PRE INSTALLED SCREWS 109 and 4 PRE INSTALLED WASHERS 114 92 109 114 9 ...

Page 10: ...Attach the LOWER HANDLEBAR J to the UPPER HANDLEBAR I using 5 PRE INSTALLED SCREWS 102 3 Attach the LOWER HANDLEBAR J to the LOWER LINK ARM 83 using 1 BOLT 101 1 WASHER 120 2 OIL BUSING 82 and 1 NUT 18 4 Repeat the above steps on the other side 115 31 82 120 Make sure this screw is tightened 83 10 ...

Page 11: ...the joints of the UPPER HANDLEBARS K I as the picture shown 2 Attach the FRONT HANDLEBAR POST COVERS 90 91 to the HANDLEBAR POST H using 4 SCREWS 11 3 Attach the LOWER FRONT and LOWER REAR HANDLEBAR COVERS 99 100 to the joints of the LOWER HANDLEBARS K I as the picture shown 11 ...

Page 12: ... Insert the PULSE WIRE upward through the HANDLEBAR POST H 2 Attach the PULSE GRIP SET M to the HANDLEBAR POST H using 4 PRE INSTALLED SCREWS 77 77 Make sure the wires go through and comes out from this end 12 ...

Page 13: ...the CONSOLE 105 Figuire A and loosen the bottom 2 PRE INSTALLED SCREWS 2 Connect CONSOLE CABLES 86 88 to the CONSOLE 105 3 Carefully tuck the CONSOLE CABLES into the HANDLEBAR POST H and Attach the CONSOLE 105 Figure B with 4 PRE INSTALLED SCREWS H 105 13 ...

Page 14: ...STEP 10 Attach the WATER BOTTLE HOLDER 45 to the MAIN FRAME A as the picture shown 45 A 14 ...

Page 15: ...te the leveling foot clockwise or counter clock wise so the leveling foot touches the floor 1 Hold the handle and lift the trainer up so the transport wheels touch the floor 2 Move the trainer to your designated position while lifting the trainer 3 Carefully let down the trainer 15 ...

Page 16: ... DOWN To select training mode and adjust function value down RECOVERY To test hear rate recovery status BODY FAT For body fat measurement INSTRUCTION MANUAL OF SM2744 67 BUTTON FUNCTION TIME Display range 0 00 99 99 Setting range 0 00 99 00 minutes DISTANCE Display range 0 00 99 99 Setting range 0 00 99 90km CALORIES Display range 0 9999 Setting range 0 9990 Cl PULSE Display range P 30 230 Setting...

Page 17: ...le turns on and display all segments on LCD for 2 seconds Fig 01 WORKOUT SELECTION Press UP or DOWN key to select programs Manual Fig 02 Beginner Fig 03 Advance Fig 04 Sporty Fig 05 Cardio Fig 06 Watt Fig 07 Fig 01 Fig 02 Fig 03 Fig 04 Fig 05 Fig 06 Fig 07 17 ...

Page 18: ...DOWN key to adjust the load level 4 Press START STOP keys to pause the workout Press RESET to reverse to the main menu Fig 08 Fig 09 Fig 10 Fig 11 Fig 12 USING THE BEGINNER PROGRAM 1 Use UP or DOWN key to select the program choose Beginner mode and press MODE ENTER to enter 2 Use UP or DOWN key to select Beginner program 1 4 Fig 13 and press MODE ENTER to comfirm 3 Use UP or DOWN key to set TIME 4...

Page 19: ...nd press MODE ENTER to enter 2 Use UP or DOWN key to select Sporty program 1 4 Fig 15 and press MODE ENTER to confirm 3 Use UP or DOWN key to set TIME 4 Press START STOP key to start workout Use UP or DOWN key to adjust the load level 5 Press START STOP key to pause the workout Use RESET to reverse to the main menu Fig 15 USING THE CARDIO H R C PROGRAM 1 Use UP or DOWN key to select the program ch...

Page 20: ...ET to reverse to the main menu Fig 18 USING THE RECOVERY PROGRAM 1 After exercising for a period of time keep holding on the hand grip or wear a chest strap and press the RECOVERY key 2 All function display will stop except the TIME starts counting down from 00 60 to 00 00 Fig 19 3 After the count down the screen displays your heart rate recovery status F1 F2 to F6 F1 is the highest rating F6 is t...

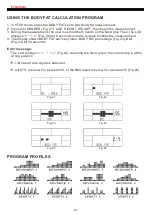
Page 21: ...e LCD displays Fig 22 for 8 seconds until the console finishes the measurement 4 The display shows BODY FAT advice symbol BODY FAT percentage Fig 23 BMI Fig 24 for 30 seconds Error message The LCD displays Fig 25 meaning the hand grip or the chest strap is at the wrong position E 1 No heart rate signal is detected E 4 FAT is below 5 or exceeds 50 or the BMI result is below 5 or exceeds 50 Fig 26 F...

Page 22: ...22 ...

Page 23: ...EXPLODED VIEW 23 ...

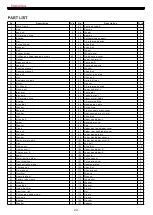
Page 24: ...e 2 28 W asher 8 89 P ulse Grip 1 29 hex bolt 1 90 Front console m ast cover 1 30 W asher 3 91 Rear console m ast cover 1 31 Nut 8 92 A llen B olt 2 32 A llen B olt 1 93 Upper handlebar L 1 33 screw 1 94 Handlebar cover 2 34 W asher 1 95 Cap 2 35 Crank 2 96 Upper front handlebar cover 2 36 hex bolt 2 97 Upper rear handlebar cover 2 37 Flat key 2 98 Lower handle bar L 1 38 W asher 10 99 Lower handl...

Page 25: ...25 ...

Page 26: ...ion If you require more information about safe and correct disposal methods please contact your local city office or the establishment where you purchased this product CLEANING MAINTENANCE Inspect and tighten all parts of the exercise trainer regularly Replace any worn parts immediately To clean the exercise trainer use damp cloth and a small amount of mild soap IMPORTANT To avoid damage to the co...

Reviews: