–7–
ENGLISH
ESP
AÑOL
FRANÇAIS
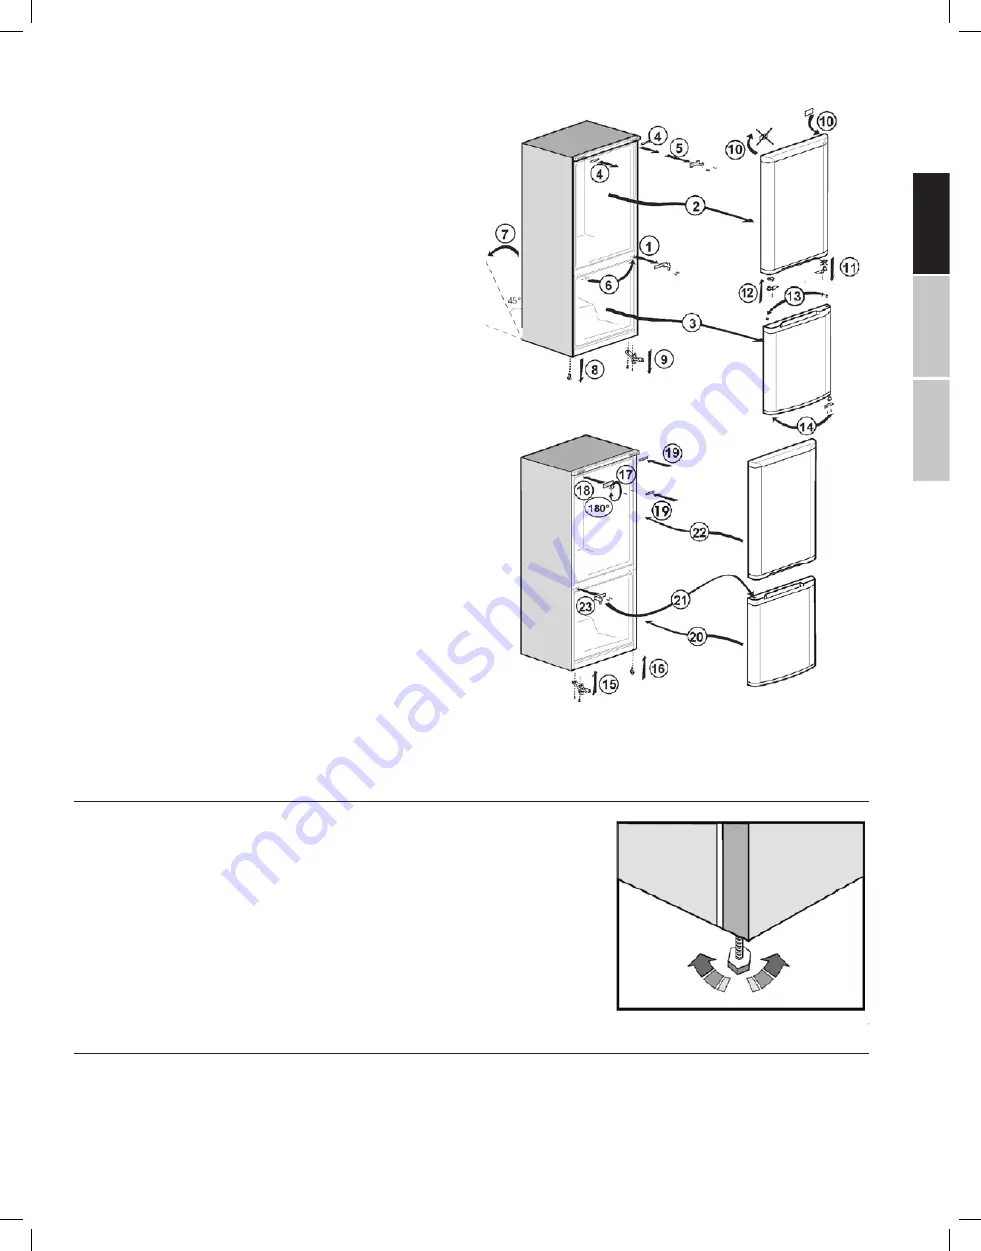
REVERSE THE DOORS
1. Remove the hole plugs from the center divider and place
the plugs in the holes remaining after removing the center
hinge (6).
2. Remove the plastic cover. Install the stopper (provided in
the parts bag), to the opposite side (10).
3. Unscrew and remove the middle hinge bushing from the
bottom of the refrigerator door (11).
4. Install the middle hinge bushing (provided in the parts
bag) to the opposite side. (12)
5. Remove the hinge bushing and the stopper from the
freezer door and reinstall each to the opposite side of the
door. (13)
6. Remove the bottom hinge bushing from the freezer door
and reinstall it on the opposite side. (14)
REPLACE THE DOORS
1. Reassemble and install the bottom hinge on the opposite
side. (15)
2. Using two or more people, reinsert the leveling foot to the
opposite side with the bottom door hinge. (16)
3. Rotate the top hinge 180°. Unscrew the hinge pin and rein-
stall it to the opposite side. (17)
4. Reinstall the top hinge and tighten the bolts. (18)
5. Reinstall the plastic cover on the front, top trim. (19)
6. Place the freezer door onto the bottom hinge and close the
door. (20)
7. Place the center hinge on top of the freezer door. (21)
8. Insert the refrigerator door between the top and center
hinges. (22)
9. Fasten the center hinge to the cabinet, and then align and
adjust the doors.
10. Completely tighten all bolts. (23)
11. Using two or more people, stand the refrigerator complete-
ly upright, and adjust the front feet to level. See “Leveling
and Door Adjustment.”
12. Return all removable parts to the cabinet and door.
REVERSE DOOR SWING
LEVELING AND DOOR ADJUSTMENT (IF NEEDED)
The refrigerator must be level to maintain optimal performance and appearance, and to
avoid excess vibration and noise.
LEVELING
Move the refrigerator to its final location on a flat, even floor. Turn the feet on the bot-
tom, front of the cabinet to raise or lower that side of the refrigerator until the refrigera-
tor is level side-to-side.
NOTE
: Having someone push against the top of the refrigerator takes some weight off
the leveling screws. This makes it easier to turn the screws.
Turn both front legs, by the same amount, to slightly raise the front of the refrigerator.
This will make it easier for the doors to close.
COMPLETE THE INSTALLATION
1. Wait a minimum of 4 hours to allow the cooling system to settle before turning on cooling.
2. Plug into a grounded 3 prong outlet.
3. Wait until the refrigerator has cooled to the recommended temperatures, before adding food.


