background image

7

ADJUST YOUR DESK HEIGHT

Press and hold the up 

 or down 

 button to 

adjust your desk to your preferred height. 

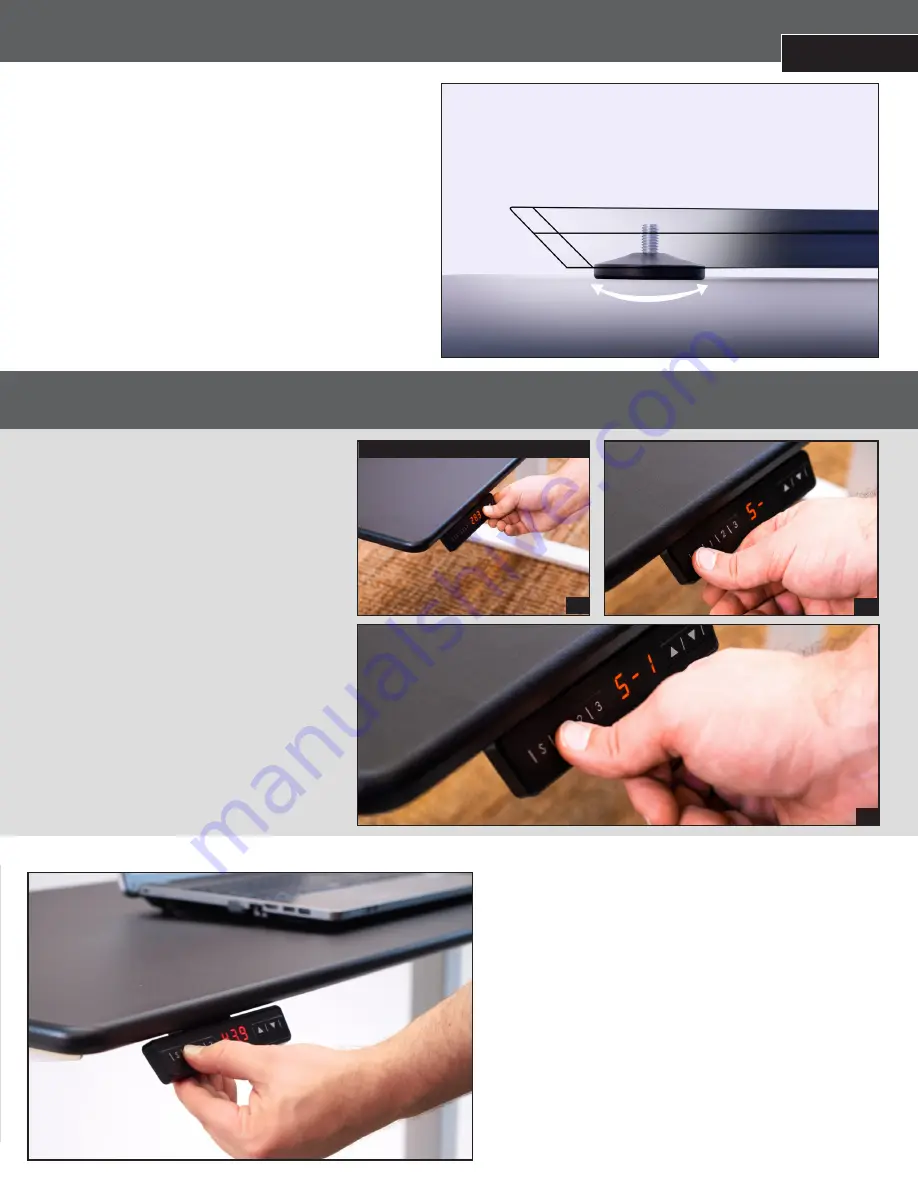
SET YOUR FAVORITE HEIGHTS

Your ZipDesk can store up to three of your favorite 

height positions. Make transitioning between 

sitting and standing a breeze! 

1. Raise or lower your desk to the height you 

want to save.

2. Press the ‘S’ button once. 

3. Press the button of the number of the height 

favorite you want to save (1, 2, or 3).

4. Your height favorite is saved.

To change a height favorite, repeat steps 1–3 

using the number of the height favorite you wish 

to change.

RAISE OR LOWER YOUR DESK TO YOUR  
HEIGHT FAVORITES

1. Press and hold the button of your preferred height 

favorite (1, 2, or 3). 

2. When the desk stops, your height favorite is reached. 

SET YOUR HEIGHT FAVORITES

1

2

3

ON UNEVEN FLOORS, LEVEL YOUR ZIPDESK

The proper operation of your ZipDesk requires that the desktop 
be perfectly level. By adjusting the leveling pads on the bottom 
of your desk’s feet, you can compensate for any minor slopes or 
irregularities in the floor’s surface.

1. Twist the leveling pads counterclockwise to raise the desk 

height, or clockwise to lower.

2. Adjust each leveling pad until the tabletop is level and 

doesn’t wobble.

3. (Optional) You can use a level on the desktop surface to 

improve the precision of your adjustments.

Leveling your desk improves its stability and safeguards the 
desk’s components from premature wear.

STEP 11

Leveling Pad

PROGRAMMING YOUR CONTROLLER

Summary of Contents for ZipDesk

Page 1: ...USER GUIDE ASSEMBLY INSTRUCTIONS...

Page 2: ...gned for quick assembly so you can get standing in a matter of minutes STEP 1 CLAMP x4 HAND CONTROLLER POWER SUPPLY CABLE LEG MOTOR CONNECTOR CABLE FOOT x2 LEVELING PAD x4 ALLEN KEY LEG x2 MACHINE SCR...

Page 3: ...Slide the clamps through the slots in the frame 2 Turn the clamps counter clockwise to lock the legs in place Note Clamps must enter through the slots and exit through the round holes on the other si...

Page 4: ...ATTACH STOPPERS TO SECURE THE CLAMPS STEP 4 STEP 5 REPEAT STEPS 2 4 FOR THE OTHER SIDE 1 Screw stopper into frame to secure clamp Repeat for other side 2 Optional Tighten using a flat head screwdrive...

Page 5: ...n key Repeat for the other side STEP 7 5 PLUG IN THE LEG MOTOR CABLES 1 Plug the first leg motor cable into the power control box PLUG IN THE POWER SUPPLY CABLE Plug the power supply cable into the po...

Page 6: ...when initialization is complete Your desk is assembled 1 2 3 STEP 8 TIDY UP YOUR CORDS 1 Place the adhesive cable management clips on the underside of your desk 2 Pass your cords through the clips to...

Page 7: ...d hold the button of your preferred height favorite 1 2 or 3 2 When the desk stops your height favorite is reached SET YOUR HEIGHT FAVORITES 1 2 3 ON UNEVEN FLOORS LEVEL YOUR ZIPDESK The proper operat...

Page 8: ...CONTROLLER OPTIONS FINE TUNE THE DISPLAY HEIGHT Your ZipDesk height reading is already calibrated to default factory configuration of a 0 75 thick desktop and fully closed leveling pads on the feet If...

Page 9: ...lation especially to the brain NEAT activity also helps you to work more efficiently throughout the day The Mayo Clinic s NEAT certification process involves rigorous lab testing to prove that the cer...

Page 10: ...eck to see if legs are perpendicular at 90 degrees to the desktop and the floor If the legs are splayed inward or outward the motor will not operate optimally Check that the weight load on the tableto...

Page 11: ...ay arrange for retrieval of the defective product via its carrier of choice In some cases the manufacturer may elect not to retrieve the defective component and may opt to send a replacement product b...

Page 12: ...tanding mats html MONITOR ARMS Eliminate neck strain enhance comfort while screen viewing Highly adjustable with smooth movement sleek looks and high grade componentry ZipView monitor arms are more th...

Reviews: